
Installation Guide


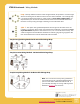


STEP I. Design your Layout
With careful planning, you can eliminate any problems that might arise
during the installation process. The first step in designing your system is
to look at your yard at night and decide where you want more light. Mak-
ing a detailed sketch of the yard can help. When deciding what to illumi-
nate, consider your existing outdoor lighting (as these areas might not
need additional light), then start with lighting your walkways and other
functional and transitional areas. Beyond that, the sky is literally the limit!
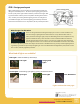
Other Design Considerations
There are many professional looking techniques you can use to create a dramatic and
attractive design. Lighting the front of the house has a very dramatic effect and can
make your house inviting at night, except to unwanted guests. Trees and plants are very
popular to illuminate. They can be back-lit to create a silhouetted effect or front lit to
light the plant itself. If you have a tall tree, you can place a light at the base and shine it
up through the branches. You can also hide a tree mount fixture and have it shine down
on a lawn or garden. If you have other objects of interest like a birdbath or bench, you may consider lighting them. It
is generally a good idea to spread out your lighting to create even illumination throughout the yard, but the secret is
to be creative, and truly light what you want.
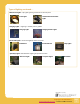
What kind of lights are available?
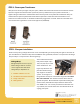
Path Lights—Used for Walkways & Driveways
Pole Lights
Hanging Path
Lights
Accent Lights—Silhouetting, spot lighting, grazing of textured surfaces
Spot Lights Flood Lights Tree / Wall Mount
Lights continued on next page...
Questions or comments?
www.lightingdirect.com - Toll Free: 800 375-3410
Page
2
Broughttoyouby: