
Installation Guide


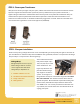


STEP II. Choose your Transformer
After you have chosen your lights and your layout, add the total watts of all fixtures. The transformer must be
equal to or higher than the total watts. If you think you may add fixtures to your system in the future, a
higher wattage transformer is recommended. There are many kinds and qualities of transformers. Many are
available with an optional photocell for dusk-till-dawn operation and/or timer. Most transformers are in-
stalled on an outside wall and can be either hardwired or plugged into an outlet. There are also models that
can be buried in the ground for an out of site application (K15IG300).
STEP 3. Plan your installation
There are many wiring configurations that can be used depending on the layout of your lights and location of
your transformer. To understand why there are different wiring methods, first here is an explanation of voltage
drop and why it is a major factor in the wiring design.
Voltage Drop
Voltage drop will occur on any run
of low voltage cable run and will
cause a light to dim. How much
voltage drop is dependant on:
1. Number of fixtures on a run
2. The distance from the transformer
3. Gauge of the cable
4. Wiring method
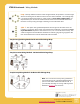
Your transformer will most
likely have multiple “taps”:
12V, 13V, 14V, 15V, or some
other combination. The
higher tap allows for com-
pensation where voltage
drop might occur within a
system. To the right is an
image of what the taps on a transformer might look like. Note
the “com” terminal. The common is for the return wires to
ground the system. On transformers capable of handling 600
watts or more, there will be multiple common terminals for
each 300W circuit. You cannot put more than 300 watts onto
any common; this must be taken into consideration when de-
signing your layout.
Questions or comments?
www.lightingdirect.com - Toll Free: 800 375-3410
Page
4
Broughttoyouby: