
Installation Guide
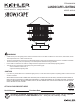


PACKAGE CONTENTS
2
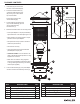
A
Fixture top
Bulb Cover
Rubber Washer
Bulb
Socket Assembly
Post Adapter
B
C
D
E
F
1
1
1
1
1
1
PART DESCRIPTION QTY.
Wood Screws
Socket Assembly Screws
Quick Connect
Fixture Top Thumbscrews
Shade
I
J
K
G
H
4
4
1
1
3
PART DESCRIPTION QTY.
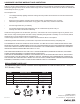
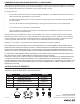
•
Place post adapter on top of post allowing
equal distances on all sides.
(See figure 1A).
•
Mark position of mounting holes on top of
post and remove post adapter
.
•
Drill pilot holes in top of post in locations
marked in previous step.
•
Drill hole for wire way.
•
Using provided wood screws assemble
post adapter to top of post.
• TURN OFF POWER. Connect fixture’s 12V
cable to transformer landscape wire run using
supplied wire connector.
•
Make wire connections using supplied
Quick connect following instructions below,
or using other approved wiring connection
method (not supplied.)
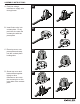
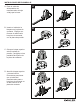
1.
Insert bulb (D) into the socket
found on socket assembly (E).
3.
Lower shade (K) and fixture top
(A) to socket assembly (E) and
secure with fixture top
thumbscrews (J).
4. Determine desired location for mounting fixture.
5. Lower socket assembly (E) over post adapter
and secure with socket assembly screws (H).
2.
Screw the rubber washer (C)
onto the threads of bulb cover
(B) moving it up until its at the
top of the threads.
Screw bulb cover (B) onto
socket assembly (E).
F
G
H
A
C
K
E
J
B
D
Required hole
for wire way
Post
(Not Included)
F
I
G
1A