
Installation Guide


4
ASSEMBLY INSTRUCTIONS
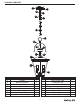
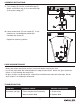
1. Screw short threaded nipple (G) onto coupling
(F).
2. Lower decorative top (J), threaded nipple cover
(M), and decorative arm (N) over the short
threaded nipple (G) and secure with fixture loop
(L).
1
F
G
2
M
L
J
G
N
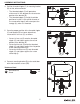
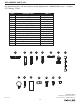
3. Pass thumbscrews (CC) through decorative arm
(N) and fixture top (P) and secure using threaded
knobs (DD).
3
CC
P
N
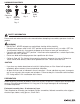
Hardware Used
Thumbscrew x 2CC
Threaded Knob x 2
DD
DD