
Installation Manual


ACTIVATING THE LEARNING PROCESS
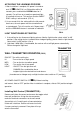
1. After installation is complete, AC power is turned on
and SWITCH is at ON position within 30
seconds, press and hold the LEARN button for 3
seconds. Fan will turn on at medium speed and light
(if installed) will turn on. This confirms that the SMART
SYNC setting is active and ok. (FIG. 4)
2. If user cannot finish the setting within the 30 seconds
time frame, the main power must be turned off and
re-started again. This will reset the unit. Repeat step 1
until the LEARNING feature is activated as indicated.
LIGHT FUNCTION SELECT SWITCH
1. If the ceiling fan has fluorescent lighting, please slide the “light function select switch” to “O”
position. If the ceiling fan has incandescent or halogen lighting, please slide the “light function
select switch” to “D” position.
(FIG. 4)
2. Light load: 190W (Max.) If overloaded, the receiver will cut off light power automatically.
Please change the light load.
WALL TRANSMITTER OPERATION (FIG.5)
FAN OFF :Turn off the ceiling fan.
HI : Turn on the fan at high speed.
MED : Turn on the fan at medium speed.
LOW : Turn on the fan at low speed.
LIGHT : ON/OFF-Turn the light on or off.
DIMMER-Press and hold to dim or
brighten light to the desired level and release.
(Incandescent or halogen only and light function select switch on “D” position.)
FIG.5
AC POWER ON/OFF SWITCH( ): Before installing
wall control, slide to “OFF” position. After installation is complete, slide to “ON” position to begin
operation.
Installing Wall Control (TRANSMITTER):
Remove wall plate, disconnect and remove the toggle switch
from wall junction box. Using the wire connectors,
make the electrical connections to the wall control
(transmitter) unit. Carefully push all connected wires
inside wall switch box. Secure wall control unit with
2 screws previously removed. Face plate will snap
onto the transmitter.
TRANSMITTER
FIG. 4