ITEM #0616037 Kichler® is a registered trademark of The L.D. Kichler Co. All Rights Reserved. 3-LIGHT VANITY MODEL #37374 Français p. 9 Español p. 17 ATTACH YOUR RECEIPT HERE Serial Number Purchase Date Questions, problems, missing parts? Before returning to your retailer, call our customer service department at 1-800-554-6504, 8 a.m. - 4:30 p.m, EST, Monday - Friday.
PACKAGE CONTENTS D E A C B PART A B C D E DESCRIPTION Canopy Mounting Bracket Socket Shade Glass Holder 2 QUANTITY 1 1 3 3 3
HARDWARE CONTENTS AA BB CC Wire Threaded Connector Short Knob Qty: 3 Machine Qty: 2 Screw Qty: 2 DD EE Anchor Qty: 2 Anchor Screw Qty: 2 SAFETY INFORMATION Please read and understand this entire manual before attempting to assemble, operate or install the product. • • • • • WARNING IMPORTANT: NEVER attempt any work without shutting off the electricity. Go to the main fuse box, or circuit breaker, in your home.
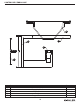
ASSEMBLY INSTRUCTIONS 1. Temporarily raise canopy (B) to wall. Mark location for anchor (DD). Use 9/32 size drill to drill holes for anchor (DD). Insert anchor (DD) into hole. 1 Wall B Hardware Used DD Anchor x2 DD 2. Orient the mounting bracket (B) so the canopy mounting screws face away from the outlet box (not included). Connect the mounting bracket (B) to the outlet box with short machine screws (BB). 2 Outlet Box (Not Included) B Hardware Used BB Short Machine Screw x2 BB 3.
ASSEMBLY INSTRUCTIONS 4. Wire connection guide: Ground wire: • For installation in the United States: Wrap ground wire from outlet box around ground screw on mounting bracket (B) no less than 2 in. from wire end. Tighten ground screw. If fixture is supplied with a ground wire, connect to outlet ground wire with a wire connector (AA). • For installation in Canada: If fixture is supplied with ground wire, wrap ground wire around ground screw on mounting bracket (B). Tighten ground screw.
ASSEMBLY INSTRUCTIONS 6. Pass shade (D) through glass holder (E) and over the socket (C). 6 D Note: Glass will rest on top of glass holder. E C 7. Insert 60-watt max candelabra-base bulb type G16.5 (not included) into socket (C). 7 C CARE AND MAINTENANCE • Always be certain that electric current is turned off before cleaning this item. • Use a soft, moist cloth with mild non-abrasive soap to clean fixture. Never use glass cleaner on fixture, as it will damage the metal finish.
WARRANTY Kichler Lighting warrants that its products will be free from defects in material and workmanship for one (1) year from the date of purchase by the Original Purchaser. To replace a product that has a warranted defect, the Original Purchaser shall return any allegedly defective parts or products to the authorized Kichler distributor that the product was purchased from with PROOF OF PURCHASE, Original Purchaser’s name and return address and a description of the claimed product defect.
REPLACEMENT PARTS LIST For replacement parts, call our customer service department at 1-800-554-6504, 8 a.m. - 4:30 p.m., EST, Monday - Friday. PART D AA BB CC DD EE D DESCRIPTION Shade Wire Connector Short Machine Screw Threaded Knob Anchor Anchor Screw PART # S37374 WC001 SCR832X050 TK1X832-NI AS001 AB001 BB AA CC DD EE Printed in China Kichler® is a registered trademark of The L.D. Kichler Co. All Rights Reserved Rev.
ARTICLE #0616037 Kichler® est une marque déposée de The L.D. Kichler Co. Tous droits réservés. LUMINAIRE À 3 LUMIÈRES POUR MEUBLE-LAVABO MODÈLE #37374 JOIGNEZ VOTRE REÇU ICI Numéro de série Date d’achat Des questions, des problèmes, des pièces manquantes? Avant de retourner le produit à votre détaillant, appelez notre service à la clientèle au 1-800-554-6504, entre 8 h et 16 h 30 (HNE) du lundi au vendredi.
CONTENU DE L’EMBALLAGE D E A C B PIÈCE A B C D E DESCRIPTION Pavillon Support de fixation Douille Abat-jour Support de verre 10 QUANTITÉ 1 1 3 3 3
QUINCAILLERIE INCLUSE AA BB Capuchon de connexion Vis à Qté : 3 métaux courte Qté : 2 CC DD Bouton fileté Qté : 2 Ancrage Qté : 2 EE Vis de l'ancrage Qté : 2 CONSIGNES DE SÉCURITÉ Veuillez vous assurer de lire et de comprendre l’intégralité du présent guide avant d’assembler, d’utiliser ou d’installer ce produit. AVERTISSEMENT IMPORTANT : Coupez l’électricité avant TOUTE manipulation.
INSTRUCTIONS POUR L'ASSEMBLAGE 1. Placez temporairement le pavillon (B) contre le mur. Marquez les emplacements des ancrages (DD). Utilisez une perceuse équipée d'un foret de 9/32 po afin de percer les trous pour les ancrages (DD). Insérez les ancrages (DD) dans les trous. 1 Mur B Quincaillerie utilisée DD Ancrage x2 DD 2. Orientez le support de fixation (B) de sorte que les vis de montage du pavillon soient dirigées à l'opposé de la boîte de sortie.
INSTRUCTIONS POUR L'ASSEMBLAGE 4. Guide de raccordement électrique 4 Fil de mise à la terre : • Pour une installation aux États-Unis : enroulez le fil de mise à la terre provenant de la boîte de sortie autour de la vis de mise à la terre située sur le support de fixation (E), à au moins 5,08 cm de l’extrémité du fil. Serrez la vis de mise à la terre.
INSTRUCTIONS POUR L'ASSEMBLAGE 6. Insérez l'abat-jour (D) à travers le support de verre (E) jusque dans la douille (C). 6 D Remarque : Le verre reposera au-dessus du support de verre. E C 7. Insérez une ampoule à culot candélabre de type G16.5 de 60 watts max. (non fournie) dans la douille (C). 7 C ENTRETIEN • Vérifiez toujours que le courant est coupé avant de nettoyer le luminaire. • Utilisez un linge doux et humide ainsi qu’un savon non abrasif.
GARANTIE Kichler Lighting garantit que ses produits seront libres de tout vice de fabrication ou défaut matériel pendant un (1) an à compter de la date d'achat par l'acheteur initial.
LISTE DES PIÈCES DE RECHANGE Pour obtenir des pièces de rechange, appelez notre service à la clientèle au 1-800-554-6504, entre 8 h et 16 h 30 (HNE), du lundi au vendredi. PIÈCE D AA BB CC DD EE D DESCRIPTION Abat-jour Capuchon de connexion Vis à métaux courte Bouton fileté Ancrage Vis de l'ancrage No DE PIÈCE S37374 WC001 SCR832X050 TK1X832-NI AS001 AB001 BB AA CC DD EE Imprimé en Chine Kichler® est une marque déposée de The L.D. Kichler Co. Tous droits réservés. Rev.
ARTÍCULO #0616037 Kichler® es una marca registrada de The L.D. Kichler Co. Todos los derechos reservados. TOCADOR DE 3 LUCES MODELO #37374 ADJUNTE SU RECIBO AQUÍ Número de serie Fecha de compra ¿Preguntas, problemas, piezas faltantes? Antes de devolverlo a la tienda, llame a nuestro departamento de servicio al cliente al 1-800-554-6504, de 8:00 a.m. a 4:30 p.m. hora del Este (EST), de lunes a viernes.
CONTENIDO DEL PAQUETE D E A C B PIEZA A B C D E DESCRIPCIÓN Cubierta Soporte de montaje Portalámparas Pantalla Soporte del vidrio 18 CANTIDAD 1 1 3 3 3
ADITAMENTOS AA BB CC Perillas roscadas Conectores de cables Tornillos Cant.: 2 Cant.: 3 para metales cortos Cant.: 2 DD EE Anclaje Cant.: 2 Tornillo de anclaje Cant.: 2 INFORMACIÓN DE SEGURIDAD Lea y comprenda completamente este manual antes de intentar ensamblar, usar o instalar el producto. • • • • • ADVERTENCIA IMPORTANTE: NUNCA intente hacer trabajos sin desconectar el suministro eléctrico. Diríjase a la caja de fusibles o a la caja del interruptor de circuito principal en su hogar.
INSTRUCCIONES DE ENSAMBLAJE 1. Levante la cubierta (B) temporalmente a la pared. Marque la ubicación de los anclajes (DD). Use una broca de 9/32" para perforar agujeros para los anclajes (DD). Inserte los anclajes (DD) en los agujeros. 1 Muro B Aditamentos utilizados DD Anclaje x2 DD 2. Oriente el soporte de montaje (B) de manera que los tornillos para el montaje de la cubierta estén en dirección opuesta a la caja eléctrica.
INSTRUCCIONES DE ENSAMBLAJE 4. Guía de conexión de cables: 4 Cable a tierra: • Para la instalación en los Estados Unidos: Enrolle el cable a tierra de la caja eléctrica alrededor del tornillo a tierra en la abrazadera de montaje (B), a no menos de 5 cm (2") del extremo del cable. Apriete el tornillo a tierra. Si la lámpara viene con un cable a tierra, conéctelo al cable a tierra de la caja eléctrica con un conector de cables (AA).
INSTRUCCIONES DE ENSAMBLAJE 6. Pase la pantalla (D) por el soporte del vidrio (E) y sobre el portalámparas (C). 6 D Nota: El vidrio se apoyará sobre el soporte del vidrio. E C 7. Inserte un foco de base de candelabro tipo G16.5 de máximo 60 W (no se incluye) en el portalámparas (C). 7 C CUIDADO Y MANTENIMIENTO • Siempre asegúrese de que la corriente eléctrica esté desconectada antes de limpiar. • Utilice un paño húmedo suave y jabón suave no abrasivo para limpiar la lámpara.
GARANTÍA Kichler Lighting garantiza que sus productos estarán libres de defectos de materiales o mano de obra por un (1) año a partir de la fecha de compra por el Comprador Original.
LISTA DE PIEZAS DE REPUESTO Para repuestos, llame a nuestro departamento de servicio al cliente al 1-800-554-6504, de 8:00 a.m. a 4:30 p.m. hora del Este (EST), de lunes a viernes. PIEZA D AA BB CC DD EE D DESCRIPCIÓN Pantalla Conectores de cables Tornillos para metales cortos Perillas roscadas Anclaje Tornillo de anclaje BB AA PIEZA # S37374 WC001 SCR832X050 TK1X832-NI AS001 AB001 CC DD EE Impreso en China Kichler® es una marca registrada de The L.D. Kichler Co. Todos los derechos reservados.