ITEM #0615970 SEMI-FLUSHMOUNT Kichler® is a registered trademark of The L.D. Kichler Co. All Rights Reserved. MODEL #38185 Français p. 10 Español p. 19 ATTACH YOUR RECEIPT HERE Serial Number Purchase Date Questions, problems, missing parts? Before returning to your retailer, call our customer service department at 1-800-554-6504, 8 a.m. - 4:30 p.m, EST, Monday - Friday.
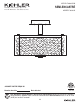
PACKAGE CONTENTS B A M G N L E H F C D I K J PART A B C D E F G DESCRIPTION Canopy Mounting Bracket Threaded Pipe Glass Panel Socket Lower Coupling Upper Coupling QTY 1 1 1 4 2 1 1 PART H I J K L M 2 DESCRIPTION Shade Bracket Diffuser Diffuser Support Finial Mounting Screw Mounting Knob QTY 4 1 1 1 4 4
HARDWARE CONTENTS AA Wire Connector Qty: 3 BB Short Machine Screw Qty: 2 CC DD EE Metal Washer Qty: 16 Threaded Knob FF GG Nylon Shade Washer Knob Qty: 32 Qty: 16 Qty: 2 Long Machine Screw Qty: 2 SAFETY INFORMATION Please read and understand this entire manual before attempting to assemble, operate or install the product. • • • • • WARNING IMPORTANT: NEVER attempt any work without shutting off the electricity.
ASSEMBLY INSTRUCTIONS 1. Orient the mounting bracket (B) so the raised center portion protrudes into the outlet box (not included). Insert long machine screws (DD) through mounting bracket (B) so the long machine screws (DD) protrude outward. Connect the mounting bracket (B) to the outlet box with short machine screws (BB). 1 Outlet Box Hardware Used Short Machine Screw x2 DD Long Maching Screw x2 BB 2. Screw canopy (A) onto the upper coupling (G). BB B DD 2 A G 3.
ASSEMBLY INSTRUCTIONS 4. Shade brackets (H) have a threaded post for securing the glass panels (D). Pass shade panel (D), metal washer (EE), and nylon washer (GG) over the threaded post on the shade bracket (H) and secure with shade knob (FF). 4 H D EE Repeat for remaining glass panels. Hardware Used EE Metal Washer FF Shade Knob FF x 16 GG GG D x 16 Nylon x 32 Washer 5.
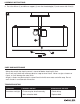
ASSEMBLY INSTRUCTIONS 6. Pass canopy (A) over long machine screws (DD) protruding from mounting bracket (B) and secure using threaded knobs (CC). 6 B Hardware Used Threaded CC Knob DD x2 A CC 7. Screw threaded pipe (C) onto the lower coupling (F). 7 F C 8. Insert 60-watt max. medium-base bulb (not included) into socket (E).
ASSEMBLY INSTRUCTIONS 9. Pass the diffuser (I) and diffuser support (J) over the threaded pipe (C) and secure with finial (K). 9 C J I K CARE AND MAINTENANCE • Always be certain that electric current is turned off before cleaning this item. • Use a soft, moist cloth with mild non-abrasive soap to clean fixture. Never use glass cleaner on fixture, as it will damage the metal finish. • All glass shades may be washed in a towel-lined sink with warm water and mild soap.
WARRANTY Kichler Lighting warrants that its products will be free from defects in material and workmanship for one (1) year from the date of purchase by the Original Purchaser. To replace a product that has a warranted defect, the Original Purchaser shall return any allegedly defective parts or products to the authorized Kichler distributor that the product was purchased from with PROOF OF PURCHASE, Original Purchaser’s name and return address and a description of the claimed product defect.
REPLACEMENT PARTS LIST For replacement parts, call our customer service department at 1-800-554-6504, 8 a.m. - 4:30 p.m., EST, Monday - Friday.
ARTICLE #0615970 SEMI-ENCASTRÉ Kichler® est une marque déposée de The L.D. Kichler Co. Tous droits réservés. MODÈLE #38185 JOIGNEZ VOTRE REÇU ICI Numéro de série Date d’achat Des questions, des problèmes, des pièces manquantes? Avant de retourner le produit à votre détaillant, appelez notre service à la clientèle au 1-800-554-6504, entre 8 h et 16 h 30 (HNE) du lundi au vendredi.
CONTENU DE L’EMBALLAGE B A M G N L E H F C D I K J PIÈCE A B C D E F G DESCRIPTION Pavillon Support de fixation Tube fileté Panneau en verre Douille Raccord inférieur Raccord supérieur QTÈ 1 1 1 4 2 1 1 PIÈCE H I J K L M 11 DESCRIPTION Support d'abat-jour Diffuseur Support du diffuseur Fleuron Vis de montage Bouton de montage QTÈ 4 1 1 1 4 4
QUINCAILLERIE INCLUSE AA Capuchon de connexion Qté : 3 BB Vis à métaux courte Qté : 2 CC DD EE FF GG Rondelle Rondelle Bouton métallique d'abat-jour nylon Qté : 16 Qté : 16 Qté: 32 Bouton fileté Qté : 2 Vis à métaux longue Qté : 2 CONSIGNES DE SÉCURITÉ Veuillez vous assurer de lire et de comprendre l’intégralité du présent guide avant d’assembler, d’utiliser ou d’installer ce produit. AVERTISSEMENT • IMPORTANT : Coupez l’électricité avant TOUTE manipulation.
INSTRUCTIONS POUR L'ASSEMBLAGE 1. Orientez le support de fixation (B) de sorte que la partie centrale surélevée fasse saillie dans la boîte de sortie (non fournie). Insérez les vis à métaux longues (DD) à travers le support de fixation (B) de sorte que les vis à métaux longues (DD) dépassent à l'extérieur. Fixez le support de fixation (B) à la boîte de sortie à l'aide des vis à métaux courtes (BB). 1 Boîte de sortie Quincaillerie utilisée BB BB Vis à métaux courte x2 Vis à métaux longue x2 DD 2.
INSTRUCTIONS POUR L'ASSEMBLAGE 4. Les supports d'abat-jour (H) sont dotés d'une tige filetée destinée à fixer les panneaux en verre (D). Faites passer le panneau en verre (D) la rondelle métallique (EE) et la rondelle nylon (GG) sur la tige filetée située sur le support d'abat-jour (H) et fixez avec le bouton d'abat-jour (FF). 4 D Répétez l'opération pour les panneaux en verre restants. Quincaillerie utilisée Rondelle x 16 EE métallique Bouton x 16 FF d'abat-jour GG Rondelle nylon x 32 5.
INSTRUCTIONS POUR L'ASSEMBLAGE 6. Faites passer le pavillon (A) sur les vis à métaux longues (DD) sortant du support de fixation (B) et fixez-le à l'aide des boutons filetés (CC). 6 B Quincaillerie utilisée CC Bouton fileté DD x2 A CC 7. Vissez le tube fileté (C) sur le raccord inférieur (F). 7 F C 8. IInsérez une ampoule à culot moyen de 60 watts max. (non fournie) dans la douille (E).
INSTRUCTIONS POUR L'ASSEMBLAGE 9. Faites passer le diffuseur (I) et le support du diffuseur (J) sur la tige filetée (C) et fixez à l'aide du fleuron (K). 9 C J I K ENTRETIEN • Vérifiez toujours que le courant est coupé avant de nettoyer le luminaire. • Utilisez un linge doux et humide ainsi qu’un savon non abrasif. N’utilisez jamais de nettoyants pour vitres; vous risqueriez d’endommager le fini métallique du luminaire.
GARANTIE Kichler Lighting garantit que ses produits seront libres de tout vice de fabrication ou défaut matériel pendant un (1) an à compter de la date d'achat par l'acheteur initial.
LISTE DES PIÈCES DE RECHANGE Pour obtenir des pièces de rechange, appelez notre service à la clientèle au 1-800-554-6504, entre 8 h et 16 h 30 (HNE), du lundi au vendredi.
ARTÍCULO #0615970 Kichler® es una marca registrada de The L.D. Kichler Co. Todos los derechos reservados. SEMI-EMPOTRADO MODELO #38185 ADJUNTE SU RECIBO AQUÍ Número de serie Fecha de compra ¿Preguntas, problemas, piezas faltantes? Antes de devolverlo a la tienda, llame a nuestro departamento de servicio al cliente al 1-800-554-6504, de 8:00 a.m. a 4:30 p.m. hora del Este (EST), de lunes a viernes.
CONTENIDO DEL PAQUETE B A M G N L E H F C D I K J PIEZA A B C D E F G DESCRIPTIÓN Cubierta Soporte de montaje Tubo roscado Panel de vidrio Portalámparas Acoplamiento inferior Acoplamiento superior CANT 1 1 1 4 2 1 1 PIEZA H I J K L M 20 DESCRIPTIÓN Soporte de la pantalla Difusor Soporte del difusor Remate Tornillo para el montaje Perilla de montaje CANT 4 1 1 1 4 4
ADITAMENTOS AA Conectores de cables Cant.: 3 BB Tornillos para metales cortos Cant.: 2 CC DD EE FF GG Arandela Arandela Perilla metálica de la pantalla de nylon Cant.: 16 Cant.: 32 Cant.: 16 Perillas roscadas Cant.: 2 Tornillos para metales largos Cant.: 2 INFORMACIÓN DE SEGURIDAD Lea y comprenda completamente este manual antes de intentar ensamblar, usar o instalar el producto. • • • • • ADVERTENCIA IMPORTANTE: NUNCA intente hacer trabajos sin desconectar el suministro eléctrico.
INSTRUCCIONES DE ENSAMBLAJE 1. Oriente el soporte de montaje (B) de modo que la parte central elevada sobresalga en la caja eléctrica (no se incluye). Inserte tornillos largos para metal (DD) a través del soporte de montaje (B) de manera que los tornillos largos para metal (DD) sobresalgan hacia afuera. Conecte el soporte de montaje (B) a la caja eléctrica con tornillos cortos para metal (BB).
INSTRUCCIONES DE ENSAMBLAJE 4. Los soportes de la pantalla (H) tienen un poste roscado para asegurar los paneles de vidrio (D). Pase el panel de la pantalla (D) la arandela metálica (EE) y arandela de nylon (GG) sobre el poste roscado del soporte de la pantalla (H) y asegúrelo con la perilla de la pantalla (FF). 4 D Repita para los paneles de vidrio restantes. Arandela de nylon 5.
INSTRUCCIONES DE ENSAMBLAJE 6. Pase la cubierta (A) sobre los tornillos largos para metales (DD) que sobresalen del soporte de montaje (B) y fíjela usando perillas roscadas (CC). 6 B DD Aditamentos utilizados CC Perillas roscadas x2 A CC 7. Atornille el tubo roscado (C) al acoplamiento inferior (F). 7 F C 8. Inserte un foco de base media de máximo 60 W (no se incluye) en el portalámparas (E).
INSTRUCCIONES DE ENSAMBLAJE 9. Pase el difusor (I) y el soporte del difusor (J) sobre el tubo roscado (C) y asegúrelo con el remate (K). 9 C J I K CUIDADO Y MANTENIMIENTO • Siempre asegúrese de que la corriente eléctrica esté desconectada antes de limpiar. • Utilice un paño húmedo suave y jabón suave no abrasivo para limpiar la lámpara. Nunca utilice un limpiador para vidrio en la lámpara, porque éste dañará el acabado metálico.
GARANTÍA Kichler Lighting garantiza que sus productos estarán libres de defectos de materiales o mano de obra por un (1) año a partir de la fecha de compra por el Comprador Original.
LISTA DE PIEZAS DE REPUESTO Para repuestos, llame a nuestro departamento de servicio al cliente al 1-800-554-6504, de 8:00 a.m. a 4:30 p.m. hora del Este (EST), de lunes a viernes.