
Installation Guide

We’re here to help 866-558-5706
Hrs: M-F 9am to 5pm EST
IS-49247LED-US
This device complies with part 15 of the FCC Rules. Operaon is
subject to the following two condions:
1) This device may not cause harmful interference, and
2) This device must accept any interference received, including
interference that may cause undesired operaon.
Note: This equipment has been tested and found to comply with
the limits for a Class B digital device, pursuant to part 15 of the FCC
Rules. These limits are designed to provide reasonable protecon
against harmful interference in a residenal installaon. This
equipment generates, uses and can radiate radio frequency energy
and, if not installed and used in accordance with the instrucons,
may cause harmful interference to radio communicaons.
However, there is no guarantee that interference will not occur
in a parcular installaon. If this equipment does cause harmful
interference to radio or television recepon, which can be
determined by turning the equipment o and on, the user is
encouraged to try to correct the interference by one or more of
the following measures:
• Reorient or relocate the receiving antenna.
• Increase the separaon between the equipment and receiver.
• Connect the equipment into an outlet on a circuit dierent
from that to which the receiver is connected.
• Consult the dealer or an experienced radio/TV technician for
help.
FCC Informaon:
2) Turning the light ON/OFF
• Tap the power buon[C] to turn the light on. The light will
come on and the switch itself will also illuminate green.
• Tap the power buon again to turn the light o. The
light will turn o and the green switch will no longer be
illuminated.
3) Dimming the lantern
• The lantern defaults to 50% light output when frst turned
on.
• To adjust the light output, press and hold the power
buon. This will begin to dim the light to its lowest
posion. Release the buon when the desired light output
is reached; otherwise the lantern will connue to its lowest
light output.
• Aer the lantern has reached its lowest light output,
release then hold the power buon again to increase light
output.
• Connue to hold the power buon to get to the highest
output level or release the buon when the desired light
output is reached.
4) Pairing and connecng a BLUETOOTH phone/tablet
• Press and hold the Bluetooth buon[D] unl a tone is
heard. The buon will flash blue signaling it is ready to pair.
• Turn on the Bluetooth funcon on your phone/tablet.
• Using the Bluetooth sengs of your phone/tablet, select
“Kichler” from the list of available connecons.
• The Bluetooth indicator light[D] on the lantern will change
to solid blue when the connecon is successful and
another tone will sound.
• To play music on your lantern, ensure volume on your
phone/tablet is NOT set to mute.
• To adjust the listening volume, use the volume controls on
your phone/tablet.
5) Listening to music
• Aer your phone/tablet has paired with the lantern, it will
connect automacally. If the lantern does not connect
automacally, repeat the pairing process to register your
phone/tablet.
• The audio source (phone/tablet) will control the volume,
pause, play, and advance tracks.
NOTE: If sound is NOT audible, ensure your phone/tablet is
not muted and make sure the volume is at an appropriate
level.
6) Turning o the lantern’s Bluetooth audio
• To turn o the lantern’s Bluetooth audio funcon, hold the
Bluetooth buon[D] unl a tone is heard and the blue light
on the Bluetooth buon is no longer lit.
7) How to switch audio source (changing between a dierent
phone/tablet)
• Repeat pairing instrucons (see secon tled Pairing and
connecng a BLUETOOTH phone/tablet) on second phone/
tablet.
• If primary phone/tablet is already connected, press and
hold Bluetooth buon unl blue light flashes. Ensure
primary phone/tablet is disconnected.
• Select lantern (tled Kichler) on second phone/tablet.
8) Product Specicaons:
• Charging parameters: 50 to 113°F (10 to 45°C)
• Operang/storage temperature: -4 to 140°F (-20 to 60°C)
9) Glass Replacement
• Unscrew boom screws [E]
• Remove lid[F].
• Unscrew screws [G].
• Remove top plate [H].
• Remove Glass [I] by sliding upwards.
• Replace Glass[I].
• Put top plate[H] back on with the screws[G].
• Reaach the lid[F] with the boom screws[E].
CAUTION – DO NOT INCINERATE
This product contains Lithium Ion Baeries that must be
disposed of following any State or Local code regulaons for
proper disposal.
WARNING:
This xture is intended for installaon in accordance
with the Naonal Electrical Code (NEC) and all local code
specicaons. If you are not familiar with code requirements,
installaon by a cered electrician is recommended.
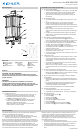
Fixture Diagram
Parts List
Cauons
Installaon Instrucons
[A] Charging Port
[B] Red Indicator
Light
[C] Power Button
[D] Bluetooth
Button /
Bluetooth
Indicator Light
[E] Bottom Screw
[F] Lid
[G] Screws
[H] Top Plate
[I] Glass
A
B
I
F
E
C
D
1) Charging the lantern
For best results, completely charge the lantern prior to use.
• To charge the lantern, plug the charger into the wall.
• Aach the other end of the charger into the charging
port[A] on the boom of the lantern.
• A red indicator light[B] will illuminate to illustrate the
lantern is charging. Once the baery is completely
charged, this light will become green.
NOTE: The lantern can sll operate as a light and/or
speaker while it is being charged.
Installaon Instrucons (connued)
TOP VIEW
H
G