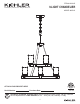
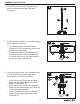
ITEM #1292415 9-LIGHT CHANDELIER Distributed by Kichler® LLC. All Rights Reserved. MODEL #82313 ATTACH YOUR RECEIPT HERE Serial Number Purchase Date Questions, problems, missing parts? Before returning to your retailer, call our customer service department at 1-800-554-6504, 8 a.m. - 4:30 p.m, EST, Monday - Friday.
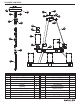
PACKAGE CONTENTS B D U T A C R F I S V H M O J G K P E Q L N PART A B C D E F G H I J K DESCRIPTION Canopy Mounting Bracket Threaded Nipple Hex Nut Socket Coupling Shade Screw Collar Ring Screw Collar Loop Spacer Chain QTY. 1 1 1 3 9 1 9 1 1 9 1 PART L M N O P Q R S T U V 2 DESCRIPTION Fixture Loop Socket Ring Threaded Pipe Arm Thumbscrew Mounting Surface Small Hex Nut Lock Washer Coupling Cover Pipe Coupling Fixture Top QTY.
HARDWARE CONTENTS AA Wire Connector Qty: 3 BB Short Machine Screw Qty: 2 SAFETY INFORMATION Please read and understand this entire manual before attempting to assemble, operate or install the product. • • • • • WARNING IMPORTANT: NEVER attempt any work without shutting off the electricity. Place the main power switch in the “OFF” position and unscrew the fuse(s), or switch “OFF” the circuit breaker switch(es), that control the power to the fixture or room you are working in.
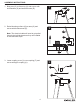
ASSEMBLY INSTRUCTIONS 1. Bring arm (O) to fixture top (V) and secure with lock washers (S) and small hex nuts (R). 1 R S V O 2. Raise Mounting surface (Q) to arms (O) and secure with thumbscrews (P). 2 O Note: The electrical cable will need to get pulled through the individual parts as they are installed on this and later steps. P Q 3. Lower coupling cover (V) over coupling (F) and secure with pipe coupling (U).
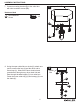
ASSEMBLY INSTRUCTIONS 4. Screw fixture loop (L) onto threaded pipe (N) before screwing threaded pipe onto pipe coupling (U). 4 L N U 5. Position threaded nipple (C) in mounting bracket (B) so that, when mounted: • • The threaded nipple (C) will protrude a minimum of ¼ inch beyond the raised center portion of the bracket (B). The threaded nipple (C) height should be positioned so that ½ the exterior threads of the screw collar loop (I) will extend past the canopy (A), when it is mounted. 6.
ASSEMBLY INSTRUCTIONS 7. Connect mounting bracket (B) to the outlet box with short machine screws (BB). 7 Outlet Box Hardware Used BB Short Machine Screw x2 B C BB 8. Using the open chain links on chain (K), attach one end to screw collar loop (I) and the other end to fixture loop (L). Weave the fixture electrical and ground wires through every other chain link and pass through threaded nipple (C) into outlet box. Lower the screw collar ring (H) and canopy (A) over the chain (K).
ASSEMBLY INSTRUCTIONS 9. Wire connection guide: Ground wire: • For installation in the United States: Wrap ground wire from outlet box around ground screw on mounting bracket (B) no less than 2 in. from wire end. Tighten ground screw. If fixture is supplied with a ground wire, connect to outlet ground wire with a wire connector (AA). • For installation in Canada: If fixture is supplied with ground wire, wrap ground wire around ground screw on mounting bracket (B). Tighten ground screw.
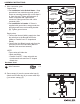
ASSEMBLY INSTRUCTIONS 11. Lower shade (G) over socket (E). Next screw spacer (J) then socket ring (M) onto socket (E) using wrench (provided). 11 Wrench Repeat for remaining sockets (E). M J G E 12. Insert 60-watt max. Edison bulb (included) into socket (E). 12 Repeat for remaining sockets (E).
CARE AND MAINTENANCE • Always be certain that electric current is turned off before cleaning this item. • Use a soft, moist cloth with mild non-abrasive soap to clean fixture. Never use glass cleaner on fixture, as it will damage the metal finish. • All glass shades may be washed in a towel-lined sink with warm water and mild soap. Do not wash shades in an automatic dishwasher. TROUBLESHOOTING PROBLEM POSSIBLE CAUSE 1.CORRECTIVE Check wiring. ACTION Fixture does not light. 1.
WARRANTY (continued) Kichler Lighting LLC 88 Long Hill Street East Hartford, CT 06108 Proof of purchase (original sales receipt) from the original purchaser must be made available to Kichler Lighting LLC for all warranty claims. Limitation on Duration of Implied Warranties TO THE EXTENT PERMITTED BY LAW, ANY IMPLIED WARRANTY, INCLUDING THE IMPLIED WARRANTIES OF MERCHANTABILITY AND OF FITNESS FOR A PARTICULAR PURPOSE, IS LIMITED TO THE STATUTORY PERIOD OR THE DURATION OF THIS WARRANTY, WHICHEVER IS SHORTER.
REPLACEMENT PARTS LIST For replacement parts, call our customer service department at 1-800-554-6504, 8 a.m. - 4:30 p.m., EST, Monday - Friday.