
Owner's Manual


5
Adjusting Equalizer Controls
Once all the wiring connections have been made, the gain controls on your
KQ30 and amplifier(s) must be adjusted for optimum performance.
Gain Setting Procedure
1
. Turn the gain controls on your amplifier(s) all the way down.
2
. Disconnect the remote turn-on lead(s) from your amplifier(s).
Be sure to insu--
laate the exposed copper wire with electricaal taape to prevent accidentaal daamaage
to your source unit’’s remote turn--on leaad output..
3
. Set all the equalization controls on the KQ30 to their center
detent (0 dB) position.
4
. Set the input gain controls at their minimum (fully counter
clock-wise) position.
5
. Set the output level controls at their minimum (fully counter
clock-wise) position.
6
. Using a well recorded CD with a strong signal or a continuous
1KHz tone recorded at 0 dB (track 10 from AutoSound 2000 CD
104), turn your head unit up to 90% of it’s maximum output.
7
. Turn the left channel input gain control up until the left
channel input clipping LED starts to flash.
8
. Adjust the right channel input gain control to match the left.
9
. Turn the left channel output level control up until the left
channel output clipping LED starts to flash.
10
. Adjust the right channel output level control to match the
left.
11
. Turn the head unit down and shut off the system.
12
. Re-connect the remote turn-on leads to your amplifier(s).
The KQ30 will have enough output to operate most amplifiers
to their full power output even with the amplifier’s gain control
set at its lowest position. If necessary, the gain setting on your
amplifier(s) may be turned up slightly. Remember, the gain set-
tings on any amplifier are for level matching only, they do not
increase the power output of your amplifier. The lowest gain
setting that will allow your amplifier to make full power is always
best for sound quality, lowest system noise and reliability.
If after making your adjustments to the equalization settings
the output clipping LED’s stay steadily lit, you will need to turn
down the output level controls and repeat steps 2, 6 and 9-12.
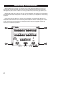
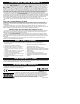
Step 3
Step 4
Step 5
Step 7
Step 8
Step 9
Step 10
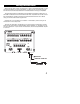
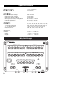
Steps 7 & 8
Clipping LED's
Steps 9 & 10
Clipping LED's
30