RS RSCOMPONENTSYSTEM RS65.2 RS60.2 English Version Versión Español Sistema de altavoces componentes RS Manual del Propietario Deutsche Version RS-Komponentensystem Benutzerhandbuch Version Française Système à composants RS Manuel d’utilisation 2009 RS Multilingual f01.
RSCOMPONENTSYSTEMOwner’sManual MODEL: RS65.2 / RS60.2 Authorized KICKER Dealer: Purchase Date: Speaker Model Number: RS COMPONENTS Blending perfectly to create stunning musical accuracy, the KICKER RS-series component systems reveal the full audio spectrum like no other. Comprised of advanced and durable materials, like DuPont Tetoron® and cast aluminum, these component systems will deliver precise reproduction of your favorite music for many years to come. PERFORMANCE Model: RS60.2 RS65.
CONFIGURATION Before mounting and wiring the RS component system, determine which configuration you will use for the speakers and crossover.
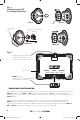
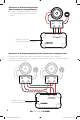
Fig. 1 Configuring the RS for Coaxial Operation Step 1 Step 2 boot tweeter lead wires coaxial mounting post tweeter Steps 3–6 Steps 7–8 Fig. 2 tweeter output-level switch. Higher switch settings mean more volume from the tweeter. RS crossover + 6 +3 +0 OUTPUT INPUT OUTPUT -MID+ -MID+ -TW+ -TW+ INPUT jumper. Install only for 2-way configurations; do not install if bi-amping.
WIRING We recommend using 16 gauge (or larger) wire. The RS components are rated at 4 ohms and work with any source unit or amplifier designed to operate at a 4 ohm load. Make sure your source unit or amplifier is rated for 4 ohm operation.
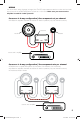
+ Crossover in bi-amp configuration Two channels per component set • At least four amplifier channels are needed for stereo operation (only two channels are shown) + - OUT + MID - OUT + TW - IN -MID+ IN -TW+ -MID+ CH2 -TW+ CH1 LEFT OUTPUT amplifier / source unit (must have at least four channels) Crossover in bi-amp configuration | One channel per component set + + - OUT + MID IN -MID+ OUT + TW IN -TW+ - - + + • Requires two complete RS systems (four woofers, four tweeters, four crossove
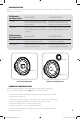
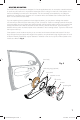
WOOFER MOUNTING The KICKER RS components are designed for free-air applications and do not require a sealed enclosure for optimum performance. It is important to isolate the sound coming from the front of the speaker from the sound radiating from the back of the speaker. This is most easily accomplished by mounting the speakers in a vehicle’s factory locations or in a location with a semi-isolated rear chamber (like the rear deck of a car behind the rear seats).
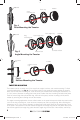
panel tweeter short mounting nut flush ring Fig. 4 Flush Mounting the Tweeter front angle ring panel long mounting nut tweeter back angle ring rounded surface inset surface Fig. 5 Angle Mounting the Tweeter panel tweeter surface mount cup Fig. 6 Surface Mounting the Tweeter TWEETER MOUNTING The tweeter can be mounted one of four ways: flush, angled, surface, and coaxial mounting. For flush mounting applications, see Fig. 4.
the narrow part of the front angle ring for the preferred angle of operation. Place the wire through the long mounting nut and loosely tighten the mounting nut around the tweeter. Rotate all the parts in unison until the tweeter is angled in the desired direction. Secure the assembly by tightening the mounting nut. See Fig. 5. For surface mounting applications use the surface mount cup as a template and pre-drill one 7/64” (2.
GRILLE MOUNTING 10 2009 RS Multilingual f01.
ACOUSTICS LIMITED WARRANTY KICKER warrants this product to be free from defects in material and workmanship under normal use for a period of THREE (3) MONTHS from date of original purchase with receipt. When purchased from an Authorized KICKER Dealer it is warranted for ONE (1) YEAR from date of original purchase with receipt. In all cases you must have the original receipt.
Manual del propietario del SISTEMA DE COMPONENTES RS MODELO: RS65.2 / RS60.2 Distribuidor autorizado de KICKER: Fecha de compra Número de modelo del altavoz: COMPONENTES RS Los sistemas de componentes de la serie RS de KICKER, la combinación perfecta para una óptima fidelidad, son incomparables al momento de revelar el espectro de audio.
CONFIGURACIÓN Antes de montar y realizar el cableado del sistema de componentes RS, determine qué configuración utilizará para los altavoces y el crossover.
Fig. 1 Configuración de RS para el funcionamiento coaxial Paso 1 Paso 2 cubierta trasera cables de alimentación del tweeter base de montaje coaxial tweeter Pasos 3 a 6 Pasos 7 a 8 Fig. 2 Regulador de nivel de salida del tweeter. Un valor mayor en el regulador significa más volumen para el tweeter. crossover RS + 6 +3 +0 OUTPUT INPUT OUTPUT -MID+ -MID+ -TW+ -TW+ puente INPUT (entrada) Instalar sólo para configuraciones de 2 vías; No instalar si es biamplificada.
CABLEADO Se recomienda utilizar un cable calibre 16 (o más). Los componentes RS están clasificados para 4 ohms y funcionan con cualquier unidad fuente o amplificador diseñado para operar a una carga de 4 ohms. Asegúrese de que la unidad fuente o el amplificador estén clasificados para funcionar con 4 ohms. Crossover en configuración de 2 vías | Un conjunto de componentes por canal • Se necesitan al menos dos canales para amplificadores para el funcionamiento en estéreo (se muestra un solo canal).
+ Crossover en configuración biamplificada Dos canales por conjunto de componentes • Se necesitan al menos cuatro canales para amplificadores para el funcionamiento en estéreo (solo se muestran dos canales).
MONTAJE DEL WOOFER Los altavoces componentes Kicker RS han sido diseñados específicamente para montarlos en aplicaciones al aire libre. Estos altavoces no necesitan caja sellada para dar un rendimiento óptimo. Es importante separar el sonido radiado por delante del sonido radiado por detrás del excitador. Esta separación se logra normalmente instalando el excitador en una ubicación de altavoz preestablecida de fábrica o provista de una cámara trasera semiaislada.
panel tweeter anillo al ras tuerca de montaje corta Fig. 4 Montaje al ras del tweeter panel tuerca de montaje larga anillo angular trasero superficie de inserción Fig. 5 Montaje en ángulo del tweeter anillo angular delantero tweeter superficie redondeada panel tweeter asiento para montaje en superficie Fig. 6 Montaje del tweeter en superficie MONTAJE DEL TWEETER El tweeter se puede montar de cuatro maneras: montaje al ras, en ángulo, en superficie y coaxial..
lograr el ángulo de funcionamiento deseado. Coloque el cable a través de la tuerca de montaje y apriete suavemente la tuerca de montaje alrededor del tweeter. Gire todas las piezas juntas hasta que el ángulo del tweeter quede en la dirección que desee. Para asegurar el conjunto, apriete la tuerca de montaje. Vea la Fig. 5. Para aplicaciones de montaje en superficie, use la copa de montaje en superficie como plantilla a fin de hacer en el panel un agujero piloto de 7/64 de plg. (2.
MONTAJE DE LA REJILLA 20 2009 RS Multilingual f01.
Handbuch für das RS-KOMPONENTENSYSTEM MODELL: RS65.2 / RS60.2 Autorisierter KICKER-Händler: Kaufdatum: Lautsprecher-Modellnummer: RS COMPONENTS Die KICKER RS-Komponentenserie offenbart wie kein zweites System das volle Klangspektrum und verfügt über eine ausgezeichnete Klangtreue. Das Komponentensystem besteht aus modernem und stabilem Material wie DuPont Tetoron® und Gussaluminium und bietet über viele Jahre eine präzise Wiedergabe. LEISTUNG Modell RS60.2 RS65.
ANORDNUNG Bevor Sie das RS-Komponentensystem einbauen und verkabeln, sollten Sie die Anordnung der Lautsprecher und der Frequenzweiche festlegen.
Abb. 1 Anordnung des RS für Koaxialbetrieb Schritt 1 Schritt 2 Abdeckung Hochtönerkabel Kabel Koaxialer Befestigungsstift Hochtöner Schritte 3 bis 6 Schritte 7 bis 8 Abb. 2 Hochtöner-Ausgangspegelschalter. Eine höhere Schaltereinstellung bedeutet höhere Lautstärke der Hochtöner. RS-Frequenzweiche + 6 +3 +0 OUTPUT INPUT OUTPUT -MID+ -MID+ -TW+ -TW+ EINGANGS-Brücke Einbau nur für 2-Wege-Anordnung. Nicht bei Bi-Amplifying einbauen.
VERKABELUNG Wir empfehlen die Verwendung eines 16-Gauge-Lautsprecherkabels (oder mehr). Die RS-Komponenten haben eine Impedanz von 4 Ohm und sind für alle 4-ohmigen Quellen oder Verstärker geeignet. Vergewissern Sie sich, dass Ihre Quelle oder Verstärker für 4-Ohm-Betrieb ausgelegt ist. Frequenzweiche in 2-Wege-Anordnung | Ein Komponentenset pro Kanal • Für den Stereobetrieb sind mindestens zwei Verstärkerkanäle erforderlich (Es wird nur ein Kanal dargestellt).
+ Frequenzweiche in bi-ampAnordnung Zwei Kanäle pro Komponentenset • Für den Stereobetrieb sind mindestens vier Verstärkerkanäle erforderlich (Es werden nur zwei Kanäle dargestellt).
WOOFER-EINBAU Ihre Kicker RS-Komponenten sind speziell für den Einbau in nicht geschlossenen Gehäusen gedacht. Die Lautsprecher benötigen kein geschlossenes Gehäuse, um optimale Leistung zu bieten. Es ist wichtig, den vorne aus dem Treiber austretenden Schall vom Schall zu trennen, der von der Rückseite des Treibers kommt. Diese Trennung wird meist durch den Einbau an einer werksseitig vorgewählten Stelle erreicht, oder an einer Stelle mit semiisoliertem Rückraum.
Verkleidung Kurze Befestigungsmutter Hochtöner Ring für bündigen Einbau Abb. 4 Bündiger Einbau des Hochtöners Vorderer Winkelring Hochtöner Verkleidung Hinterer Winkelring Lange Befestigungsmutter Abgerundete Oberfläche Einsatz Abb. 5 Einbau des Hochtöners mit Winkelringen Verkleidung Hochtöner Oberflächenbefestigungsschale Abb. 6 Einbau des Hochtöners auf der Oberfläche EINBAU HOCHTÖNER Der Hochtöner kann auf vier Weisen eingebaut werden: Bündig, mit Winkel, auf der Oberfläche und koaxial.
Sie als nächstes das Kabel durch den hinteren Winkelring, ziehen Sie diesen hinten auf den Hochtöner und richten Sie den schmalen Teil auf den bevorzugten Winkel aus. Verlegen Sie das Kabel durch die Befestigungsmutter und ziehen Sie diese leicht am Hochtöner fest. Drehen Sie alle Teile gleichzeitig bis sich der Hochtöner in der gewünschten Position befindet. Ziehen Sie jetzt die Befestigungsmutter fest an. Siehe Abb. 5.
GRILLEINBAU 29 2009 RS Multilingual f01.
RSCOMPONENTSYSTEMNotice d’Utilisation MODÈLE : RS65.2 / RS60.2 Revendeur agréé KICKER : Purchase Date : Numéro de modèle haut-parleur : COMPOSANTS RS Se fondant parfaitement pour créer une précision musicale étonnante, les systèmes de composantes de la série KICKERR RS révèlent le spectre audio complet comme aucun autre système.
CONFIGURATION Avant de monter et de câbler le système composant RS, déterminer la configuration à utiliser pour les haut-parleurs et le filtre passif.
Fig. 1 Configuration du RS pour un Fonctionnement Coaxial Étape 1 Étape 2 suspension fils du tweeter tube coaxial de montage tweeter Étapes 3–6 Étapes 7–8 Fig. 2 interrupteur de niveau de sortie du haut-parleur d’aigus. Des réglages d’interrupteur plus élevés signifient plus de volume en sortie du hautparleur d’aigus. Filtre passif RS + 6 +3 +0 OUTPUT INPUT OUTPUT -MID+ -MID+ -TW+ -TW+ Jarretière d’ENTRÉE.
CÂBLAGE Nous conseillons d’utiliser du fil de calibre 16 (ou supérieur). Les composants RS ont une valeur nominale de 4 ohms et fonctionnent avec n’importe quelle source ou n’importe quel amplificateur conçu pour une charge de 4 ohms. S’assurer que la source ou l’amplificateur est prévu pour un fonctionnement à 4 ohms.
+ Filtre passif en configuration bi-ampli Deux canaux définis par composant • Au moins quatre canaux amplificateurs sont requis pour une exploitation stéréo (seuls deux canaux sont représentés) + - OUT + MID - OUT + TW - IN -MID+ IN -TW+ -MID+ CH2 -TW+ CH1 LEFT OUTPUT SORTIE amplificateur / source (doit comporter au moins quatre canaux) Filtre passif en configuration bi-ampli | Un canal défini par composant + + - OUT + MID IN -MID+ OUT + TW IN -TW+ - - + + • Requiert deux systèmes RS com
MONTAGE DU WOOFER Les composants Kicker RS ont été spécialement conçus pour un montage sans enceinte. Leur fonctionnement optimal ne nécessite pas d’enceinte close. Il est important d’isoler le son sortant par l’avant du haut-parleur et le son diffusé à l’arrière du haut-parleur. En général, cette isolation est obtenue en installant le haut-parleur dans un emplacement standard ou dans un emplacement pourvu d’une chambre arrière semi-isolée.
panneau bague affleurante tweeter écrou de montage court Fig. 4 Montage encastré du tweeter panneau écrou de montage long bague angulaire arrière bague angulaire avant tweeter surface arrondie surface encastrée Fig. 5 Montage angulaire du tweeter panneau tweeter coupelle de bâti de surface Fig. 6 Montage en surface du haut-parleur d’aigus MONTAGE DU TWEETER Le haut-parleur d’aigus peut être monté de quatre différentes façons : montage affleurant, angulaire, en surface et coaxial.
bague angulaire arrière, faire passer la bague angulaire arrière au-dessus de la partie arrière du tweeter et aligner la partie étroite de la bague angulaire avant pour trouver l’angle d’exploitation préféré. Faire passer le fil à travers l’écrou de montage et serrer légèrement l’écrou de montage autour du tweeter. Faire tourner toutes les pièces en même temps jusqu’à ce que le tweeter adopte la bonne direction angulaire. Fixer l’ensemble en serrant l’écrou de montage. Voir la Figure 5.
MONTAGE DE LA GRILLE 38 2009 RS Multilingual f01.
INTERNATIONAL WARRANTY Contact your International Kicker dealer or distributor concerning specific procedures for your country’s warranty policies. WARNING: KICKER products are capable of producing sound levels that can permanently damage your hearing! Turning up a system to a level that has audible distortion is more damaging to your ears than listening to an undistorted system at the same volume level.
©2008 Stillwater Designs 2009 RS Multilingual f01.