LIVIN’ LOUD KS KS COMPONENTS KS5.2 KS6.2 KS65.2 English Version Versión Español Altavoz Componentes KS Manual del Propietario Deutsche Version KS Komponenten-System Benutzerhandbuch Version Française Haut-parleurs Composants KS Manuel d'utilisation 2011 KS Components Multilingual d01.
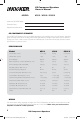
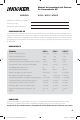
KS Component Speakers Owner’s Manual MODEL: KS5.2 / KS6.2 / KS65.2 Authorized KICKER Dealer: Purchase Date: Speaker Model Number: KS COMPONENT SPEAKERS The KICKER KS Speakers offer an excellent upgrade to your vehicle’s factory sound system, delivering great full-range sound at an amazing value! Their high-efficiency design means less power is needed to play your music, while our use of advanced materials and construction techniques ensures optimal performance for years to come. PERFORMANCE Model: KS5.
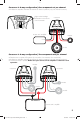
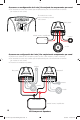
Crossover in 2-way configuration | One component set per channel • At least two amplifier channels are needed for stereo operation (only one channel is shown) Higher switch settings will result in more volume from the tweeter.
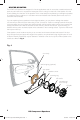
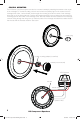
WOOFER MOUNTING The KICKER KS Speakers are designed for free-air applications and do not require a sealed enclosure for optimum performance. It is important to isolate the sound coming from the front of the speaker from the sound radiating from the back of the speaker. This is most easily accomplished by mounting the speakers in a vehicle’s factory locations or in a location with a semi-isolated rear chamber (like the rear deck of a car behind the rear seats).
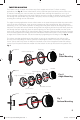
TWEETER MOUNTING The tweeter can be mounted one of three ways: flush, angled and surface. For flush mounting applications, see Fig. 5. Choose a flat location on the panel with space behind the panel to allow room for the short mounting nut, motor structure, and tweeter. After checking the clearances, cut a 1-3/4” (44mm) diameter mounting hole in the panel. Position the short mounting nut behind the panel. Feed the wire through the optional flush ring, the hole in the panel, and the mounting nut.
COAXIAL MOUNTING The KS-Series Component system can also be mounted coaxially by attaching the tweeter to the center of the midrange. For coaxial mounting, unscrew and remove the phase plug from the center of the KS midrange driver. Next, run the tweeter wires through the mounting post into the center of the midrange driver and out of the back plate hole. Connect the tweeter assembly to the mounting post and screw the mounting post into the center of the midrange driver.
CROSSOVER MOUNTING Mount the crossover in a location that is easy to access for wiring and tweeter output level adjustment. Make sure that the crossover will not be exposed to water. The bottom of the car door is not a good location. If you must mount the crossover in the car door, exercise caution as water can accumulate in the bottom of the door. Keep the crossover high in the door and shielded from water. KS crossover.
ACOUSTICS LIMITED WARRANTY KICKER warrants this product to be free from defects in material and workmanship under normal use for a period of THREE (3) MONTHS from date of original purchase with receipt. When purchased from an Authorized KICKER Dealer it is warranted for ONE (1) YEAR from date of original purchase with receipt. In all cases you must have the original receipt.
Manual del propietario del Sistema De Componentes KS MODELO: KS5.2 / KS6.2 / KS65.2 Distribuidor autorizado de KICKER: Fecha de compra Número de modelo del altavoz: COMPONENTES KS Los sistemas de Component de la serie KS de KICKER ofrecen una fidelidad de audio inigualable para aplicaciones para vehículos.
Crossover en configuración de 2 vías | Un conjunto de componentes por canal • Se necesitan al menos dos canales para amplificadores para el funcionamiento en estéreo (se muestra un solo canal). Si e selecciona un valor mayor, el tweeter producirá más volumen.
MONTAJE DEL WOOFER Los altavoces Componentes Kicker KS han sido diseñados específicamente para montarlos en aplicaciones al aire libre. Estos altavoces no necesitan caja sellada para dar un rendimiento óptimo. Es importante separar el sonido radiado por delante del sonido radiado por detrás del excitador. Esta separación se logra normalmente instalando el excitador en una ubicación de altavoz preestablecida de fábrica o provista de una cámara trasera semiaislada.
MONTAJE DEL TWEETER El tweeter se puede montar de cuatro maneras: montaje al ras, en ángulo, y en superficie. Para aplicaciones de montaje al ras, vea la Fig. 5. Elija una ubicación plana en el panel con espacio sufi ciente detrás para la tuerca de montaje corta y el tweeter. Después de controlar los espacios libres, corte un orificio de montaje de 1-3/4” (44 mm) de diámetro en el panel. Coloque la tuerca de montaje detrás del panel.
MONTAJE COAX El sistema de altavoces componentes de la serie KS también se puede instalar coaxialmente montando el tweeter al centro del altavoz de frecuencias medias. Para el montaje coaxial, desatornille y quite el tapón de fase del centro del excitador de frecuencias medias KS. A continuación, pase los cables del tweeter a través del cilindro de montaje, ubicado al centro del excitador de frecuencias medias, hasta que salgan por el agujero de la placa trasera.
MONTAJE DEL CROSSOVER Monte el crossover en una ubicación que sea de fácil acceso para realizar el cableado y ajustar el nivel de salida del tweeter. Asegúrese de que el crossover no quede en un lugar que se pueda mojar. La parte inferior de la puerta del automóvil no es una buena ubicación. Si tiene que montar el crossover en la puerta del automóvil, tenga cuidado ya que se puede acumular agua en la parte inferior de la puerta. Mantenga el crossover en un lugar alto de la puerta y protegido del agua.
Handbuch für das KS-KOMPONENTEN SYSTEM MODELL: KS5.2 / KS6.2 / KS65.2 Autorisierter KICKER-Händler: Kaufdatum: Lautsprecher-Modellnummer: KS KOMPONENTEN Ihr KS Komponenten-System wurde besonders für “Livin’ Loud” in der harten Autoumwelt entworfen. Es ist Materialien und Konstruktion fortgeschritten beizubehalten, dass ideale Leistung jahrelang kommt. LEISTUNG Modell: KS5.2 Tieftönergröße, Zoll (mm) 5-1/4 (130) 6 (160) 6-1/2 (165) Hochtönergröße, Zoll (mm) 1 (25) 1 (25) 1 (25) KS6.2 KS65.
Frequenzweiche in 2-Wege-Anordnung | Ein Komponentenset pro Kanal • Für den Stereobetrieb sind mindestens zwei Verstärkerkanäle erforderlich (Es wird nur ein Kanal dargestellt). Je höher die die Schaltereinstellung ist, desto höher ist die Lautstärke der Hochtöner.
WOOFER-EINBAU Ihre Kicker KS-Komponenten sind speziell für den Einbau in nicht geschlossenen Gehäusen gedacht. Die Lautsprecher benötigen kein geschlossenes Gehäuse, um optimale Leistung zu bieten. Es ist wichtig, den vorne aus dem Treiber austretenden Schall vom Schall zu trennen, der von der Rückseite des Treibers kommt. Diese Trennung wird meist durch den Einbau an einer werksseitig vorgewählten Stelle erreicht, oder an einer Stelle mit semiisoliertem Rückraum.
EINBAU HOCHTÖNER Der Hochtöner kann auf drei Weisen eingebaut werden: Bündig, mit Winkel und auf der Oberfläche. Für den bündigen Einbau, siehe Abb. 5. Wählen Sie eine ebene Fläche auf der Verkleidung mit ausreichend Platz hinter der Verkleidung für die kurze Befestigungsmutter und den Hochtöner. Nachdem Sie den Freiraum überprüft haben, schneiden Sie ein Montageloch mit 1-3/4 Zoll (44 mm) Durchmesser in die Verkleidung. Halten Sie die Befestigungsmutter hinter die Verkleidung.
KOAX-EINBAU Das KS-Komponentensystem kann auch koaxial eingebaut werden, indem man den Hochtöner in der Mitte des Mitteltöners anbringt. Zur koaxialen Befestigung müssen Sie den Phase-Plug aus der Mitte des KS-Mitteltönertreibers entfernen. Führen Sie dann die Hochtönerdrähte durch die Befestigungsstütze in die Mitte des Mitteltönertreibers und aus dem Rückplattenloch heraus. Verbinden Sie die Hochtönerbaugruppe mit der Befestigungsstütze und schrauben Sie die Stütze in die Mitte des Mitteltönertreibers.
CROSSOVER-EINBAU Bauen Sie die Frequenzweiche an einem leicht zugänglichen Ort für Verkabelung und Einstellung des Hochtönerausgangspegels ein. Stellen Sie dabei sicher, dass die Frequenzweiche vor Wasser geschützt ist. Der untere Teil der Tür ist kein geeigneter Ort. Wenn die Frequenzweiche in die Fahrzeugtür eingebaut werden muss, treffen Sie entsprechende Vorsichtsmaßnahmen, da sich im unteren Teil der Tür Wasser ansammeln kann.
KS Composants System Notice d’Utilisation MODÈLE : KS5.2 / KS6.2 / KS65.2 COMPOSANTS Revendeur agréé KICKER : Purchase Date : Numéro de modèle haut-parleur : COMPOSANTS KS Vos haut-parleurs de KS composants ont été conçus pour l’environnement automoteur dur. L’hautparleur utilise des matériels avancés et les techniques de construction pour maintenir l’exécution optimale pendant des années pour venir. PERFORMANCES Modèle: KS5.
Filtre passif en configuration à 2 voies | un composant défini par canal • Au moins deux canaux amplificateurs sont requis pour pour une exploitation stéréo (un seul canal est représenté) Des réglages d’interrupteur plus élevés se traduiront par plus de volume à la sortie du haut-parleur d’aigus.
MONTAGE DU WOOFER Les composantsiaux Kicker KS ont été spécialement conçus pour un montage sans enceinte. Leur fonctionnement optimal ne nécessite pas d’enceinte close. Il est important d’isoler le son sortant par l’avant du haut-parleur et le son diffusé à l’arrière du haut-parleur. En général, cette isolation est obtenue en installant le haut-parleur dans un emplacement standard ou dans un emplacement pourvu d’une chambre arrière semi-isolée.
MONTAGE DU TWEETER Le haut-parleur d’aigus peut être monté de tres différentes façons : montage affleurant, angulaire et en surface. Pour des applications de montage encastré, voir la Figure 5. Choisir un emplacement plat sur le panneau en laissant un espace derrière le panneau pour l’écrou de montage court et le hautparleur d’aigus. Après avoir vérifié les dégagements, découper un trou de montage de 1-3/4” (44 mm) de diamètre dans le panneau. Positionner l’écrou de montage derrière le panneau.
MONTAGE COAXIAUX Le système à composants KS peut aussi être monté de façon coaxiale, en fixant le hautparleur d’aigus au centre du haut-parleur de médiums. Pour effectuer un montage coaxial, dévissez et retirez le bouchon de phase du centre du haut-parleur de médiums KS. Passez ensuite les fils du haut-parleur d’aigus par le support de montage, le centre du haut-parleur de médiums et le trou de la plaque arrière.
MONTAGE DU FILTRE PASSIF Monter le filtre passif dans un emplacement facile d’accès pour le câblage et le réglage de niveau de sortie du tweeter. S’assurer que le filtre passif n’est pas exposé à l’eau. Le bas de la porte du véhicule n’est pas un bon endroit. Si le filtre passif doit être monté dans la portière, faire attention dans la mesure où l’eau risque de s’accumuler au bas de la portière. Lefiltre passif doit rester en haut de la portière et être protégé de l’eau. filtre passif KS.
INTERNATIONAL WARRANTY Contact your International Kicker dealer or distributor concerning specific procedures for your country’s warranty policies. WARNING: KICKER products are capable of producing sound levels that can permanently damage your hearing! Turning up a system to a level that has audible distortion is more damaging to your ears than listening to an undistorted system at the same volume level.
©2011 Stillwater Designs 2011 KS Components Multilingual d01.