
Owner's Manual


4
OPERATION
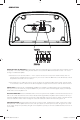
Automatic Turn-On Selection: The PX series offers two automatic turn-on modes that can be selected on the
end panel; +12V or DC Offset. Using the DC Offset mode causes the REM terminal wire to have +12V out for
turning on additional amplifi ers.
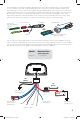
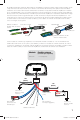
• Remote Turn-On: Set the switch to +12V to use the remote turn-on lead from the PX harness. Run 18
gauge wire from the Remote Turn-On Lead on your source unit to the REM wire on the PX harness. This is
the preferred automatic turn-on method.
• DC Offset Turn-On: If Remote Turn-On is not an option, the next best setting is DC Offset. The DC Offset
mode detects a 6V DC offset from the HI-Level speaker outputs when the source unit has been turned on.
Input Level: The RCA inputs on KICKER PX amplifi ers are capable of receiving either Hi or Low-level signals
from your source unit. If the only output available from your source unit is a Hi-Level signal, simply set the Input
Level switch on the amplifi er to HI.
Crossover Switches: Use the HI-PASS switch on the end panel of the amplifi er to set the internal crossover to
OFF or ON. When the switch is set to OFF, a full bandwidth signal will be amplifi ed. Set the switch to ON if you
want the amplifi er’s internal crossover to serve as a high-pass fi lter. Choose a cutoff of 100Hz or 250Hz with the
crossover selection switch. Never change the crossover “OFF/ON” switch with the audio system on!
Input Gain Control: The input gain control is not a volume control. It matches the output of the source unit to
the input level of the amplifi er. Turn the source unit up to about 3/4 volume (if the source unit goes to 30, turn it
to 25). Next, slowly turn (clockwise) the gain on the amplifi er up until you can hear audible distortion, then turn it
down a little.
2012 PX 100.2 Rev F.indd 42012 PX 100.2 Rev F.indd 4 11/29/2011 2:45:42 PM11/29/2011 2:45:42 PM