CX Amplifiers CX SERIES MONO AMPLIFIERS CXA300.1 | CXA600.1 | CXA1200.1 | CXA1800.1 Owner’s Manual | English Manual del Propietario | Español AMPLIFICADOR DEL LA SERIE CX.1 Benutzerhandbuch | Deutsch MONOVERSTÄRKER DER CX.1-SERIE Manuel d’utilisation | Française AMPLIFICATEUR DE SÉRIE CX.1 2016 CXA Mono Amps Rev F.
CX.1-SERIES AMPLIFIERS OWNER’S MANUAL CXA300.1 | CXA600.1 CXA1200.1 | CXA1800.1 MODEL: Authorized KICKER Dealer: Purchase Date: Model Number: Serial Number: WARNING: KICKER products are capable of producing sound levels that can permanently damage your hearing! Turning up a system to a level that has audible distortion is more damaging to your ears than listening to an undistorted system at the same volume level.
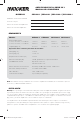
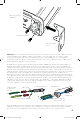
VERTICAL MOUNTING amplifier end panel hex screws double-slotted bracket Wiring: Disconnect the vehicle’s battery to avoid an electrical short. Then, connect the ground wire to the amplifier. Make the ground wire short, 24” (60cm) or less, and connect it to a paint-and-corrosion-free, solid, metal area of the vehicle’s chassis. Adding an additional ground wire of this same gauge (or larger) between the battery’s negative post and the vehicle chassis is recommended.
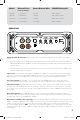
MONO OPERATION minimum impedance of 2 ohms woofer ≤18” (45cm) ≤24” (60cm) external fuse 12V battery remote turn-on (see page 5) bare-metal chassis ground 12V bare-metal chassis ground ≤18” (45cm) external fuse For multiple amplifier installations where distribution blocks are used, each amplifier should have its proper-rated fuse, or breaker, installed between the amplifier and the distribution block within eighteen inches of the block, or on the distribution block if it provides for fusing.
Model External Fuse Power/Ground Wire KICKER Wiring Kit (sold separately) CXA300.1 1 x 40 Ampere 8 Gauge PK8, ZCK84 CXA600.1 1 x 80 Ampere 4 Gauge PK4, CK44, ZCK44 CXA1200.1 1 x 150 Ampere 4 Gauge PK4, CK44, ZCK44 CXA1800.1 1 x 150 Ampere 1/0 Gauge PKD1, PWB050 OPERATION Automatic Turn-On Selection: The CX series offers two different automatic turn-on modes; +12V and DC Offset.
CXARC REMOTE BASS INSTALLATION Surface-mount the CXARC remote using the supplied screws. back view Remote cable passes audio; do not run cable parallel to power wires. Connect the supplied 1/8th inch [3.5mm] patch cable to the CXARC remote and the Remote Bass jack on the amplifier TROUBLESHOOTING If your amplifier does not appear to be working, check the obvious things first such as blown fuses, poor or incorrect wiring connections, incorrect setting of crossover switch and gain controls, etc.
Ground Noise? KICKER amplifiers are engineered to be fully compatible with all manufacturers’ head units. Some head units may require additional grounding to prevent noise from entering the audio signal. If you are experiencing this problem with your head unit, in most cases running a ground wire from the RCA outputs on the head unit to the chassis will remedy this issue. CAUTION: When jump starting the vehicle, be sure that connections made with jumper cables are correct.
AMPLIFICADOR DE LA SERIE CX.1 MANUAL DEL PROPIETARIO MODELOS: CXA300.1 | CXA600.1 | CXA1200.1 | CXA1800.1 Distribuidor autorizado de KICKER: Fecha de compra: Número de modelo del amplificador: Número de serie del amplificador: RENDIMIENTO Modelo: CXA300.1 CXA600.1 CXA1200.1 CXA1800.1 Potencia RMS [Vatios] a 14.4V, 4Ω mono, ≤ 1% THD+N a 14.
panel de fondo del amplificador tornillos hexagonales soporte de doble ranura Cableado: Desconecte la batería del vehículo para evitar cortocircuitos. Luego, conecte un cable de conexión a tierra al amplificador. El cable de conexión a tierra debe ser corto, de 24 plg. (60 cm) o menos, y debe ir conectado a un punto sólido del chasis del vehículo en que no haya ni pintura ni corrosión.
FUNCIONAMIENTO MONOFÓNICO impedancia mínima de 2 ohmios woofer ≤18” (45cm) 12V ≤24” (60cm) batería encendido a distancia (página 11) conexión a tierra 12V conexión a tierra ≤18” (45cm) fusible externo Para varias instalaciones de amplificadores donde se utilizan bloques de distribución, cada amplificador debe poseer su fusible de grado apropiado, o interruptor, instalado entre el amplificador y el bloque de distribución a dieciocho años pulgadas del bloque, o sobre el bloque de distribución si admite
Modelo Fusible Externo Cable de Alimentación y Conexión a Tierra Kit de cableado KICKER (no incluido) CXA300.1 1 x 40A Calibre 8 PK8, ZCK84 CXA600.1 1 x 80A Calibre 4 PK4, CK44, ZCK44 CXA1200.1 1 x 150A Calibre 4 PK4, CK44, ZCK44 CXA1800.1 1 x 150A Calibre 1/0 PKD1, PWB050 FUNCIONAMIENTO Selección de Encendido Automático: El modelo CX le ofrece dos distintos modos de encendido automático; desvío a +12V y DC.
CXARC CONTROL REMOTO DE BAJOS INSTALACIÓN Para instalar en superficie el control remoto CXARC use los tornillos suministrados. vista desde atrás Conecte el cable de extensión de 1/8 pulgadas [3.5mm] suministrado al control remoto CXARC y a la entrada de grave remoto en el amplificador. Cable de control remoto de audio pasa, no se ejecutan en paralelo a los cables de alimentación.
¿No hay salida de uno de los canales? Revise el control de balance de la unidad fuente. Revise las conexiones RCA (o de entrada de altavoz) y de salida de altavoz del canal. ¿Hay ruido sibilante de alternador asociado a las RPM del motor? Vea si hay algún cable RCA (o de entrada de altavoz) dañado. Revise el encaminamiento del cable RCA (o de entrada de altavoz). Vea si la unidad fuente tiene conexión a tierra apropiada. Revise las configuraciones de amplificación y bájelas si están muy altas.
VERSTÄRKER DER CX.1 SERIE BENUTZERHANDBUCH MODELL: CXA300.1 | CXA600.1 | CXA1200.1 | CXA1800.1 Autorisierter KICKER-Händler: Kaufdatum: Verstärker-Modellnummer: Verstärker-Seriennummer: LEISTUNG Modell: CXA300.1 CXA600.1 CXA1200.1 CXA1800.1 RMS-Leistung @ 14.4V, 4Ω mono, ≤ 1% Gesamtklirrfaktor @ 14.
Verstärkerabdeckplatte Sechskantschrauben Doppelt geschlitzte Halterung Anschluss: Trennen Sie den Anschluss der Fahrzeugbatterie, um einen Kurzschluss zu vermeiden. Schließen Sie dann das Massekabel an den Verstärker an. Verwenden Sie ein kurzes Erdungskabel (maximal 60 cm) und schließen Sie es an eine lack- oder korrosionsfreie Metallstelle an der Fahrzeugkarosserie an.
MONO-BETRIEB Minimalimpedanz von 2 Ohm ≤18” (45cm) ≤24” (60cm) 12V externe Sicherung Batterie Ferneinschaltung (Seite 17) Masse 12V Masse ≤18” (45cm) externe Sicherung Beim Einbau mehrerer Verstärker unter Verwendung von Verteilerblöcken sollte jeder Verstärker eine ordnungsgemäß zugelassene Sicherung oder Stromunterbrechung haben, die zwischen Verstärker und Verteilerblock angebracht wird, in einer Entfernung von 45 cm (18 Zoll) vom Block bzw.
Modell Externe Sicherung Massekabel KICKER Verkabelungssatz (nicht inbegriffen) CXA300.1 1 x 40 Ampere 8 GA PK8, ZCK84 CXA600.1 1 x 80 Ampere 4 GA PK4, CK44, ZCK44 CXA1200.1 1 x 150 Ampere 4 GA PK4, CK44, ZCK44 CXA1800.1 1 x 150 Ampere 1/0 GA PKD1, PWB050 BETRIEB Automatische Einschaltung: Die CXA-Serie umfasst zwei automatische Einschaltmodi: +12V und DC Offset.
CXARC BASSPEGEL-FERNBEDIENUNG INSTALLATION Montieren Sie den CXARC-Remote-Regler mit den mitgelieferten Schrauben. Remote-Kabel geht Audio-, Kabel laufen nicht parallel zum Stromkabel. Rückansicht Stecken Sie das mitgelieferte 1/8 Zoll [3.5mm] Patchkabel in den CXARCRemote-Regler und in die “Remote-Bass”-Steckerbuchse am Verstärker.
Lichtmaschine erzeugt bei steigender Motordrehzahl heulendes Geräusch? Prüfen Sie, ob das RCA- oder Lautsprechereingangskabel defekt ist. Prüfen Sie den Verlauf des RCA- oder Lautsprechereingangskabels. Prüfen Sie, ob das Autoradio richtig geerdet ist. Prüfen Sie die Verstärkungseinstellungen und reduzieren Sie diese ggf.
AMPLIFICATEUR SÉRIE CX.1 MANUEL D’UTILISATION MODÈLE: CXA300.1 | CXA600.1 | CXA1200.1 | CXA1800.1 Revendeur agréé KICKER : Date d’achat : Numéro de modèle de l’amplificateur : Numéro de série de l’amplificateur : PERFORMANCES Modèle: CXA300.1 CXA600.1 CXA1200.1 CXA1800.
panneau d’extrémité de l’amplificateur vis hexagonales bride à double fente Câblage: Débranchez la batterie du véhicule pour éviter un court-circuit. Ensuite, raccordez le fil de masse à l’amplificateur. Le fil de masse doit être le plus court possible, de 60 cm (24 po) maximum. Raccordez-le à une partie métallique solide du châssis du véhicule, ne comportant ni peinture ni rouille.
FONCTIONNEMENT MONO impédance minimum de 2 ohms ≤18” (45cm) ≤24” (60cm) 12V Fusible Externe Batterie Mise sous tension à distance (page 23) Masse 12V Masse ≤18” (45cm) Fusible Externe Pour des installations à plusieurs amplificateurs où des répartiteurs sont mis en œuvre, chaque amplificateur doit avoir son propre fusible correctement calibré, ou un coupe-circuit, installé entre l’amplificateur et le répartiteur à moins de 45 cm du répartiteur ou sur le répartiteur lui-même s’il sert de fusible.
Modèle Fil de Masse / Alimentation KICKER Kit de câblage (non inclus) Fusible Externe CXA300.1 1 x 40 Ampères Calibre 8 PK8, ZCK84 CXA600.1 1 x 80 Ampères Calibre 4 PK4, CK44, ZCK44 CXA1200.1 1 x 150 Ampères Calibre 4 PK4, CK44, ZCK44 CXA1800.1 1 x 150 Ampères Calibre 1/0 PKD1, PWB050 UTILISATION Sélection de Mise sous Tension Automatique : La série CX propose deux modes d’allumage automatique différents ; +12 V et décalage en continu.
CXARC TÉLÉCOMMANDE DU NIVEAU DES GRAVES INSTALLATION Installez la télécommande CXARC en surface en utilisant les vis fournies. Vue arrière Câble de la télécommande passe audio, ne le font pas parallèles à câbles d’alimentation. Raccordez le cordon de raccordement de 1/8 pouces [3.5mm] alimentant la télécommande CXARC et l’entrée « Basses à distance » sur l’amplificateur.
Piaulement prolongé de l’alternateur avec le régime du moteur ? Vérifiez l’état du câble RCA (ou d’entrée de haut-parleur) Vérifiez l’acheminement du câble RCA (ou d’entrée de haut-parleur) Vérifiez que l’appareil source est correctement mis à la masse Vérifiez les paramètres de gain et baissez-en la valeur s’ils sont trop élevés. Réponse réduite des graves ? Inversez le branchement d’un haut-parleur de positif à négatif sur le ou les canaux de la stéréo/du caisson des graves.
ELECTRONICS LIMITED WARRANTY When purchased from an Authorized KICKER Dealer, KICKER warrants this product to be free from defects in material and workmanship under normal use for a period of TWO (2) YEARS from date of original purchase with receipt. If this product is identified as “Refurbished” or “B Goods”, the warranty is limited to a period of THREE (3) MONTHS from the date of original purchase. In all cases you must have the original receipt.
INTERNATIONAL WARRANTY Contact your International KICKER dealer or distributor concerning specific procedures for your country’s warranty policies. Our goods come with guarantees that cannot be excluded under the Australian Consumer Law. You are entitled to a replacement or refund for a major failure and for compensation for any other reasonably foreseeable loss or damage.
©2015 Stillwater Designs 2016 CXA Mono Amps Rev F.