KX Amplifiers KX MONO AMPLIFIERS KX400.1 | KX800.1 | KX1200.1 | KX1600.1 | KX2400.1 Owner’s Manual | English Manual del Propietario | Español AMPLIFICADOR DEL LA SERIE KX.1 Benutzerhandbuch | Deutsch MONOVERSTÄRKER DER KX.1-SERIE Manuel d’utilisation | Française AMPLIFICATEUR DE SÉRIE KX.1 2013 KX Mono Amps Rev G.
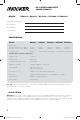
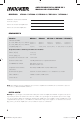
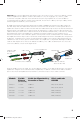
KX.1-SERIES AMPLIFIERS OWNER’S MANUAL MODEL: KX400.1 / KX800.1 / KX1200.1 / KX1600.1 / KX2400.1 Authorized KICKER Dealer: Purchase Date: Model Number: Serial Number: PERFORMANCE Model: KX400.1 KX800.1 KX1200.1 KX1600.1 KX2400.1 RMS Power @ 14.4V, 4Ω mono, 1% THD+N @ 14.4V, 2Ω mono, 1% THD+N 200W x 1 400W x 1 400W x 1 800W x 1 600W x 1 1200W x 1 800W x 1 1600W x 1 Length | in [cm] 8 [20.4] 9 9/16 [24.4] 9 9/16 [24.4] 11 3/16 [28.4] 15 1/2 [39.
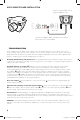
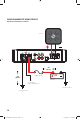
Wiring: Disconnect the vehicle’s battery to avoid an electrical short. Then, connect the ground wire to the amplifier. Make the ground wire short, 24” (60cm) or less, and connect it to a paint-and-corrosion-free, solid, metal area of the vehicle’s chassis. Adding an additional ground wire of this same gauge (or larger) between the battery’s negative post and the vehicle chassis is recommended.
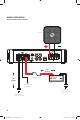
MONO OPERATION minimum impedance of 2 ohms woofer 18” (45cm) external fuse 24” (60cm) 12V battery remote turn-on (see page 5) bare-metal chassis ground bare-metal chassis ground 4 2013 KX Mono Amps Rev G.
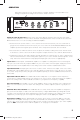
OPERATION Mini-USB for internal use only; do NOT remove or tamper. KICKER is not responsible for any damage to equipment resulting from connections made to this port. Automatic Turn-On Selection: The KX series offers three different automatic turn-on modes that can be selected on the end panel; +12V, DC Offset, and Audio. Using either the DC Offset or Audio mode causes the REM terminal to have +12V out for turning on additional amplifiers.
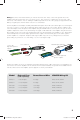
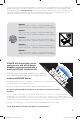
KXRC REMOTE BASS INSTALLATION Surface-mount the KXRC remote using the supplied screws. back view Connect the supplied cable to the KXRC remote and the Remote Bass jack on the amplifier TROUBLESHOOTING If your amplifier does not appear to be working, check the obvious things first such as blown fuses, poor or incorrect wiring connections, incorrect setting of crossover switch and gain controls, etc. There is a Protection (PRT) LED on the side panel of your Kicker KX series amplifier.
If you have more questions about the installation or operation of your new KICKER product, see the Authorized KICKER Dealer where you made your purchase. For more advice on installation, click on the SUPPORT tab on the KICKER homepage, www.kicker.com. Choose the TECHNICAL SUPPORT tab, choose the subject you are interested in, and then download or view the corresponding information. Please E-mail support@kicker.com or call Technical Services (405) 624-8583 for unanswered or specific questions. KX400.
AMPLIFICADOR DE LA SERIE KX.1 MANUAL DEL PROPIETARIO MODELOS: KX400.1 / KX800.1 / KX1200.1 / KX1600.1 / KX2400.1 Distribuidor autorizado de KICKER: Fecha de compra: Número de modelo del amplificador: Número de serie del amplificador: RENDIMIENTO Modelo: KX400.1 Alimentación RMS @ 14.4V, 4 mono, 1% THD+N 200W x 1 @ 14.4V, 2 mono, 1% THD+N 400W x 1 Longitud | pulg. [cm] 8 [20.4] KX800.1 KX1200.1 KX1600.1 KX2400.1 400W x 1 800W x 1 600W x 1 1200W x 1 800W x 1 1600W x 1 9 9/16 [24.
Cableado: Desconecte la batería del vehículo para evitar cortocircuitos. Luego, conecte un cable de conexión a tierra al amplificador. El cable de conexión a tierra debe ser corto, de 24 plg. (60 cm) o menos, y debe ir conectado a un punto sólido del chasis del vehículo en que no haya ni pintura ni corrosión. También se recomienda instalar un cable de conexión a tierra adicional, de este mismo calibre (o de mayor calibre), entre la terminal negativa de la batería y el chasis del auto.
FUNCIONAMIENTO MONOFÓNICO impedancia mínima de 2 ohmios woofer 18” (45cm) fusible externo 24” (60cm) 12V batería encendido a distancia (página 11) conexión a tierra conexión a tierra 10 2013 KX Mono Amps Rev G.
FUNCIONAMIENTO El Mini-USB es únicamente para uso interno: NO lo retire o manipule. KICKER no se responsabiliza por aquel daño al equipo que resultare de las conexiones realizadas en este puerto. Selección de Encendido Automático: El modelo KX ofrece tres modalidades de encendido automático que se pueden seleccionar en el panel de extremo: +12V, compensación de CC y audio. Las modalidades de audio o compensación de CC dan +12V a la terminal REM para encender otros amplificadores.
KXRC CONTROL REMOTO DE BAJOS INSTALACIÓN Para instalar en superficie el control remoto KXRC use los tornillos suministrados. vista desde atrás RESOLUCIÓN DE PROBLEMAS Si su amplificador parece no estar funcionando, revise lo obvio primero: fusibles quemados, conexiones malas o incorrectas, posición incorrecta de los selectores de crossover y amplificación, etc. Su amplificador modelo KX de KICKER cuenta con un LED de protección (PRT) en el panel de alimentación lateral.
PRECAUCIÓN: Cuando haga arrancar el vehículo con cables de arranque conectados a una batería externa, asegúrese de que las conexiones de los cables de arranque sean correctas. Conectar los cables de arranque de manera incorrecta puede quemar los fusibles del amplificador y causar fallas en otros sistemas del vehículo. Si tiene más preguntas sobre la instalación de su nuevo producto KICKER, vaya al distribuidor autorizado de KICKER donde lo compró.
VERSTÄRKER DER KX.1 SERIE BENUTZERHANDBUCH MODELL: KX400.1 / KX800.1 / KX1200.1 / KX1600.1 / KX2400.1 Autorisierter KICKER-Händler: Kaufdatum: Verstärker-Modellnummer: Verstärker-Seriennummer: LEISTUNG Modell: RMS-Leistung @ 14,4V, 4Ω mono, 1% Gesamtklirrfaktor @ 14,4V, 2Ω mono, 1% Gesamtklirrfaktor Länge | Zoll [cm] KX400.1 KX800.1 KX1200.1 KX1600.1 KX2400.
Anschluss: Trennen Sie den Anschluss der Fahrzeugbatterie, um einen Kurzschluss zu vermeiden. Schließen Sie dann das Massekabel an den Verstärker an. Verwenden Sie ein kurzes Erdungskabel (maximal 60 cm) und schließen Sie es an eine lack- oder korrosionsfreie Metallstelle an der Fahrzeugkarosserie an. Es wird auch empfohlen, ein weiteres Massekabel mit gleicher (oder größerer) Drahtstärke zwischen dem negativen Pol der Autobatterie und der Fahrzeugkarosserie zu verwenden.
MONO-BETRIEB Minimalimpedanz von 2 Ohm 18” (45cm) externe Sicherung 24” (60cm) 12V Batterie Ferneinschaltung (Seite 17) Masse Masse 16 2013 KX Mono Amps Rev G.
BETRIEB Mini-USB nur für internen Gebrauch; NICHT entfernen oder manipulieren. KICKER ist nicht verantwortlich für eventuelle Schäden, die durch den Anschluss von Geräten an diese Buchse entstehen. Automatische Einschaltung: Die KX-Serie bietet drei verschiedene automatische Einschaltmethoden, die an der Endplatte gewählt werden können: +12V, DC Offset und Audio. Wenn Sie „DC Offset“ oder „Audio“ verwenden, wird am REM-Terminal +12V für das Einschalten weiterer Verstärker bereit gestellt.
KXRC BASSPEGEL-FERNBEDIENUNG INSTALLATION Montieren Sie den KXRC-Remote-Regler mit den mitgelieferten Schrauben. Rückansicht PROBLEMBEHEBUNG Wenn der Verstärker nicht zu funktionieren scheint, sollten Sie zuerst offensichtliche Faktoren prüfen, wie durchgebrannte Sicherungen, schlechte oder fehlerhafte Verkabelung, inkorrekte Einstellung des CrossoverSchalters und der Verstärkungsregler etc. Am seitlichen Einschaltfeld des Kicker KX-Verstärkers befinden sich eine Schutz-LED (PRT).
Wenn Sie weitere Fragen zur Installation oder zum Betrieb Ihres neuen KICKER-Produkts haben, setzen Sie sich bitte mit Ihrem autorisierten KICKER-Fachhändler in Verbindung. Weitere Installationshinweise finden Sie, indem Sie auf der KICKER-Startseite (www.kicker.com) auf die Registerkarte SUPPORT klicken. Wählen Sie das Register TECHNICAL SUPPORT und dann das gewünschte Thema, um die entsprechenden Informationen anzuzeigen oder herunterzuladen.
AMPLIFICATEUR SÉRIE KX.1 MANUEL D’UTILISATION MODÈLE: KX400.1 / KX800.1 / KX1200.1 / KX1600.1 / KX2400.1 Revendeur agréé KICKER : Date d’achat : Numéro de modèle de l’amplificateur : Numéro de série de l’amplificateur : PERFORMANCES Modèle: KX400.1 KX800.1 KX1200.1 KX1600.1 KX2400.
Câblage: Débranchez la batterie du véhicule pour éviter un court-circuit. Ensuite, raccordez le fil de masse à l’amplificateur. Le fil de masse doit être le plus court possible, de 60 cm (24 po) maximum. Raccordez-le à une partie métallique solide du châssis du véhicule, ne comportant ni peinture ni rouille. Il est recommandé d’ajouter un fil de masse supplémentaire de même calibre (ou de calibre supérieur) entre la borne négative de la batterie et le châssis du véhicule.
FONCTIONNEMENT MONO impédance minimum de 2 ohms 18” (45cm) Fusible Externe 24” (60cm) 12V Batterie Mise sous tension à distance (page 23) Masse Masse 22 2013 KX Mono Amps Rev G.
UTILISATION Mini-USB pour usage interne uniquement ; NE PAS retirer ni modifier. KICKER n’est pas responsable de tout dommage matériel résultant de connexions à ce port. Sélection de Mise sous Tension Automatique : La série KX est dotée de trois modes différents de mise sous tension automatique pouvant être sélectionnés au panneau d’extrémité de l’amplificateur : +12V, DC Offset (décalage c.c.) et Audio.
KXRC TÉLÉCOMMANDE DU NIVEAU DES GRAVES INSTALLATION Installez la télécommande KXRC en surface en utilisant les vis fournies. Vue arrière EN CAS DE DIFFICULTÉ Si votre amplificateur ne marche pas, vérifiez d’abord les possibilités évidentes comme les fusibles sautés, les branchements incorrects ou desserrés, le mauvais réglage des commandes de gain et du commutateur du filtre etc.
ATTENTION : Lorsque vous effectuez une recharge rapide de la batterie du véhicule, assurez-vous que les branchements effectués avec les câbles de recharge rapide sont corrects. Des branchements incorrects peuvent faire sauter les fusibles de l’amplificateur et provoquer des pannes dans d’autres systèmes cruciaux du véhicule. Si vous avez d’autres questions relatives à l’installation ou au fonctionnement de votre nouveau produit KICKER, contactez le revendeur agréé KICKER qui vous l’a vendu.
ELECTRONICS LIMITED WARRANTY When purchased from an Authorized KICKER Dealer, KICKER warrants this product to be free from defects in material and workmanship under normal use for a period of TWO (2) YEARS from date of original purchase with receipt. If this product is identified as “Refurbished” or “B Goods”, the warranty is limited to a period of THREE (3) MONTHS from the date of original purchase. In all cases you must have the original receipt.
INTERNATIONAL WARRANTY Contact your International KICKER dealer or distributor concerning specific procedures for your country’s warranty policies. WARNING: KICKER products are capable of producing sound levels that can permanently damage your hearing! Turning up a system to a level that has audible distortion is more damaging to your ears than listening to an undistorted system at the same volume level.
©2012 Stillwater Designs 2013 KX Mono Amps Rev G.