
Use and Care Manual


Mounting
This CO alarm can be either wall mounted or
placed on a tabletop.
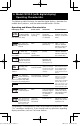
For wall mounting, follow these steps:
1. Using the mounting bracket, place it in the
desired location and mark the location of
the two holes needed on the wall.
2. Insert the two screws provided until the
screw heads are protruding approximately
1/8” from the wall. (If mounting in a
plasterboard or drywall, drill a
3/16” hole in the wall and use the
plastic anchors provided.)
3. Hook the CO alarm over the
screws and onto the keyholes in
the back mounting plate of the
alarm. After the mounting plate
is secured to the wall, slide the
alarm down over the mounting
plate until it snaps into place.
The alarm is now activated!
Your CO alarm may also be placed on a tabletop. If alarm is not wall
mounted, then be sure the alarm is no more than three feet from the
floor to minimize the risk of causing permanent damage to the alarm in
the event that it is knocked to the ground by accident.
The alarm is activated once the mounting bracket/back cover is installed!
Once activated, removing the mounting bracket/back cover will not turn
it off. The unit will remain on for the next ten years.
Important Labels Provided
A label has been provided that has important information on what to do
in case of an alarm. Add the phone number of the emergency service
provider in the space provided. Place the label near to the alarm where it
can be seen in an emergency situation.
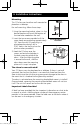
4. Installation Instructions
Wall Mount
Screw Head Distance
from Wall
2537-7201-00_B_V5.indd 132537-7201-00_B_V5.indd 13 2012.8.24 10:05:40 AM2012.8.24 10:05:40 AM