
User Guide
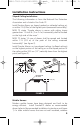

place. Then push the excess wire back into the electrical box
through the hole in the center of the mounting bracket.
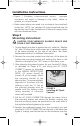
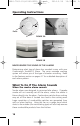
6. Install the alarm on the mounting bracket and rotate the
alarm in the direction of the “ON” arrow on the cover until
the alarm ratchets into place (this ratcheting function allows
for aesthetic alignment). Note: The alarm will mount to the
bracket in 4 positions (every 90 degrees). NOTE: Installing the
alarm on the mounting bracket will automatically activate the
battery backup.
7. Turn on the AC power. The green AC Power On Indicator
should be lit when the alarm is operating from AC power.
8. Two labels are included with your alarm. They have important
information on what to do in case of an alarm. Add the
phone number of your emergency service provider (Fire
Department or 911) in the space provided. Place one label
next to the alarm after it is mounted, and one label near a
fresh air source such as a door or window.
Step 4
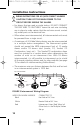
Testing the Alarm
CAUTION: Due to the loudness (85 decibels) of the
alarm, always stand an arms length away from the unit
when testing.
After installation, TEST THE UNIT’S ELECTRONICS by pressing and
releasing the test/reset button. You will hear one beep on the
button push, and will then hear the following sequence of
"beeps":
Three long beeps.
Verbal warning: "FIRE!"
Three long beeps.
Four quick beeps.
Verbal warning: “WARNING! CARBON MONOXIDE”
Four quick beeps
Single beep to reset
Weekly testing is required! If at anytime the alarm does not
perform as described, verify power is connected correctly. Clean
dust and other buildup off the unit. If it still doesn’t operate
properly call the Product Support Line at 1-800-880-6788.
Installation Instructions
14
!
2550-7201-01(i12010SCO)_V4.qxd:_ 2014.2.20 10:24 AM Page 16