
Instructions / Assembly


18 support@solowavedesign.com
Step 2: Rock Wall Assembly
A:Lay2(0349)RockRailsdown,sidebysidewithanglededgesfacingdown.(g.2.1)
B:Place(0606)CEAccessBoardonthebottomofeach(0349)RockRailasshowning.2.1.Makesure(0606)
CEAccessBoardisushtotheoutsideandbottomedgesofeach(0349).Attachusing4(S2)#8x1-1/2”Wood
Screws.
C:7-3/4”downfromthetopofboth(0349)RockRailsplace1(0630)CERockBoard,makingsurethesidesare
ushtotheoutsideedgesofeach(0349)RockRail.Attachusing4(S2)#8x1-1/2”WoodScrews.(g.2.1)
D:Inbetweenthe(0606)CEAccessBoardand(0630)CERockBoardstagger2(0631)and2(0630)CERock
Boardsusing4(S2)#8x1-1/2”WoodScrewsperboard.Placingthemasshowning.2.1,thiswillpreventrocks
fromformingastraightline.Makesuretheboardsareevenlyspacedanddonotexceed2-3/8”betweenboards.
E: Place1rockoneach(0630)and(0631)
CERockBoard(g.2.2)andattachusing1
(PB2)1/4x1-1/4”PanBolt(withlockwasher,
atwasherandbarrelnut)and1(S10)#8x
1”PanScrewperrock.TheScrewmustbein
theholedirectlyunderthePanBolt,itwillstop
therockfromspinning.(g.2.3)
Note: Gaps between boards 2-1/4”,
not to exceed 2-3/8”
Note: The holes
in the rock boards
must orient to the
top of the boards.
7-3/4”
Approx
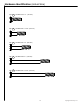
1 x CE Access Board 1 x 6 x 19-3/4 ”
3 x CE Rock Board 1 x 6 x 19-3/4”
2 x CE Rock Board 1 x 6 x 19-3/4”
2 x Rock Rail 2 x 3 x 51”
24 x #8 x 1-1/2” Wood Screw
5 x #8 x 1” Pan Screw
5 x 1/4 x 1-1/4 Pan Bolt
(1/4” lock washer, 3/16” at washer & 1/4” barrel nut)
S2
0349
0631
0630
0606
5 x Rocks (3 green/2 yellow)
S10
Wood Parts
Hardware
Other Parts
PB2
Fig. 2.1
0606
Fig. 2.2
Fig. 2.3
0630
0631
0349
0630
0630
0631
S2
S10
1/4”Lock
Washer
3/16”Flat
Washer
1/4”BarrelNut
Rock
PB2