
Instructions / Assembly


21 support@solowavedesign.com
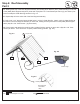
Step 5: Attach Swing End to Swing Beam
A:Place(4919)SWRailBlockinthecentrebetween(1826)FrontBeamand(1825)BackBeamandattachwith
1(H8)1/4x4-1/4”HexBolt(withlockwasher,atwasherandt-nut).(g.5.1&5.2)
B:AttachSwingBeamAssemblytothesideoftheSwingEndAssemblywiththeoverhang(g.5.3&5.4)using
1(G5)5/16x4-1/2”HexBolt(withlockwasher,atwasherandt-nut)inthetopholeofTrianglePlateand1(G8)
5/16x2”HexBolt(with2atwashersandlocknut)inthebottomholeofTrianglePlate.(g.5.4)Makesure
SwingEndAssemblyaresoutatanangle.(g.5.3)
Wood Parts
Hardware
Fig. 5.2
1/4”Flat
Washer
1/4”Lock
Washer
1/4”
T-Nut
H8
4919
G5
5/16”
T-Nut
5/16”Flat
Washer
5/16”Lock
Washer
5/16”Flat
Washer
5/16”
LockNut
G8
1825
Side with
overhang
1 x SW Rail Block 2 x 4 x 5-3/8”
4919
1 x 1/4 x 4-1/4” Hex Bolt (1/4” lock washer, 1/4” at washer, 1/4” t-nut)
1 x 5/16 x 4-1/2” Hex Bolt (5/16” lock washer, 5/16” at washer, 5/16” t-nut)
1 x 5/16 x 2” Hex Bolt (5/16” at washer x2, 5/16” lock nut)
H8
G5
G8
Fig. 5.1
Fig. 5.3
Fig. 5.4
1826
1825
1826
100
o
1825
1826