
Instructions / Assembly


43 support@cedarsummitplay.com
Fig. 17.2
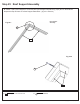
Fig. 17.3
2718
Outside View
1/2”
Hinge Stop
Hardware
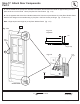
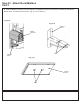
C: On the outside of the (2718) Door Window Panel attach the second Door Handle at approximately the same
place as the one on the inside. Use 2 (S13) #6 x 5/8” Pan Screws. (g. 17.2)
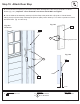
D: On the opposite side of the Door Handle measure 5/8” from the top and bottom of (2718) Door Window Panel
attach 2 Door Hinges on the outside using 3 (S13) # 6 x 5/8” Pan Screws per Hinge. (g. 17.2 and 17.4)
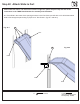
Note: Hinge stops must be tight to (2718) Door Window Panel. (g. 17.3)
8 x #6 x 5/8” Pan Screw
S13
Other Parts
1 x Door Handle
2 x Door Hinge
Top View
S13
Door
Handle
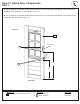
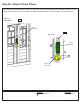
Step 17: Attach Door Components
Part 2
Using 12- #6 x 5/8" Pan Screws, attach hinges to Door & Fort.
SCALE:1:50
A
WEIGHT:
Details
SHEET 1 OF 5
REV.
SIZE
DWG. NO.
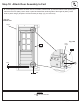
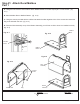
Using 8- #8 x 7/8" Truss Screws, attach jamb mount to lower jamb
5/8”
Fig. 17.4
Door
Hinge
S13