
Instructions / Assembly


54 support@cedarsummitplay.com
A
DWG. NO.
SIZE
SCALE:1:50
WEIGHT:
Details
SHEET 1 OF 2
REV.
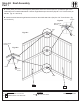
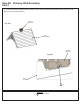
Attach Chimney Wall 9320606 together mating both tabs to slots.
Attach Chimney Top 8047500 to the walls using 4 - #6 -5/8 Pan Screws.
A
DWG. NO.
SIZE
SCALE:1:50
WEIGHT:
Details
SHEET 1 OF 2
REV.
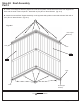
Attach Chimney Wall 9320606 together mating both tabs to slots.
Attach Chimney Top 8047500 to the walls using 4 - #6 -5/8 Pan Screws.
SIZE
WEIGHT:
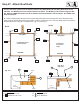
Chimney Prep
SHEET 2 OF 2
REV.
A
DWG. NO.
SCALE:1:50
SIZE
WEIGHT:
Chimney Prep
SHEET 2 OF 2
REV.
A
DWG. NO.
SCALE:1:50
A
DWG. NO.
SIZE
SCALE:1:50
WEIGHT:
Details
SHEET 1 OF 2
REV.
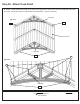
Attach Chimney Wall 9320606 together mating both tabs to slots.
Attach Chimney Top 8047500 to the walls using 4 - #6 -5/8 Pan Screws.
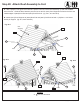
Hardware
4 x #6 x 5/8” Pan Screw
S13
Other Parts
1 x Chimney Wall Set
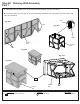
Fig. 26.2
Fig. 26.1
Tabs
Chimney
Wall
S13
Step 26: Chimney Wall Assembly
Part 1
A: Bend the Chimney Wall to form a box and insert tabs into slots. (g. 26.1 and 26.2)
B: Place the (7567) Chimney Top on top of the assembly and attach with 4 (S13) #6 x 5/8” Pan Screws. (g.
26.3, 26.4 and 26.5)
Chimney
Wall
Chimney
Wall
Tabs
Slots
Slots
x 4
Fig. 26.3
Fig. 26.4
Fig. 26.5
Chimney
Wall
Wood Parts
1 x Chimney Top 15/16 x 4-1/4 x 6-1/4”
7567
7567