
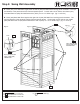
Instructions / Assembly
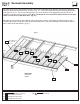
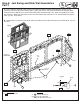


G: On the inside of the assembly attach (041) Narrow Back Panel to (052) Back Wall Panel using 2 Flat Panel
Brackets in the places shown with 4 (S8) #12 x 3/4” Pan Screws per bracket. (g. 6.8 and 6.9)
H: Repeat Step G to attach (042) Narrow Front Panel to (051) Front Wall Panel. (g. 6.8 and 6.9)
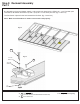
I: At all four corners, both top and bottom, attach 1 Panel Corner Bracket with 4 (S8) #12 x 3/4” Pan Screws per
bracket. Brackets to be ush to the top and bottom of the panels. (g. 6.8 and 6.10)
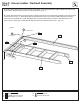
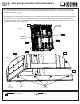
051
042
48 x #12 x 3/4” Pan Screw
Hardware
S8
Other Parts
4 x Flat Panel Bracket
8 x Panel Corner Bracket
Flat Panel
Bracket
x 4 per
bracket
Step 6: Join Swing and Slide Wall Assemblies
Part 4
Front Wall
Back Wall
Inside View
Fig. 6.9
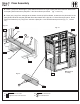
Fig. 6.10
052
041
x 2 per wall
Fig. 6.8
Inside View
S8
Flush
Panel
Corner
Bracket
x 2 per wall
x 4 per
bracket
S8
29 support@cedarsummitplay.com