
Instructions / Assembly


Step 27: Attach Elbow Assembly to Elbow Assembly
Part 1
Hardware
3 x 1/4 x 3/4” Pan Bolt
(1/4” lock nut)
PB1
Other Parts
1 x TNR2 Slide Clamp Ring
Note: When installing Pan Bolts make sure to look at holes so bolts go
through the side with the round recess and the lock nuts go through
the side with the hexagonal recess. Keep all bolts loose until further
step.
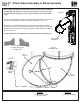
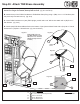
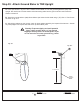
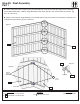
A: Fit a second Elbow Assembly to the rst Elbow Assembly by lining up the
arrows on each assembly. Notice the elbow orientation. (g. 27.1)
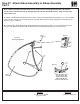
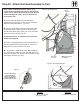
B: Attach 1 TNR2 Slide Clamp Ring to the top of the joined Assemblies
using 3 (PB1) 1/4 x 3/4” Pan Bolts (with lock nut), making sure to match the
arrows up with the end of the clamp ring (where a seam will be) as shown in
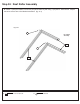
g. 27.2 and 27.3.
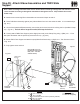
Use Quadrex Driver as a guide pin for each hole before inserting bolt.
DO NOT USE
USE IMAGE
Top Slide Bolt Holes
Elbow
Assembly
Fig. 27.1
Make sure
arrows are
aligned
PB1
Lock
Nut
Do not install bolt
in Clamp Ring ends
until Step 27D
Fig. 27.2
Notice elbow
orientation
Elbow
Assembly
DO NOT USE
USE IMAGE
Fig. 27.3
71 support@cedarsummitplay.com