
Operation Manual

Kindle User’s Guide 27
Chapter 1 Getting Started with Your Kindle
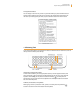
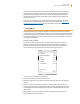
5. Enter the Wi-Fi password (if required). Press the Symbol key to enter numbers or
characters not present on the Kindle keyboard. You can continue to use the keyboard while
the Symbol menu is displayed.
6. Choose “submit.” Kindle connects to the Wi-Fi network.
Once you’re connected to a Wi-Fi network, Kindle automatically connects to it again whenever
that network is in range. If more than one previously used network is in range, your Kindle
automatically connects to the network that was most recently used.
Once your Kindle connects to a Wi-Fi network, that network displays “forget” next to it in
the list of available networks. Selecting “forget” disconnects your Kindle from that Wi-Fi
network and also prevents Kindle from automatically connecting to it in the future. For more
information, see “Forget a Wi-Fi Network.”
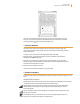
Add a New Wi-Fi Network
If you don’t see the network you want to connect to in the list of detected networks, you can
add it by choosing “enter other Wi-Fi network” at the bottom of the list of detected networks.
To add a new Wi-Fi network, follow these steps:
1. Make sure you are within range of the network you want to add, and that you know the
network name and password (if required).
2. Press the Home button, then press the Menu button.
3. Navigate to “Settings” by moving the 5-way controller down, then press the 5-way controller
to select.
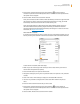
4. Select “view” next to “Wi-Fi Settings” to display a list of detected Wi-Fi networks.
5. Use the 5-way controller to navigate down to “enter other Wi-Fi network” and press to
select.
6. Enter the name of the Wi-Fi network that you want to add.
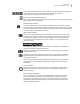
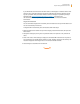
7. Enter the Wi-Fi password (if required). Press the Symbol key
to enter numbers or
characters not present on the Kindle keyboard. You can continue to use the keyboard while
the Symbol menu is displayed.
8. Choose “submit.” Kindle connects to the new Wi-Fi network.