English OUTDOOR COOKERS 2113 ASSEMBLY INSTRUCTIONS AND USE AND CARE MANUAL MODEL/SERIAL # __________ THE INSTRUCTION MANUAL CONTAINS IMPORTANT INFORMATION NECESSARY FOR THE PROPER ASSEMBLY AND SAFE USE OF THE APPLIANCE. READ AND FOLLOW ALL WARNINGS AND INSTRUCTIONS BEFORE ASSEMBLING AND USING THE APPLIANCE. FOLLOW ALL WARNINGS AND INSTRUCTIONS WHEN USING THE APPLIANCE. KEEP THIS MANUAL FOR FUTURE REFERENCE. METAL FUSION, INC. 712 St. George Avenue.
DANGER If you smell gas: 1. Shut off gas to the appliance. 2. Extinguish any open flame. 3. Open front door slowly. Open the door approximately 1-2 inches (2.5-5.0cm) and check for flare-up before opening door completely. Quick introduction of oxygen to the cooking chamber could lead to possible flare-up. 4. If odor continues, keep away from the appliance and immediately call your Fire Department.
READ AND UNDERSTAND BEFORE USING THIS PRODUCT Throughout this manual the words appliance, cooker and smoker will be used interchangeably to refer to the King Kooker® Outdoor Cooker. 1) 2) 3) 4) 5) 6) 7) 8) 9) 10) 11) 12) 13) 14) 15) This is an ATTENDED appliance. Do NOT leave this appliance unattended while the burner is lit or while heating oil, grease, water or cooking food. Monitor the appliance when hot after use [cooking chamber above 100˚ F (38˚C)].
METAL FUSION, INC. LIMITED ONE-YEAR WARRANTY WHAT THIS WARRANTY COVERS This warranty covers all components of this outdoor cooker to be free from defects in materials and workmanship, with the exceptions stated below. HOW LONG COVERAGE LASTS This warranty runs for one year from the date of purchase. Please keep your receipt with this manual for future reference. WHAT IS NOT COVERED This warranty does not cover the following: Incidental and Consequential Damages.
OWNER’S REGISTRATION Dear Customer, Thank you for purchasing a King Kooker®! Please take a moment to fill out your registration form and return it to us. We are always happy to hear suggestions and comments from our customers about our products. Completion of this registration allows us to contact you if the need arises. Please keep your receipt with your instruction manual. It will be necessary as a proof of purchase for us to help you if there is a problem with your cooker.
TAPE HERE FOLD ________________________ ________________________ ________________________ Place Stamp Here METAL FUSION, INC. 712 St.
READ AND UNDERSTAND ALL INSTRUCTIONS BEFORE USING YOUR KING KOOKER® PRODUCT TABLE OF CONTENTS Warnings. . . . . . . . . . . . . . . . . . . . . . . . . . . . . . . . . . . . . . . . . . . . . . . . . . . . . . . . . . . . . . . . . . . . . . . . . . . .2-3 Warranty. . . . . . . . . . . . . . . . . . . . . . . . . . . . . . . . . . . . . . . . . . . . . . . . . . . . . . . . . . . . . . . . . . . . . . . . . . . . . 4 Owners Registration. . . . . . . . . . . . . . . . . . . . . . . . . . . . . . . . . . . .
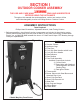
SECTION I OUTDOOR COOKER ASSEMBLY THE USE AND CARE MANUAL MUST BE READ AND UNDERSTOOD BEFORE USING THE APPLIANCE Throughout this manual the words appliance, cooker and smoker will be used interchangeably to refer to the King Kooker® Outdoor Cooker. ASSEMBLY INSTRUCTIONS Tools Required: Phillips Head Screwdriver, Adjustable Wrench, Leak Testing Solution 1. Before assembling, check that all smoker components are included in the shipping carton. Identify these smoker parts from the parts list below.
2. Read assembly instructions, and understand sequence of assembly, before commencing to assemble your smoker. 3. Turn the smoker cabinet upside down. Install the four appliance legs using four black bolts on each leg to the bottom of the smoker cabinet. The two front legs will have holes for connection to the face panel assembly. After all four legs are connected, install the face panel assembly onto the front appliance legs using four black bolts.
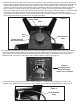
5. Install the burner shroud with steel burner onto the bottom of the smoker using three black bolts as pictured in Figure 3 (bolts must be inserted up through the inside of the smoker cabinet bottom and tightened into the bolt receiver tabs attached to the burner shroud.) Make sure the end of the venturi tube of the burner is placed securely over the end of the valve extending from the backside of the face panel before tightening shroud to base of smoker.
8. Turn smoker right side up. Make sure smoker stands sturdily. 9. Install cool grip side handles on both sides of smoker using eight black bolts (4 on each handle). Bolts should thread towards inside of smoker. See Figure 2, page 9. 10. Locate the cool grip door handle. Remove the two bolts that are pre-attached to the extensions of the handle. Align the two extensions of the cool grip door handle to the two holes provided on the outside of the smoker door.
SECTION II USE AND CARE Throughout this manual the words appliance, cooker and smoker will be used interchangeably to refer to the King Kooker® Outdoor Cooker. LP GAS CYLINDER INFORMATION King Kooker® Outdoor Cookers are manufactured for use with 20lb. (9 kg) LP Gas Cylinders. Important information to remember about LP Gas cylinders include: 1. Always read and follow the cylinder manufacturer’s instructions. 2. Make sure that the gas cylinder is not overfilled.
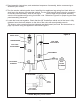
CONNECTION INSTRUCTIONS 1. 2. Check that the control knob on your smoker is set to not allow gas flow (in the off position). Attach the regulator to the cylinder valve by turning the Type 1 fitting clockwise. Hand tighten with the regulator positioned upright. Refer to the assembly diagram for the appliance below. LOW PRESSURE REGULATOR TYPE 1 CONNECTION 20 lb. LP GAS CYLINDER * Model May Vary From Picture 3.
PREPARATION OF SMOKER CABINET 1. Next, prepare the wood chip and water pans for smoking (See below picture for proper pan placement). The water pan should always be installed into the smoker when cooking. The water pan will collect drippings from hot food and extend your burner’s life. Only use the water pan provided with this unit. Top lip of water pan slides in and rests on guides. Wood chip pan sits on rack.
LIGHTING AND OPERATING INSTRUCTIONS 1. THE SMOKER MUST NOT BE LIT UNTIL THE PRECEDING PLACEMENT INSTRUCTIONS HAVE BEEN COMPLETELY FOLLOWED. Check the casting (steel burner) to make sure it is set up as per Figure 3 on page 10 (valve orifice inserted into venturi tube.) Open the main smoker door. Never light the burner with the smoker door closed. Never lean into the smoker chamber while lighting. 2. Make certain that the control knob on the smoker is turned to the OFF position. 3.
SMOKING WITH PROPANE 1. Once the cooker is lit according to the Lighting and Operating Instructions on page 15, set the flame intensity to the desired setting. When smoking with propane, the heat intensity will remain constant. 2. Use the thermometer to monitor the temperature of the smoker. If it falls lower than the desired temperature, turn up the flame intensity by adjusting the control knob on the face plate. Adjust the damper(s) more open to reduce heat or closed to increase heat. 3.
TURNING OFF AND STORING THE SMOKER AFTER USE NEVER MOVE THE SMOKER WHILE IN USE OR STILL HOT{ABOVE 100˚F (38˚C)}. 1. 2. 3. After each use turn OFF the King Kooker® at the control knob first, then at the gas cylinder valve. Check to make sure there is no flame and all valves are OFF. Do not leave the cooker until it has cooled completely. When removing food from the smoker wear protective mitts.
7. Cleaning of the appliance: LP Hose/Regulator and Burner/Lighting Components: If necessary, remove any oil or liquid which has spilled onto the unit during cooking with mild soapy water on a rag and towel dry. Do not immerse the burner unit/components or hose/regulator into water as this will cause rust. Thermometer: Clean after each use with mild soapy water and towel dry. Do not submerge in liquid or put in dishwasher.
SECTION III RECIPES from The King of Outdoor Cooking™ READ AND UNDERSTAND ALL INSTRUCTIONS BEFORE USING THE PRODUCT SMOKING Congratulations on your purchase of your King Kooker Outdoor Propane Smoker. You will be delighted with the variety of dishes you can prepare with your smoker. Use your imagination and you can be a gourmet chef, surprising your friends and family with the wonderful meals you will prepare. We have provided a few recipes below to get you started.
Jalapeno Corn Bread Dressing Ingredients: 2-6 oz. packages of your favorite sweet corn muffin mix & additional ingredients as per the mix instructions. 1 tbsp. chopped canned jalepeno peppers, drained 4 oz. canned chicken broth 4 oz. water 1/2 cup chopped onions 1/4 cup chopped bell pepper 1/4 cup chopped celery 1 tbsp. chopped parsley 1/4 cup cooking oil 4 oz. can sliced mushrooms, drained 1 well beaten egg Mix the corn bread batter as per the instructions on the package and add the jalepenos.
Smoked Split Whole Chicken Ingredients: 4-5 lb Fryer King Kooker Sweet & Spicy Rub Prepare your chicken for cooking by thawing, removing the giblet pack and neck, and rinsing the chicken inside and out. Pat dry with paper towels. Cut the side opposite the breast straight down the middle into the cavity (do not fully sever chicken). Generously rub in King Kooker Sweet & Spicy Rub seasoning. Place the split chicken on rack with the breast up and the rib cage against the rack.
Smoked Leg of Lamb Ingredients: 3-6 lb. Leg of Lamb Garlic Cloves- as desired Olive Oil Dried Rosemary Rinse the lamb and pat dry with a paper towel. Slice small slits and stuff each slit with a garlic clove. Rub the lamb with olive oil. Sprinkle generous amounts of rosemary on the lamb. Cover with aluminum foil. Refrigerate and marinate overnight if desired. Remove from marinating pan and place on a rack for smoking. Smoke according to the Smoking Chart on page 16.
Smoked Butterflied Shrimp Ingredients: Shrimp, 16-20 to the pound King Kooker Cajun Seasoning 1 - Lemon 1 - Lime Prepare your shrimp for cooking by thawing, if frozen, and removing the heads. Cut the shrimp down the back and butterfly. Remove the vein, leaving the shells on. Sprinkle generously with King Kooker Cajun Seasoning. Arrange individually on the rack of the smoker. Squeeze lemon and lime over shrimp before placing into the smoker. Cook for the time recommended in the Smoking Chart on page 16.
SECTION IV READ AND UNDERSTAND ALL INSTRUCTIONS BEFORE USING YOUR KING KOOKER® PRODUCT FREQUENTLY ASKED QUESTIONS AND ANSWERS 1. What is the problem if the smoker takes too long or will not heat cooking chamber to desired temperature? My cooker’s flame appearance is very weak. Answer: If the hose assembly has a Type 1 Connection (black/green knob), it is equipped with a flow limiting device. This device is intended to limit the flow of gas should there be a leak between the regulator and the appliance.
NOTES 25
NOTES 26
NOTES 27
www.kingkooker.com or go to KING GRILLERDINE, KING KOOKER®, the KING KOOKER® logo, THE KING, THE KING OF OUTDOOR COOKING, MR. OUTDOORS, and WATCHDOG OUTDOOR COOKER SERIES are trademarks of Metal Fusion, Inc., 712 St. George Avenue, Jefferson, LA 70121 Rev.