
Installation Guide

10
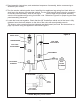
Figure 4
Wood Chip Pan
Rack Placement
Valve
Venturi Tube
Burner Shroud
with Steel Burner
Piezo
Line
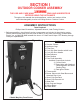
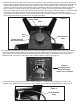
5. Install the burner shroud with steel burner onto the bottom of the smoker using three black bolts as pictured in
Figure 3 (bolts must be inserted up through the inside of the smoker cabinet bottom and tightened into the bolt
receiver tabs attached to the burner shroud.) Make sure the end of the venturi tube of the burner is placed
securely over the end of the valve extending from the backside of the face panel before tightening shroud to
base of smoker. Connect the piezo line (line with plastic covering) to the red ignitor button’s black plastic
body on the back side of the face panel. Test the connection by pushing the red ignitor button on the face panel.
You should see a spark between the end of the exposed piezo wire and burner. If not sparking, check
connections and make sure wire is not touching burner. There should be a distance of 3/16” (4.8mm) between
the end of the electrode tip and the burner for proper operation.
6. Locate the wood chip pan rack. Remove the four nuts pre-attached to the threaded ends of the rack. Install the
wood chip pan rack to the inside of the smoker cabinet by inserting the threaded ends of the wood chip pan
rack through the four holes provided on the bottom of the smoker cabinet. Re-attach the four nuts to the
threaded ends of the rack on the bottom of the smoker cabinet. Tighten. See Figure 4.
Figure 3
Bolt Receiver
Tabs
7. Locate the hose routing ring. Remove the attached bolt/nut. Locate the hole provided on the side of the
appliance leg. Attach the hose routing ring to the appliance leg using the supplied bolt/nut. See Figure 5.
Figure 5
Hose Routing
Ring
(INSIDE VIEW OF SMOKER)