
Installation Guide

9
2. Read assembly instructions, and understand sequence of assembly, before commencing to
assemble your smoker.
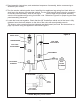
3. Turn the smoker cabinet upside down. Install the four appliance legs using four black bolts on
each leg to the bottom of the smoker cabinet. The two front legs will have holes for connection
to the face panel assembly. After all four legs are connected, install the face panel assembly
onto the front appliance legs using four black bolts. Reference Figure 2 for proper leg and face
panel assembly placement.
4. Locate the hose and regulator. Check that the 3/8” female flare swivel end of the hose is fully
tightened onto the brass adapter on the side of the valve with an adjustable wrench.
The hose to valve conection must be tightened and leak tested (see Leak Test instructions on
page 13) before using the appliance. See below Figure 2.
Figure 2
3/8" Female
Flare Installed
Valve
Orifice
INSIDE VIEW
OF FACE PANEL
FACE PANEL
ASSEMBLY
COOL GRIP
DOOR HANDLE
20 lb.
LP GAS
CYLINDER
COOL GRIP
SIDE HANDLE
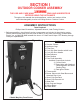
SIDE DAMPER
THERMOMETER
FRONT DOOR
* Model May Vary From Picture