
Product Manual


TOOLS REQUIRED:
TORQUE WRENCH or ADJUSTABLE WRENCH, LEAK TESTING SOLUTION
1. Before assembling, check that all cooker components are included in the shipping carton.
Identify these cooker parts from the assembly drawing. Accessories such as pots may vary
according to model. Check the list of accessories on your cooker box. The following parts are
considered essential and should be included in your package regardless of model number.
Required Parts Lists:
Cooker Stand, Cast Burner(s), LP Hose and Regulator, Thermometer(s)
If any of the above parts are missing, contact Metal Fusion, Inc. at 1-800-783-3885 between the
hours of 7:30 a.m. and 3:30 p.m. CST Monday through Friday for replacements.
2. Read assembly instructions, and understand sequence of assembly, before commencing to
assemble your cooker.
3. If your casting(s) is not pre-installed follow the below CASTING INSTALLATION directions.
9
SECTION I
OUTDOOR COOKER ASSEMBLY
THE USE AND CARE MANUAL MUST BE READ AND UNDERSTOOD
BEFORE USING THE APPLIANCE
Throughout this manual the words appliance, cooker, fryer/boiler, burner and stove will be
used interchangeably to refer to the King Kooker
®
Outdoor Cooker.
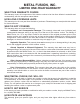
A) Remove top nut from casting bolt. Leave bottom nut attached and tightened (if applicable.)
B) Place the casting bolt through the hole on the flat bar casting support bracket as pictured
below. The venturi tube of the burner should be located underneath the windshroud. For
cookers supplied with a heat plate, place the heat plate onto the casting bolt beneath the
flat bar casting support bracket.
C) Reinstall nut to casting bolt. Tighten. Check to see if casting is pointing straight up and is
sturdy.
Bottom Nut (If Applicable)
Top Nut
Casting Bolt
FRONT VIEW
SIDE VIEW
Venturi Tube
Heat Plate
(If Applicable)
Casting
Bolt
Shroud
Shroud
Flat Bar
Casting Support
Bracket
Heat Plate
(If Applicable)
Casting
Bolt
Flat Bar
Casting Support
Bracket
* Model May Vary From Picture