
User's Manual


19
OPERATING INSTRUCTIONS
STEP 1
Before each use perform the maintenance described in maintenance section (page
20).
STEP2
Read, understand, and follow the information on safety training, preparation, starting
and stopping safety, operational safety, transport safety warning sections of this man-
ual (pages 12 thru 15).
STEP 3
With the rotary tiller positioned on level ground, adjust the tractor lift arms so that
when lifted, the rotor bar remains parallel to the ground.
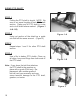
STEP 4
With the rotary tiller attached to the tractor, raise and support the tiller with suitable
blocks. Adjust the skids, located on the sides of the tiller. The adjustment bolts for
both right and left sides should be positioned in the same adjustment hole. This al-
lows the tiller to till the same depth on each side. Adjust the back plate, with regulat-
ing chain, until the desired mulching effect is found.
Note: Never attempt to adjust the rotary tiller while the tractor is
running.
STEP 5
Raise the tiller and remove the blocks. Lower the tiller to the ground.
STEP 6
With the tractor at idle RPM and the tiller lifted off of the ground, engage PTO and
slowly advance throttle to 540 PTO RPM. NOTE: Rotary tiller is designed to run at
540 PTO RPM only.
STEP 7
Select a low gear for the tractor and begin to move forward. Tractor
ground speed is to be controlled by gear selection only and not engine
speed. As the tractor moves forward, slowly lower the tiller down. Allow the
tiller tines to gradually engage the ground.