PO Box 1200 305 Commerce Drive Winfield, Alabama 35594 S-ATV-180-U OPERATION AND PARTS MANUAL www.kingkutter.
TO THE PURCHASER This manual contains valuable information about your new King Kutter ATV Spreader. It has been carefully prepared to give you helpful suggestions for operating, adjusting, servicing and ordering repair parts. Keep this manual in a convenient place for quick and easy reference. Study it carefully. You have purchased a dependable and sturdy spreader, but only by proper care and operation can you expect to receive the service and long life designed and built into it.
It is the purchaser and/or operator’s responsibility to…. z Read and understand the information contained in this manual. z Operate, lubricate, assemble and maintain the equipment in accordance with all instructions and safety procedures in this manual. z Inspect the equipment and replace or repair any parts that are damaged or worn which under continued operation would cause damage, wear to other parts, or cause a safety hazard.
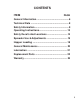
CONTENTS ITEM PAGE General Information ................................................. 6 Technical Data .......................................................... 8 Safety Information .................................................... 9 Operating Instructions........................................... 13 Safety Decal's And Locations ............................... 14 Spreader Use & Adjustments ................................ 15 Hopper Loading .....................................................
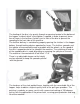
INFORMATION ON THE MACHINE The models in this manual have been designed and made exclusively allowing the distribution of solid, granular fertilizers and seeds in the field. Their use is particularly made for gardening and golf courses but can be used in many more places. These machines are usually used in daylight. If you need to use the spreader at night or poor visibility, you must use the lighting system of your tractor or some other source to operate safely.
The feeding of the disc is by gravity through an opening located at the bottom of the hopper, inside of which a mix/agitator is applied, in order to prevent formation of lumps in the fertilizer. A plate is put in front of the disc to prevent the speading to the front side of the machine. The fertilizer delivery is controled by properly opening the shutters in the hopper bottom, through locking devices operated by levers.
A. REGULATING LEVER B. HOPPER C. DISTRIBUTOR VANES D. SPREADER DISC E. STEEL FRAME F. TIRES G. ROD FOR TONGUE ADJUSTMENT H. TONGUE I.
SAFETY READ AND FOLLOW THE INSTRUCTIONS IN THIS MANUAL AND ESPECIALLY IN THE SAFETY SECTION. FAILURE TO DO SO CAN RESULT IN SERIOUS INJURY OR DEATH. TAKE NOTE! THIS SAFETY ALERT SYMBOL FOUND THROUGHOUT THIS MANUAL IS USED TO CALL YOUR ATTENTION TO INSTRUCTIONS INVOLVING YOUR PERSONAL SAFETY AND THE SAFETY OF OTHERS.
EQUIPMENT SAFETY GUIDELINES z Safety of the operator and by standards is one of the main concerns in designing and developing a spreader. However, every year accidents occur which could have been avoided by a few seconds of thought and a more careful approach to handling equipment. You, the operator, can avoid many accidents by observing the following precautions and insist those working with you, or for you, follow them.
IMPORTANT SAFETY INFORMATION -----------------------------------------------------------------------------------------------------------THE FOLLOWING SAFETY RECOMENDATIONS ARE FOR YOUR SAFETY. THEREFORE IT IS NECESSARY TO READ THEM CAREFULLY, MEMORIZING AND ALWAYS APPLYING THEM. -----------------------------------------------------------------------------------------------------------The present warnings in this manual regard exclusively the allowed uses and reasonably foreseeable dangers.
DANGER! It is forbidden to climb or to transport someone when the spreader is in motion. Do not let anyone inside the hopper for any reason. Keep the spreader clean from foriegn bodies (debris, tools, miscellaneous), as they could damage the operations or the operator. Generally the fertilizers are rather corrosive. For this reason, it is important that no particle of fertilizer stay in the spreader for a long period of time. Clean the hopper and distributor after each use.
OPERATION OF THE MACHINE Make a check of the spreader before switching it on. Start to work only if spreader is in perfect condition. Before using the spreader please be sure that all safety devices are correctly in place and in good working condition; in case of breakdowns or damages to the guards, please replace them immediately. ATTENTION! During work, please be sure there is no person or animals within 50 meters.
SAFETY SETTINGS ATTENTION! Be sure that the safety labels are readable. Clean them up using a cloth, water and soap. Replace damaged labels placing them in the right position. The safety signs on the machine supply the most improtant indications: their observance helps your safeness. 1. ATTENTION! Before doing any work or repair on the spreader, stop the engine of the pulling vehicle, remove the key, put on the parking brake and read the operator’s manual carefully. 2.
PULL TYPE SPREADER USE ATTENTION! - Before use, please check that zerks are adequately greased (see page 21). ATTENTION! - During the use of the spreader, please be sure there are not any persons or animals within 50 meters (165 Ft.). If someone comes up please stop immediately. Recommendations for correct distribution - Please always test lbs/acre you want to spread before starting to work. - Use a fertilizer or seeds in perfect condition: a humid fertilizer cannot be spread uniformly and correctly.
Adjustments It is not possible to have an exact spreading chart for equipment that makes use of the centrifugal force principle, the distributed quantity depends on the speed , on the radius of distribution, on the quality and humidity of the fertilizer or seed and roughness of the land. The fertilizer must always be stored and conserved adequately, so as to keep it’s physical characteristics unchanged.
HOW TO ADJUST THE SPREADING The material spreading is regulated through the regulation lever that moves the opening section on the bottom of the hopper. In order to carry out the regulation, after having consulted the spreading table, acording to the type of material to spread and to the speed of pulling vehicle, it is necessary to move the lever “A” along the graduated scale “E” and locking it in the chosen position with pin “D”. In order to spread from both sides (ref.
HOPPER LOADING It is advised not to load the hopper manually but by using a lift or suitable mechanical means. ATTENTION! The hopper must be loaded only after having hitched the spreader to a pull vehicle. Do not drive for very long distances with a full load and do not put full bags on the material in the hopper during transport to the field or during working, in order not to overload the capacity of the machine and compress the material.
Various ways exist to spread the material in the field. One of the simplest methods is, as follows: Position spreader at the beginng of the field you intend to fertilize or seed, to a distance (D/2) that is the half of the working width that is used (point 1); Driving in the field distributing the fertilizer or seed on all the perimeter; Stop at one distance (D) from the point 1, equivalent to the set working width (point 2); Beginning the spreading proceeding in line, straight to point 3.
SPREADING MISTAKES Mistakes of use - Drive speed; - incorrect spreading width; - The spreading disc is not in a horizontal position compared to the land; - Drive speed is different to those suggested by the spreading tables, or speed is not suitable for that particular type of material; - Drive mistakes, (lack of overlap of the spreading surfaces); - Lack of cleaning of distributing vanes and disc. Mistakes due to fertilizer - Fertilizer of poor quality.
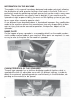
LUBRICATION Before every use and after every 8 hours of use, grease the spreader. Be sure that the grease zerks are clean from dirt and debris before injecting with grease. Lubricate with (with a grade II type tube grease) at the points shown in the picture, both sides of axle. The unit comes with grease in the gearbox, there is a plug (see picture on left) on the bottom of the gearbox that a flathead screwdriver will fit if you ever need to add grease.
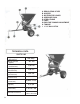
S-ATV-180 PARTS Ref. No.
S-ATV-180 PARTS Ref. No. Part Name 1 2 3 4 5 6 7 8 Gear Box Tire 16 x 6.
1. Limited Warranty. King Kutter, Inc. (“King Kutter”), P.O. Box 1200, Winfield, Alabama 35594, warrants to the original retail purchaser (“Purchaser”) that the product that is the subject of this sale is free from defects in material and workmanship at the time of sale. Under this warranty, King Kutter will repair the defective product free of charge to the Purchaser, with either new or used and reconditioned replacement parts.