
User's Manual


8
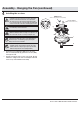
Assembly - Hanging the Fan
Attaching the fan to the electrical
box
Hanging the fan
Ƒ Loosen the two mounting screws (II) in the outlet box.
Ƒ Pass the 120-Volt supply wires through the center hole in the
mounting bracket (A).
Ƒ Slide the mounting bracket (A) on to the mounting screws (II) and
center the mounting bracket (A) in relation to the outlet box. If
necessary, use leveling washers (not included) between the slide-on
mounting bracket (A) and the outlet box. The at side of the slide-on
mounting bracket (A) should face toward the outlet box, as shown.
Ƒ Securely tighten the two mounting screws (II).
Ƒ Carefully lift the fan-motor assembly (E) up to the slide-on
mounting bracket (A).
Ƒ Insert the ball portion of the ball/downrod assembly into
the socket of the slide-on mounting bracket (A).
Ƒ Turn the ball/downrod assembly clockwise until it is seated
with the tab of the slide-on mounting bracket (A) aligned
with the slot in the ball.
1
2
>(9505.! To reduce the risk of re, electric shock or personal
injury, mount to outlet box marked “Acceptable for fan support
of 35 lbs. 15.9 kg) or less”, and use screws provided with the
outlet box.
A
II
II
56;,! The mounting bracket (A) is designed to slide into place
on an outlet box with the outlet box screws (II) installed.
A
B
E
C
D
3
56;,! The frequencies on your receiver and hand unit have been preset
at the factory. Before installing the receiver, make sure the dip switches
on the receiver and hand unit are set to the same frequency. The dip
switches on the hand unit are located inside the battery compartment.
56;,! The switch marked “O/D” controls the dimming function of
the lights. If using non-dimmable bulbs, use a ballpoint pen or small
screwdriver to set the switch to “O” to disable the dimming function. If
using dimmable bulbs, set the switch to “D” to enable the dimming
function. The remote is preset at the factory to the “D” position.
Setting the code on the remote control and receiver
Ƒ Remove the remote control (K) battery cover by pressing rmly on
the arrow and sliding the cover off.
Ƒ Slide the dip switches to your choice of either up or down. The
factory setting is up.
Ƒ Slide the dip switches (ZZ) on the receiver (J) to the same
position as set on the remote control (K).
Ƒ Install two 1.5V AAA batteries (included).
Ƒ Replace the battery cover on the remote control (K).
O
O
O
K
J
ZZ
O
O O
O
O
B
O