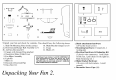
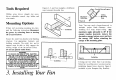
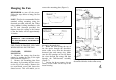
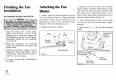
Hanging the Fan remove the mounting plate (Figure 6). REMEMBER to turn off the power. Follow the steps below to hang your fan properly. NOTE: This fan is recommended for the standard ceiling mounting using the downrod provided with this fan. When using standard ceiling installation with an 12 inch downrod provided, the distance from the ceiling to the bottom of the fan blades will be approximately 18 inches.
of the motor housing (Figure 7). Carefully insert the hanger pin through the holes in the collar and downrod. Be careful not to jam the pin against the wiring inside the downrod. Insert the locking pin through the hole near the end of the hanger pin until it snaps into its locked position, as noted in the circle inset of Figure 7. 7. Re-tighten the set screws on the collar on the top of the motor housing. 8.
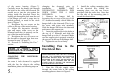
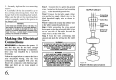
Attaching the Light Kit/Glass Bowl CAUTION- To reduce the risk of electrical shock, disconnect the electrical supply circuit to the fan before installing light kit. THE GLASS IS FRAGILE, USE CARE WHEN INSTALLING THE LIGHT KIT AND THE GLASS SHADE. 1. Remove one of three mounting screws and lockwashers in the light kit plate and loosen the other two mounting screws and lockwashers. 2.