
Use and Care Manual


1. Serious injury or death could result from electric shock.
Make sure electrical power supply circuit coming to heater
is disconnected at main disconnect or service panel before
servicing this heater. Allow heater to cool before cleaning to
prevent a possible burn
2. Use care when cleaning element fi ns to avoid damaging
fi ns. Note also that fi ns are sharp and may cause cuts so
avoid contact.
KING ELECTRICAL MFG. CO. · 9131 10TH AVENUE SOUTH · SEATTLE, WA 98108 · TEL: 206.762.0400 · FAX: 206.763.7738
MAINTENANCE INSTRUCTIONS
Painting
If it becomes necessary to repaint heater, use only a quality
enamel paint suitable for metal surfaces following the instruc-
tions provided with the paint. DO NOT paint the heating ele-
ment or safety limit capillary tube. Repaint only the exterior
of the cabinet.
WARRANTY
King Electrical Mfg Company will repair or replace, without charge to the original owner, any baseboard heater found to be
defective or malfunctioning within 1 year (K Series) or 5 years (CB Series) of installation. If the product becomes defective,
contact King at 206-762-0400 for instructions on how to replace heater. Do not return the heater to the store. All returned goods
require a Returned Goods Authorization. This warranty requires the owner or his agent install the heater in accordance with
these instructions, the National Electrical Code and any other applicable heating or electrical codes. It further requires that
reasonable and necessary maintenance be performed on the unit. The company is not liable for abuse or misuse of product.
SYMPTOM PROBLEM SOLUTION
Breaker trips
1. Short circuit 1. Find source of short. Trace heater circuit and verify the heater is wired properly.
2. Overloaded circuit 2. Reduce wattage in circuit. Refer to circuit sizing table for maximum wattage
3. Improper voltage 3. Verify the heater voltage matches the supply voltage.
Heater not working
1. No power
1. Turn breaker on. Turn thermostat on. Check that the breaker is positioned properly on panel bus-bar. A 2-Pole breaker
must be connected to both bus-bars (A&B phase) to produce 240V power.
2. Loose connections 2. Tighten wire connections.
3. Defective limit 3. By-pass the limit to test. If heater works, replace the limit.
Heater Smokes
1. Oil on element
1. It is normal for the element to burn off some light fi nishing oil used in the manufacturing process when fi rst energized.
Open windows and allow room to vent until it stops, usually within a few minutes.
2. Needs cleaning 2. Remove any dust or dirt accumulation.
Room Temperature
does not match
thermostat setting
1. Thermostat affected by
another heat source
1. Sunlight or other heat sources can affect the thermostat. Move the thermostat to another location or remove the heat
source.
2. Improper calibration 2. Remove cover and adjust calibration screw.
Room Temperature
swings from too hot
to too cold
1. Defective or low quality
thermostat
1. Replace with a better quality thermostat. Anticipated thermostats are fairly accurate; an electronic thermostat is the best.
Your heater will give you years of service and comfort with only
minimum care. To assure effi cient operation follow the simple
instructions below.
1. The user can perform some basic cleaning of the heater. All
other servicing is to be done by qualifi ed service personnel.
2. Because of the convection heating principle which depends
upon a circulation of air through the fi nned element, dust will
collect between the fi ns. The heater should be cleaned regu-
larly for maximum effi ciency.
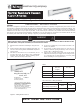
3. To clean heating element fi ns, fi rst remove both wiring com-
partment covers and the front cover. Using a vacuum cleaner
or compressed air, remove the dust and lint from the alumi-
num heating element fi ns while being careful not to damage
the fi ns.
4. The painted heater cabinet may be cleaned using a slightly
damp cloth. Do not use abrasive cleaners or waxes as these may
damage the fi nish or leave a residue that will discolor.
5. Replace front cover (making sure it is latched in place at
each element support bracket and at each end) and two wiring
compartment covers (using the two screws provided), restore
power and check heater for proper operation.
TROUBLESHOOTING CHART FOR BASEBOARD HEATERS
1. This heater must be properly installed in accordance with
the National Electrical Codes (NEC) & local electrical codes be-
fore it is used.
2. After the baseboard system has been completely installed,
all thermostats should be turned to LOW or NO HEAT. Turn on
breakers, wait 3 to 5 minutes and check to see that none of
the heaters are operating. If operating, disconnect power and
check wiring. If none are operating then turn thermostats to
highest position and wait 3 to 5 minutes. Check to see that all
heater(s) are operating. Should any not be operating, discon-
nect power and check wiring.
3. Allow entire system to operate steadily for 1/2 hour. This
should remove oily residue from manufacturing. (Some smoking
may occur).
4. Select the setting for comfort on all thermostats.
5. A safety limit control is provided to turn off the heater au-
tomatically if it is blocked or otherwise overheats due to an
abnormal condition-see Figures 4 and 5. DO NOT bypass or re-
move this safety device from the electrical circuit-see Warning
11 on page 2. During normal use, this safety control should not
operate. If you fi nd that this control is operating, make sure the
heater is not being blocked. If it continues to cycle the heater
off, disconnect power to heater and have it checked and re-
paired by a qualifi ed electrician.
OPERATING INSTRUCTIONS
WARNING