
Manual

(714) 891-0008 • www.kinginstrumentco.com
When it comes to ow...we’re instrumental.
1
7710 Series
Installation Instructions
Flow Meter liMited warranty
Meters are warranted against defects in materials and workmanship to the original user for a period of
thirteen (13) months from the date of factory shipment, provided the meter is installed, operated and main-
tained in accordance with King Instrument Company’s instructions and recommendations.
This warranty does not apply if failure is caused or contributed to by any of the following: improper han-
dling, improper storage, abuse, unsuitable application of the product, lack of reasonable and necessary
maintenance, use exceeding suggested pressure and temperature maximums, improper packaging for
return, or repairs made or attempted to be made by anyone other than King Instrument Company, Inc.
KING INSTRUMENT COMPANY, INC. MAKES NO WARRANTY AS TO THE FITNESS OF ITS PRODUCTS FOR SPE-
CIFIC APPLICATIONS.
This warranty is valid for the original end-user only and does not apply to products that have been dam-
aged or modied. This warranty is non-transferrable and is limited to replacement or repair. The liability of
King Instrument Company arising out of its supply of the products, or their use, shall not in any case exceed
the cost of correcting defects in the products as set forth above.
THIS WARRANTY IS A LIMITED WARRANTY AND SHALL BE IN LIEU OF ANY OTHER WARRANTIES, EXPRESSED
OR IMPLIED, INCLUDING BUT NOT LIMITED TO ANY IMPLIED WARRANTY OR MERCHANTABILITY OR FITNESS
FOR A PARTICULAR PURPOSE. THERE ARE NO OTHER WARRANTIES WHICH EXIST BEYOND THE DESCRIPTION
OR FACE HEREOF.
IN NO EVENT SHALL KING INSTRUMENT COMPANY BE LIABLE FOR LOSS OF PROFITS, INDIRECT, CONSE-
QUENTIAL OR INCIDENTAL DAMAGES.
Products should be returned, prepaid, to King Instrument Company, Inc. with proof of purchase. Call factory
for Return Merchandise Authorization (RMA) number and return instructions.
this is iMportant inForMation.
read it careFully beFore beginning work.
1) Inspect meter for damage that may have occurred during shipping.
Report any damage to the container to the freight carrier immediately.
2) Make sure your pressure, temperature, uid and other requirements
are compatible with the meter and components (including o-rings).
3) Select a suitable location for installation to prevent excess stress on
the meter which may result from:
a) Misaligned pipe.
b) The weight of related plumbing.
c) “Water Hammer” which is most likely to occur when ow is
suddenly stopped as with quick closing solenoid operated
valves. (If necessary, a surge chamber should be installed. This
will also be useful in pressure start-up situations.)
d) Thermal expansion of liquid in a stagnated or valve isolated
system.
e) Instantaneous pressurization which will stress the meter and
could result in tube failure.
note: In closed thermal transfer or cooling systems, install the meter
in the cool side of the line to minimize meter expansion and contrac-
tion and possible uid leaks at the threaded connections.
4) Handle the meter carefully during installation.
a) Use an appropriate amount of teon tape on external pipe
threads before making connections. Do not use paste or stick
type thread sealing products.
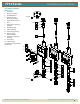
5) Install the meter vertically with the inlet port at the bottom.
6) Meters with stainless steel ttings will support several feet of pipe
as long as signicant vibration or stress resulting from misaligned pipe
are not factors.
additionally:
• 7710 Series meters are designed for vertical installation only. (Inlet
at bottom, Outlet at top)
• Do not remove or adjust the screws on the side of the indicator
housing. These screws were positioned during factory calibration
and represent the zero adjustment. If the pointer is set on zero,
proceed with installation. If the pointer is not set at zero, follow
these steps:
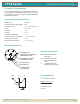
1) Remove front cover with gasket from indicator housing.
2) Loosen set screw at the base of the pointer hub.
3) Reposition pointer to zero line.
4) Tighten set screw with a 1/16” allen wrench by holding the
pointer hub and gently tightening the set screws.
5) Replace front cover with gasket on indicator housing.
CAUTION: Zero is factory set when meter is calibrated. Do not
loosen screws that fasten indicator housing to meter body. If indica-
tor housing is moved, the meter will need to be calibrated.