Built-in oven OK 201 Instruction booklet
Important Safety Information It is of the utmost importance that this booklet be kept with the appliance, so that it can be consulted for any reason.Should the appliance be sold or transferred to another owner, please ensure that the booklet goes with it, so that the new user is able to become familiar with its operation and the relevant warnings. These warnings have been included for your safety and for that of others.
Contents Instructions for the User Instructions for the Installer Important Safety Information 2 Instructions for the installer 20 Guide to Use the instructions 3 Building in 20 Before the First Use 4 Electrical connection 22 Description of the Appliance 4 Operation 5 Electronic Programmer 6 Grease Filter 9 Using the Oven 10 The Conventional Oven 11 Using the Fan Oven 13 Defrosting 15 Grilling 16 Cooking Chart - Grilling 17 Cleaning and maintenance 18 Service and spare p
Before the First Use Remove all packaging, both inside and outside the oven, before using the appliance. Before first use, the oven should be heated without food. During this time, an unpleasant odour may be emitted. This is quite normal. Proceed as follows: 1. Switch the oven function control knob to fan cooking . F 2. Set the thermostat control knob to MAX. 3. Open a window for ventilation. 4. Allow the oven to run empty for approximately 45 minutes.
Operation Oven function control knob 0 The oven function control knob (Fig. 1) can be set on the following symbols and functions: Oven light Upper and lower heating elements Upper heating element Lower heating element Simple grill element Fig. 1 FO 2602 Double grill element Fan grill element 50 Fan cooking Defrosting MAX 100 Thermostat control knob Turn the thermostat control knob (Fig. 2) clockwise to select temperatures between 50°C and 250°C (MAX). The Safety Thermostat 200 Fig.
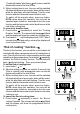
Electronic Programmer 1. Push button for selecting a function 4 5 6 7 8 2. Decreasing control button 3. Increasing control button 4. Display 5. Cooking Duration pilot lamp 6. End of cooking pilot lamp 7. Minute minder pilot lamp Fig. 3 2 1 3 FO 2571 8. Time of day pilot lamp The oven will work only if the time of day has been set. Moreover, the oven can also be operated without any programme.
"Cooking Duration" pilot lamp will come on and the display will revert to the time of day. 3. When cooking time is over, the oven will be switched off automatically and an acoustic alarm will be heard, while the pilot lamp will start flashing. Turn the oven function and the thermostat control knob to zero. To switch off the acoustic alarm, press any button.
2. Press button until the display shows the current time of day. The programmer will beep and the pilot lamp will go out. Cooking duration and End of combined cooking time The functions Cooking duration e End of cooking time can be used simultaneously to set the oven to switch on and off automatically at a later time. 1. With the Cooking duration function (carry out the cooking duration setting as described in the relevant chapter) set the duration time.
How to switch off the display 1. Press two or three programmer push buttons simoultaneously and keep them pressed for about 5 seconds. The display will switch off. 2. To switch on the display, press any button. The display can be switched off only if no other functions have been set. Grease Filter When cooking meat, the grease filter must be fitted over the oven fan by clipping it over the vents in the back panel. This will prevent a built-up of fat on the fan impellor.
Using the Oven Shelf supports The oven has four shelf levels. The shelf positions are counted from the bottom of the oven as shown in figure 6. Shelf levels 1, 2 and 4 are fitted with telescopic shelf supports, to allow en easier operation when inserting or removing the shelves. Pull the right and left hand telescopic shelf supports completely out, as shown in figure 7. Place the shelf or the grill pan on the telescopic shelf supports, then gently push them all inside the oven (Fig. 7).
Cookware Use any oven proof cookware which will withstand temperatures of 250°C. Baking trays, oven dishes, etc. should not be placed directly against the grid covering the fan at the back of the oven, or placed on the oven base. Do not use baking trays larger than 30 cm x 35 cm (12 in x 14 in) as they will restrict the circulation of heat and may affect performance.
Hints and Tips - - The middle shelf position allows for the best heat distribution. To increase base browning simply lower the shelf position. To increase top browning, raise the shelf position. The material and finish of the baking trays and dishes used will affect base browning. Enamelware, dark, heavy or non-stick utensils increase base browning, while oven glassware, shiny - - aluminium or polished steel trays reflect the heat away and give less base browning.
Using the Fan Oven The air inside the oven is heated by the How to Use the Fan Oven F element around the fan situated behind the 1. Turn the oven function control knob to back panel. The fan circulates hot air to maintain an even temperature inside the oven. The advantages of cooking with this function are: l Faster Preheating As the fan oven quickly reaches temperature, it is not usually necessary to preheat the oven although you may find that you need to allow an extra 5-7 minutes on cooking times.
rature of 190-200°C and allow 20-40 minutes (depending on the quantity of food in the oven). The use of too high temperatures can cause uneven browning. Check with the recommendations for oven temperatures given in the cooking charts, but be prepared to adjust the temperature by 10°C if necessary. Remember to reduce temperatures by about 20-25°C for your own conventional recipes. - Cooking Chart - Fan Oven This chart is intended as a guide only.
When roasting, ensure the meat is cooked thoroughly, use a meat thermometer if preferred to check the centre temperature has reached the required temperature (see table below). MEAT TEMPERATURES Beef Rare - 60°C Medium - 70°C Well Done - 80°C Pork Well Done - 80°C Lamb Medium - 70°C Well Done - 80°C Defrosting The oven fan operates without heat and circulates the air, at room temperature, inside the oven. This increases the speed of defrosting.
Grilling Grilling must be carried out with the oven door closed. F How to Use the Grill 1. Turn the oven control function knob on . 2. Turn the thermostat control knob on the required temperature. 3. Adjust the grid and grill pan runner position to allow for different thicknesses of food. Position the food close to the element for faster cooking and further away for more gentle cooking. Preheat the grill on a full setting for a few minutes before sealing steaks or toasting.
Cooking Chart - Grilling Hints and Tips Prepare foods in the same way as for conventional grilling. Brush lean meats and fish lightly with little oil or butter to keep them moist during cooking. A general guide to cooking times is given below but these times may vary slightly depending on the thickness and quantity of food being cooked.
Cleaning and maintenance Before cleaning, always disconnect the applliance and allow it oven to cool down. When using spray cleaning products, be careful not to spread them on the heating elements or on the thermostat sensor. Never use harsh abrasives, steel wool or cleaners with bleach, as they could damage the enamel and the oven door glass. The Oven Cavity The enamelled oven cavity is best cleaned whilst the oven is still warm.
The Oven Door Gasket Replacing the Oven Light The correct operation of the oven is ensured by a gasket placed round the edge of the oven cavity. Periodically check the condition of this gasket. If necessary, clean it without using abrasive cleaning products. If the gasket shows to be damaged, call you local Service Centre. Do not use the oven until it has been repaired. Ensure the electricity supply is switched off before carrying out this operation.
Instructions for the installer Technical Data Oven elements Recess dimensions: Bottom heating element Top heating element Full Oven (Top+Bottom) Grill heating elements simple double Fan Oven heating element Oven lamp Convection fan Cooling fan Maximum power rating Voltage tension (50 Hz) Height in coloumn cm 59,1 undertop cm 58,0 Width cm 55,0 Depth cm 56.
example the appliance is positioned at the beginning or at the end of the cabinet composition) must be fixed in such a way that they cannot be removed without the aid of tools. Fitting and assembly - Insert the appliance into the cabinet space; - open the oven door and fix the body of the oven to the cabinet using four wood screws of a suitable size for the holes already made around the oven (see figs 15 and 16).
Electrical connection Before the appliance is connected: 1) check that the main fuse and the domestic installation can support the load; 2) check that the power supply is properly earthed in compliance with the current rules; 3) check the double pole switch used for the electrical connection can be easily reached with the appliance built in the forniture unit. The appliance is supplied with connection cable provided with plug. The plug has to be fitted into a proper socket.
The Guarantee Your new appliance is covered by a guarantee. You will find the Guarantee certificate attached to this booklet. If the certificate is not evident, contact your supplier quoting the date of purchase, the model and the serial number of the appliance, which are printed on the identification plate of the appliance.