
Users Manual


1) Turn on the receiver by pressing the switch, the OLED show "ON" and then enter into
the operation interface.
2) Setting group / frequency /channel ---
A. Press SW button slightly to choose a channel from the four ones, the other three
channels will get dark at the same time.
B. Press Menu button to see it display "Group", Turn the Menu control clockwise/
anticlockwise to adjust the groups.
C. Press the Menu button again to see it display "CH", Turn the Menu control
clockwise/anticlockwise to adjust the channels.
D. When group display letter "U", Press Menu control again to see the top three
frequencies. Turn the Menu control clockwise/anticlockwise to adjust frequency
under 1Mhz stepping. To do the same operation to see the bottom three frequency ,
then turn the Menu control clockwise/anticlockwise to adjust frequency under
25Khz stepping
3) IR SYNC/ACT---Put the handheld/bodypack transmitter close to receiver within/meter.
Press"Sync" button slightly starting "IR Sync" by facing the IR Launcher from
transmitter to IR Window on the receiver untill it show "Success".
4) Auto Scan--- Press "Scan" button slightly to find a clean frequency until it show
"Scan complete".If there's no available frequency, it display "Scan fail" You
need to choose a frequency in manually in this condition. It will come back to
operation interface when "Auto Scan" is complete.
How to operate
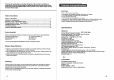
IR
14)Power switch
15) IR window: It receive the IR signal
here from the receiver to complete
the IR matching for microphone
and receiver.
16)LCD Display: Display frequency
infromation
17)Power Switch: Turnit on/off by
pushing
18)Audio Input Interface.
19)LED Indicator: Light when turn
on. Flashes when low power.
20)Battery Store.
21)Antenna