Owner's Manual Original Instructions Dehumidifier Thank you for choosing our product. Please read this Owner’s Manual carefully before operation and retain it for future reference. If you have lost the Owner's Manual, please contact the local agent or visit www.gree.com or send an email to global@gree.com.cn for the electronic version.
Actual product may be different from above graphics, please refer to actual product.
&RQWHQW 2SHUDWLRQ 1RWLFHV Ɣ 2SHUDWLRQ $UHD Ɣ 6DIHW\ 3UHFDXWLRQV Ɣ 3DUWV 1DPH Ɣ &KHFN %HIRUH 2SHUDWLRQ 2SHUDWLRQ ,QVWUXFWLRQV Ɣ 2SHUDWLRQ 0HWKRG
Explanation of Symbols DANGER Indicates a hazardous situation that, if not avoided, will result in death or serious injury. WARNING Indicates a hazardous situation that, if not avoided, could result in death or serious injury. CAUTION Indicates a hazardous situation that, if not avoided, may result in minor or moderate injury. NOTICE Indicates important but not hazard-related information, used to indicate risk of property damage.
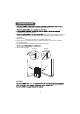
Operation Area not be used for commercial or industrial applications. enclosed area, such as a closet. temperature will not below 5°C(41°F) or above 32°C(90°F). The suggested range of relative humidity is between 30% and 90%. : Allow at least 18inchs of air space on all sides of the unit. : Close all doors, windows and other outside openings of the room to improve the working effect. : Please keep the air inlet/outlet clean and not blocked. : Avoid direct sunlight.
Safety Precautions Warning : This appliance can be used by children aged from 8 years and above and persons with reduced physical, sensory or mental capabilities or lack of experience and knowledge if they have been given supervision or instruction concerning use of the appliance in a safe way and understand the hazards involved. : Children and disabled people are not allowed to use the dehumidifier without supervision. : Children shall not play with the appliance.
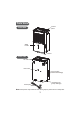
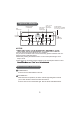
Parts Name Control panel Front Side Water bucket Castors Back Side Air outlet Rear case Cover plate (continuous drainage) Prainage joint (pump drainage) Power plug Note:Actual product may be different from above graphics, please refer to actual product.
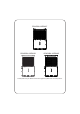
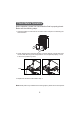
Check Before Operation Before operation, please first check whether float is properly placed. Below are the checking steps: 1. Hold the handles on both sides of the water bucket and pull it out following the arrow direction. 2. Check whether float in the water bucket is properly placed. It might have beeQ moved a little after long-time transportation. If it's not placed properly, move it to the correct position by hand. Float Correct Position Wrong Position 3.
Operation Method Nonstop operation on indicator light Filter indicator light High, Medium and Low fan indicator lights 4 hour or 2 hour delay on/off indicator lights )XOO light indicates bucket needs to be emptied or is not in place in the unit Power On indicator light Pump mode indicator lights *Actual product may be different from above graphics, please refer to actual product. NOTICE: : : Do not remove the bucket while unit is in operation.
3 -/+ Button The humidity level can be set within a range of 80% RH (Relative Humidity) . to 35% RH (Relative Humidity) in 5% reduce or at continuous operation. NOTE: If Nonstop is selected, the dehumidifier will operate continuously at its maximum dehumidification settings if attached to a hose to drain or until the bucket is full.For drier air, press the - pad and set to a lower percent value (%). For damper air, press the + pad and set to a higher percent value (%).
2WKHU ,QVWUXFWLRQV )XOO /LJKW *ORZV ZKHQ WKH EXFNHW LV UHDG\ WR EH HPSWLHG RU ZKHQ WKH EXFNHW LV UHPRYHG RU QRW UHSODFHG LQ WKH SURSHU SRVLWLRQ $ODUP ,I WKH EXFNHW LV IXOO RU PLVVLQJ IRU PRUH WKDQ WKUHH PLQXWHV DQ DODUP ZLOO VRXQG IRU DERXW VHFRQGV WR UHPLQG \RX WR HPSW\ DQG UHSODFH WKH EXFNHW $XWR 6KXW 2II 7KH :DWHU /HYHO &RQWURO 6ZLWFK VKXWV RII WKH GHKXPLGLILHU ZKHQ WKH EXFNHW LV IXOO RU ZKHQ WKH EXFNHW LV UHPRYHG RU QRW UHSODFHG LQ WKH SURSHU SRVLWLRQ $XWR 'HIURVW :KHQ IURVW EXL
Drainage Option Option 1 Emptying Manually NOTICE: : Do not remove the bucket when unit is in operation or has just stopped. Otherwise it may cause some water to drip on the floor : Do not use the hose if using water bucket to collect water. When the hose is connected, water will be drained out through it instead of into the bucket. 1. Hold the handles on both sides of the water bucket and pull it out following the arrow direction.
Option 2 Gravity Drain Hose 1. Hose is not provided, so user shall prepare it in advance. [Size: The hose thread should have an outer diameter of 11/16 inches (1.0625 inches or 27.0mm), and a pitch of 11.5 TPI.] 2. Remove bucket from the unit as instructed. 3. Thread the drain hose onto the nozzle and make sure it's securely locked. 4. Replace the bucket. Make sure the drain hose goes through the bucket's drain hole and is placed downward. Lead the hose to the floor drain and then cove the hole with a lid.
Option 3 Pump Drain 1. Pull the rubber plug to remove from drainage joint. ʒ 2. Insert the drainage hose into the hole. ʓ 3. Place the other end of the drain hose in the location you want the water to go to: a floor drain, a water container, or through a basement window to the outdoors. NOTICE: : In the option 3, the unit must be running under PUMP mode. Please refer to the instructions in page 6 for operation. : The maximum distance and the rise may be 5m from the unit.
Clean and Maintenance Warning may lead to electric shock. . Otherwise it will damage unit's appearance. 1. Grille and Case To clean the case: When there is dust on the case, use soft towel to dust it off; When the case is very dirty(greasy), use mild detergent to clean it. To clean the grille:Use a dust catcher or brush. 2. Water Bucket Every few weeks, clean the bucket to prevent growth of mold, mildew and bacteria. Use soft brush to clean the bucket and then rinse it.
(3) After cleaning, replace the drain lid and handle and make sure the oat of water bucket is placed properly. The side with foam plastic should be beneath the drain lid. Do not remove the foam plastic on the float Float 3. Air Filter Dehumidifier will remind you to clean the air lter when it has been operating for 250 hours. If it is used in dusty places, clean the air filter more often. To clean: Remove the bucket. Grasp the filter edge, and pull it straight down and out.
Troubleshooting Ɣ 1RW DOO WKH IROORZLQJ SUREOHPV DUH PDOIXQFWLRQV Problem Possible Causes Ɣ 8QLW LV RSHUDWLQJ LQ DQ DUHD ZKHUH WHPSHUDWXUH 'HKXPLGLZHU LV QRW RSHUDWLQJ LV KLJKHU WKDQ & ) RU ORZHU WKDQ & ) &RQWUROV FDQ QRW EH VHW Ɣ %XFNHW LV IXOO Ɣ 1RLVH ZLOO ULVH LI FRPSUHVVRU KDV MXVW VWDUWHG 1RLVH VXGGHQO\ ULVHV GXULQJ Ɣ 3RZHU VXSSO\ SUREOHP RSHUDWLRQ Ɣ 8QLW LV SODFHG RQ XQHYHQ IORR Ɣ $UHD WR EH GHKXPLGLZHG LV WRR ODUJH 7KH FDSDFLW\ RI \RXU GHKXPLGLILHU PD\ QRW EH DGHTXDWH +XP
Problem Possible Causes Solution : _ !* ! + ` ) % * ! !* ! ! + : ` ! % * : ^!* ! # $ ! !* # ! !* ! Power indicator is ( $ & $+ !* # ! * not lit when power : _ * !* # inserted. is connected. loosen. : _ * !* ! $ $ & $+ : # ( !* + : { # + : # ! ! ) # # $ ! placed.
Malfunction Codes : | # ! _!$ No. Malfunction Name Display Code Display Window 1 Amb T mp r #r S !r # ! F1 2 T#b T mp r #r S !r # ! F2 3 D h rg T mp r #r S !r # ! F5 4 H#m $ y S !r # ! L1 Unit's Condition _!mpr !r $ m! !r !p. Th b# ! r v $. Possible Causes ƽ Amb mp r #r !r !! !r p!!r y ! $ w h h rm ! $ p y b! r$.
Malfunction Codes : | # ! _!$ No. Malfunction Name Display Code Display Window Fr ! - k g pr! ! F0 6 H gh- mp r #r !v r ! $ pr! ! H3 7 H gh $ h rg mp r #r pr! ! ! !mpr !r E4 8 P#mp # ! E0 5 Unit's Condition Possible Causes ƽ R r g r k g. T !& !r ! &! ! ! 30 ! $ + ƽ Sy m b ! k $ ƽ Amb !p r ! ! $ ! b $. ƽ Th v p!r !r $ ! $ r r b ! k $ w h h.
Electric schematic diagram The Electric schematic diagram are subject to change without notice. Please refer to which one on the unit. 、 +80,',7< 6(1625 75$16)250(5 %8&.(7 6:,7&+ /,48,' /(9(/ 6:,7&+ 6$ 6$ 12 &20 12 &20 %8 &1 AP2 DISPLAY BOARD 78%( 57 &1 7 3,3( 57 78%( ',6&+$5*( 7(03 6(1625 7(03 6(1625 、 75 287 75 ,1 %. :+ %1 &1 &1 3803 %8 7(03 /,0,7(5 0 5' 3803 &1 AP1 0$,1 %2$5' / &203 )$1 %. %1 :+ %8 *1 <(*1 1 %8 %8 <( %.
GREE ELECTRIC APPLIANCES, INC. OF ZHUHAI Add: West Jinji Rd, Qianshan, Zhuhai, Guangdong, China, 519070 Tel: (+86-756) 8522218 Fax: (+86-756) 8669426 E-mail: gree@gree.com.cn Web: www.gree.