USER MANUAL KBU-50DX / 100DX / 170DX DUAL ZONE WINE REFRIGERATORS KBU50DX-FG KBU100DX-FG KBU170DX-FG BORDERLESS BLACK GLASS DOOR SERIES KBU170DX KBU100DX KBU50DX GLASS DOOR WITH STAINLESS TRIM SERIES PLEASE NOTE: • Every time the unit is powered ON, there will be a 6-minute delay for the compressor to start. • For optimal use of this product, the temperature of the LOWER cooling zone should be set to at least 4°F above the temperature of the UPPER cooling zone. COMPRESSOR WINE COOLERS www.
CONTENTS TABLE OF CONTENTS Congratulations Congratulations and thank you for choosing our KingsBottle wine coolers. We are sure you will find your new appliance a pleasure to use. Before installing and operating the wine cooler, we recommend that you read through this manual which provides a description of your wine cooler and its functions.
SAFETY PART I IMPORTANT SAFETY INSTRUCTIONS Please read this user manual carefully and store in a handy place later reference. placeforfor forlater later reference. place reference. The symbols you will see in this The symbols you will see place for later reference. The symbols you see in in this this booklet booklet have have these these meanings: meanings: booklet have thesewill meanings: The symbols will see in this booklet have these meanings: place for lateryou reference.
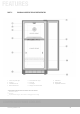
FEATURES PART II DIAGRAM & DESCRIPTION OF REFRIGERATOR UPPER ZONE TEMP.SET TEMP.
INSTALLATION PART III INSTALLATION INSTRUCTIONS CUTOUT DIMENSION ILLUSTRATED ” 26.97 23.54 ” ” 26.97 23.54 ” ” KBU-170 SERIES 23.54”W x 26.97”D x 71.69”H (598W x 685D x 1821H mm) Included stand height 0.98”(25mm) KBU-100 SERIES 23.54”W x 26.97”D x 55.43”H (598W x 685D x 1408H mm) Included stand height 0.98”(25mm) MODEL WIDTH DEPTH HEIGHT INCLUDED STAND HEIGHT KBU-50 23.42” 595mm 23.62” 600mm 33.86” 860mm 0.79” 20mm KBU-100 23.54” 598mm 26.97” 685mm 55.43” 1408mm 0.
INSTALLATION PART III INSTALLATION INSTRUCTIONS INSTALLING YOUR WINE COOLER 1. Move the unit into its final position. (CAUTION: for safety purpose, for the KBU100 and KBU170 models, it is necessary to anchor the appliances to the wall, please refer to the instruction on the next page.) 2. If the unit is not tilting back, minor adjustments can be made to the leveling legs. 3. Compare the alignment of the appliance to the surrounding cupboard.
Instructions to Anchor The Appliance to The Wall INSTALLATION B Rear of the refrigerator B A parts included A B 1. Area “A” is around 7”W x 2”H ( 180Wx50H mm ). This area is located 1.2 inch (30mm) from the edge of the appliance on top, left or right side (see above image). 2. “B” refers to the position where the holes for brackets should be drilled. Note: “B” should always be inside the area “A” 3. Position the brackets on the desired location, mark and drill pilot holes for the screws about 0.
STORAGE PART IV LAYOUT AND STORAGE display shelves options ( for KBU170DX Models) As an additional option, you might like the idea of having some display shelves to show your bottle label. You could refer to the instruction on how to remove the 2nd, 4th shelves in the upper zone (use the screws to fill the holes on the wall after the shelves are removed), and then change the 1st, 3rd, 5th shelves to display shelves. Note: This changes will reduce the total storage capacity.
STORAGE PART IV LAYOUT AND STORAGE display shelves options ( for KBU100DX Models) As an additional option, you might like the idea of having some display shelves to show your bottle label. You could refer to the instruction on how to remove the 1st, 3rd shelves in the upper zone (use the screws to fill the holes on the wall after the shelves are removed), and then change the 2nd, 4th shelves to display shelves. Note: This changes will reduce the total storage capacity.
STORAGE PART IV LAYOUT AND STORAGE YOUR CABINET WAS DESIGNED TO STORE A MAXIMUM NUMBER OF BOTTLES SECURELY. WE RECOMMEND THAT YOU OBSERVE THE TIPS BELOW TO OPTIMIZE LOADING. 1. 2. 3. 4. Disperse your bottles evenly so as not to concentrate the weight in any one area. Also, be careful that your bottles do not touch either the back of the cabinet or the step at the bottom. Also, make sure that bottles are not all grouped together either at the top or bottom of the cabinet.
OPERATION PART V OPERATING YOUR REFRIGERATOR ON/OFF UPPER ZONE UP DOWN LOWER ZONE LIGHT C/F SWITCH SELECT Each wine cooler includes an operating panel on the front of the unit. This operating panel includes several features to operate and control the temperature of both the upper and lower zones of the wine cooler. The operating panel includes the following features: ON/OFF: Turns the wine cooler power on or off. TEMP.
OPERATION ERROR CODE AND ALARM Code Description Solution E1 When the temp. In the UPPER zone is 4°F (2°C ) higher than the LOWER zone, E1 displays on the panel. With the temp. changes, and temp. in the UPPER zone is lower than the LOWER zone, E1 will disappear automatically. So, just wait for about one hour and check again. F1 When the evaporator temperature is lower than 0°F (-18°C ) F1 displays on the panel F1 meaning the cooler is at defrosting mode.
MAINTENANCE WARNING The refrigerator must be plugged into its own dedicated 220-240V, 50Hz AC electrical outlet. PART VI CARE AND MAINTENANCE The plug must be accessible when the refrigerator is place for later reference. in position. The symbols you will see in this booklet have these meanings: CLEANING YOUR WINE COOLER It is essential the power point is properly earthed to ground. Consult a qualified electrician if you are unsure. WARNING Don’t use extension cords or adapter plugs with this refrigerator.
TROUBLESHOOTING GUIDE PART VII PROBLEM Refrigerator does not operate Refrigerator is not cold enough; can not cool down to the preset temp.
TECHNICAL DATA PART X TECHNICAL DATA KBU170DX KBU100DX KBU50DX 14.30 CF ( 405 Liter ) 10.88 CF ( 308 Liter) 5.37 CF ( 152 Liter ) compressor with air-circulated fan cooling compressor with air-circulated fan cooling compressor with air-circulated fan cooling CLIMATE TYPE N N N ELECTRICITY PROTECTION GRADE I I I 110-115V/50-60HZ 110-115V/50-60HZ 110-115V/50-60HZ RATED CURRENT 1.1 A 1.1 A 0.