USER MANUAL KINGSLIM D1 Dual Dash Cam v1.
EN CONTENTS What’s in the Box 2 Camera Overview 3 Product Operation 4 Installation 8 Formatting the microSD Card 9 Recording 9 Icon Introduction 9 Setup Menu 10 Download the GPS Player 13 Troubleshooting 13 Caution 14 Contact Us 14 1
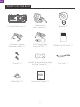
EN WHAT'S IN THE BOX D1 Dual Dash Cam * 1 Waterproof Rear Camera * 1 Bracket * 1 23ft Rear Camera Extension Cable * 1 Car Charger with External GPS * 1 32GB microSD Card * 1 Screws * 2 Double-Sided Adhesive Tape for Rear Camera * 1 Pry Tool * 1 Quick Start Guide KingSlim D1 Dash Cam V1.
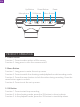
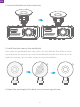
EN CAMERA OVERVIEW Bracket Slot Mini USB Power Port Rear Camera In Power Button Lens microSD Card Slot Working Indicator Screen 3
EN Up Button Microphone Down Button OK Button Reset Menu Button PRODUCT OPERATION 1. Power Button Function 1: Press to wake up/turn off the screen. Function 2: Long press to turn the camera on/off. 2. Menu Button Function 1: Long press to enter the set-up menu. Function 2: Press to switch the shooting mode/playback mode/recording mode. Function 3: Press the menu button to lock the video during recording. Press the menu button again to unlock. Function 4: Press to exit the set-up menu. 3.
EN 4. Up Button Function 1: In the set-up menu, press the up button to view the setting options. Function 2: In the recording mode, press the up button to view the display modes. Function 3: After pause recording, long press the up button to display the GPS information. 5. Down Button Function 1: In the set-up menu, press the down button to view the setting options. Function 2: When recording, press the down button to turn audio on/off. 6. Working Indicator Standby: The red and blue lights are on.
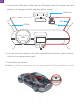
EN 2. Insert the bracket into the bracket slot. 3. Install the dash cam on the windshield. First, clean the windshield with a dry cloth. Second, take the film off the suction cup and press the suction cup onto the windshield to make sure there is no air inside the suction cup, and then rotate to secure the bracket. 4. Adjust the view angle of the dash cam to ensure a good view.
EN 5. Connect the USB power cable into the USB power port of the dash cam, then plug the car charger into the cigarette lighter socket. Cable clip GPS A-Pillar GP S A-Pillar 6. Connect the rear camera to the dash cam with the extension cable to check that the rear camera works well. 7. Install the rear camera. Position 1: Install the rear camera on the rear windshield. This installation is easier.
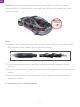
EN Position 2: Install the rear camera near the license plate. Position 2 is highly recommended. The rear image is crisp and clear for both rear viewing and as a back-up camera. Note: ① Pay attention to the connector position when connecting the rear camera with the extension cable; please refer to the photo below. ② Clean the area to ensure the optimum adhesion before installing the rear camera. ③ If you choose position 1, clean the rear windshield regularly to ensure the image quality.
EN FORMATTING THE MICROSD CARD Use a high-speed microSD card of Class10 or higher. Format your microSD card in the camera before putting it into the dash cam. 1. Long press the menu button to access the set-up menu. 2. Press the down button to view "format", then press the OK button. 3. Select "Confirm" and then press the OK button. RECORDING 1. After finishing formatting, connect a car charger and start the car engine. The device will automatically turn on and begin recording. 2.
EN SETUP MENU • Long press the menu button to enter the dash camera set-up menu. • Press the up/down button to view the setting options. Select a setting option by using the OK button. • Press the menu button again to exit the set-up menu. 1. Resolution Select "Resolution" and press the OK button to select the front camera recording resolution of "1080FHD 1920×1080" or "720P 1280×720". The default setting is "1080FHD 1920×1080". The rear camera recording resolution is "720P". 2.
EN 6. Date/Time Set the date and time manually. 7. Date Stamp Turn on the date stamp; recorded videos will show the time stamp. Options: On and Off Default Setting: On 8. Language Settings Options: English/繁體中文/简体中文/日本語/Français/Deutsch/Polskie/ไทย/ Tiếng Việt/русский/Español/Italiana Default Setting: English 9. Gravity Sensor When the mode is turned on, it will automatically start recording and save content if an impact or sudden braking is detected.
EN 12. Speed Unit You can set the speed unit that you prefer. Options: KM/H and MP/H Default Setting: KM/H 13. Motion Detection In standby mode, it will automatically start recording when motion is detected. Options: On and Off Default Setting: Off 14. License Plate Setting Enter your license plate number. Options: On and Off Default Setting: Off 15. Screen Saver The display screen will turn off automatically after the set duration of inactivity. Options: On and Off Default Setting: On 16.
EN 18. Format Format the microSD card. Note: ① All data will be deleted. Before formatting your microSD card, please remember to back up your important data on another device. ② Before the microSD card is inserted for the first time, please format it in the camera to ensure that the card is compatible with the camera. 19. Reset The dash cam will be reset to factory settings. 20. Version Number Use this to check the version of the dash camera. DOWNLOAD THE GPS PLAYER Download the GPS player: www.kingslim.
EN 4. The image is misty. Ensure there are no fingerprints or other marks on the camera lens. Use a soft, dry cloth to clean the lens. Clean the front windshield. 5. Crashing If your device crashes, use a sharp object to press the reset button to restart the device. 6. No sound on the video. Ensure the audio recording mode is on. 7. The camera keeps turning on and off automatically. Charge the camera with the included car charger. Do not charge the battery via the USB data cable with other adapters.