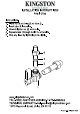
oh wn KINGSTON KITCHEN & BATH INSTALLATION INSTRUCTIONS Angle Stop Instructions: Place nut (4) and ring (3) on tube (2). Insert tube (2) into valve. Wrench tighten nut (4) onto valve. Repeat steps 1 through 3 with the other side. Stop any leaks by tightening nuts slightly. www.kingstonbrass.
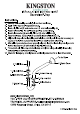
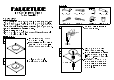
KINGSTON KITCHEN & BATH INSTALLATION INSTRUCTIONS Decorative P-Trap Instructions: Remove horizontal leg and slip joint nut from bottle trap. Apply Teflon tape to all exposed threads. Insert slip joint nut (3) and waste cover (4) onto horizontal leg (6). Insert horizontal leg into wall waste opening, do not tighten. Insert black washer (2) and slip joint nut (1) onto tail piece (8). Attach bottle trap (7) to tail piece and hand tighten slip joint nut (1).
KINGSTON HEMOSTAT & BATH www laughingstock TOLL-FREE CUSTOMER SERVICE: 1-877-2-BRASS TECHNICAL SUPPORT E-mail: 12775 Reservoir Street, Chino, CA 91710
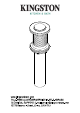
KINGSTON BITCH GR Ba INSTALLATION INSTRUCTIONS Push Drain without Overflow Need Tools: i Go Loy =e Basin Wrench Adjustable Wrench Teflon Tape Silicone Sealant Screwdriver INSTALLATION: 1. Remove the lock nut (7), washer (6) and rubber gasket (5) from the drain body (3). 2. Insert the drain assembly downward through the drain opening on the bottom of sink. Se the tailpiece (8) and the outer threads of drain body (3) can go all the way through the drain opening and expose beneath the sink. 3.
P-Trap Installation: 9 4. Waste Cover 8. Tail Piece 8. Horizontal Leg 1. lip Joint Nut 2. Black Washer 7. Bottle Trap 3. Slip Joint Nut 5. Black Washer 1. Remove horizontal leg and slip joint nut from bottle trap. 2. Apply Teflon to all exposed threads. 3. Insert slip joint nut{3) and waste cover(4) onto horizontal leg(8). 4. Insert horizontal lag into wall waste opening, do not tighten. 5. Insert black washer(2) and slip joint tail piece(8). 6.
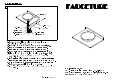
FAUCET INSTALLATION INSTRUCTIONS For Use Vessel Sink Before Installation : 1.Prior the installation, unpack your new Kingston Brass product and inspect it keep the product in its original package until you are ready to install it. 2.Shut the water supply off when replacing an existing fixture. Preparation of the soars and walls, including all additional wall supports, maybe required. observer all local plumbing and building codes. 4.Do not install this fixture alone. 5.