Kingston Technology MCMaster User’s Guide Model: MC133PD
Kingston Technology’s MCMaster 486DX4 Processor Upgrade Micro Channel Adapter User’s Guide Part No. 4460012-001. B06 Kingston Technology Company 17600 Newhope Fountain Valley, CA 92708 (714) 435-2600 MCMaster User’s Guide - Rev.
TABLE OF CONTENTS Introduction............................................................................ 1 General Description .................................................... 2 Package Contents ...................................................... 3 Packaging Materials ................................................... 3 Hardware Installation .............................................................. 4 Preparing your Reference Disk.................................... 4 Installing Memory .......
Appendices ..........................................................................11 Appendix A Configuration Options...........................12 Appendix B MCMaster Software Utilities..................20 Appendix C Troubleshooting ...................................26 Configuration Problems................................. 26 Using the MCMaster Diagnostic.....................29 Hardware Issues...........................................35 How to Reach Kingston.................................
General Information 1 Introduction Congratulations on the purchase of your Kingston MCMaster. This guide will take you through the basic steps of physically installing MCMaster into your PS/2 system and configuring the system. For most installations, this is all you need to do. Even battle-hardened PS/2 veterans should at least read over the installation directions before proceeding. The Appendices contain more detailed information, along with troubleshooting suggestions in case you run into problems.
2 General Information General Description The Kingston Technology MCMaster processor upgrade board is a busmaster processor upgrade card. It provides your computer with a powerful 486DX2 microprocessor to give your system the increased performance to handle today’s most demanding graphical software applications.
General Information 3 Package Contents The Kingston MCMaster package should contain the following items: • MCMaster Processor Upgrade Circuit Board • MCMaster Option Diskette • User’s Guide If any item is missing or damaged, contact your Kingston dealer for a replacement. Be sure the items you receive are genuine Kingston Technology products. The printed circuit board has the Kingston name etched on its surface. If the Kingston name is missing, it’s not a genuine Kingston product.
4 Hardware Installation Hardware Installation Install the MCMaster processor upgrade following these steps: Preparing your Reference Disk 1. If you have not previously made a backup copy of the Reference disk that came with your PS/2 computer, you should do it now. Your original Reference disk should be write protected, and you won't be able to copy files onto it. 2. Power up the system with the backup copy of the Reference disk installed in Drive A. 3.
Hardware Installation 5 Please verify that any SIMMs supplied by anyone other than Kingston meet the IBM specification before using them. The table below shows all of the SIMM types that can be installed in MCMaster. Note the MCMaster DOES NOT support 1MB or 2MB SIMM modules. Size 4 MB 8 MB 16 MB 32 MB Configuration 1024K x 32, 70ns 2048K x 32, 70ns 4096K x 32, 70ns 8192K x 32, 70ns Kingston Part No.
6 Hardware Installation Installing SIMMs 1. Place the MCMaster board onto the anti static bag on a flat surface with the component side face up and the edge connector toward you. 2. Insert the edge of the SIMM into the socket with pin 1 to your right. If the pin number is not marked on the SIMM module, look for a notch cut out of one of the corners on the connector side of the SIMM. That notch will be at pin 1. 3.
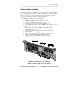
Hardware Installation 7 Installing the MCMaster 1. Make sure that the system power switch is OFF. 2. Unlock and remove the system cover. Your PS/2 Quick Reference provides detailed instructions for removing or reinstalling the cover. 3. Choose a vacant expansion slot to plug MCMaster card into. MCMaster will work in a 16 or 32-bit slot.
8 Configuring the System Configuring the System At this point, you've finished physically installing MCMaster in the system. The next step is to configure the system to acknowledge MCMaster's presence. For most PC-DOS users, the automatic configuration will be adequate. This section will guide you through the Automatic Configuration process.
Configuring the System 9 If you press the 'o' key now, control will return to the system's own processor. Otherwise, MCMaster will add its own memory to the memory count and then display the message: Starting MCMaster MCMaster start successful This completes the installation of MCMaster in your PS/2 system. It should now be ready for operation. If it doesn't seem to be working, read the appropriate section in the Appendices for troubleshooting help.
10 Kingston Technology Company Configuring the System MCMaster User’s Guide - Rev.
11 Appendices MCMaster User’s Guide - Rev.
12 Appendix A Appendix A Configuration Options Configuration Options For most installations the automatic configuration will suffice. However, in order to make the MCMaster work properly in other circumstances, you may have to go to the configuration screen and set some options by hand. This section describes the MCMaster configuration options in detail.
Appendix A Configuration Options 13 If you use the MCMaster driver, place it after the driver for the memory board in your CONFIG.SYS file. For example: DEVICE = [Memory board driver].SYS DEVICE = MMPIDD.SYS Early versions of the Intel Above Board implement the INITPROG option in a different manner. For these boards, Intel provides a program called SOFTSET. If you are using the MCMaster with one of these Intel Above Boards, please read "The MCMaster and the Intel Above Board" contained in Appendix C.
14 Appendix A Configuration Options ;remove semicolon from next line ;if you wish to use INITPROG ;initprog 80 Edit the line with "initprog 80" to delete the semicolon. The two lines should now read: ;remove semicolon from next line ;if you wish to use INITPROG initprog 80 5. 6. Save the ADF file back out to the disk. Exit the editor. Now you can run the Set Configuration program and set the Operating Mode to "INITPROG or IDD.
Appendix A Configuration Options 15 Interrupt Level Default: Level 15 Options: Level 10 Level 12 This selects the hardware interrupt level that the MCMaster uses. There's no reason to select a level other than 15, unless this conflicts with another adapter already in the PS/2 system. Option ROM Address Default: D0000-D3FFF Options: C8000-CBFFF D8000-DBFFF "Disable board" The MCMaster has an option ROM (Read Only Memory) that contains program code to control the MCMaster's startup and operation.
16 Appendix A Configuration Options Flush Mode Default: Mode 1 Option: Mode 2 Mode 3 This option controls the method that the MCMaster uses to maintain hardware cache coherency when the MCMaster is being used with other busmaster adapters including a number of SCSI disk controllers. For most installations where there are no other busmaster adapters in the system, Mode 1, the default, will function perfectly well. If another busmaster is present, select Mode 2. IBM SCSI controllers require Mode 2.
Appendix A Configuration Options 17 Memory Options Default: Mapped, report all Options: Unmapped Report MCMaster memory Mapped, Report all, <16M Unmapped, <16M Mapped, report MM, <16M Mapped, report all In this configuration, the MCMaster remaps memory so that, from the MCMaster CPU's point of view, its own memory appears "first." This means that DOS applications that run in low memory will be running in the MCMaster's onboard 32-bit memory.
18 Appendix A Configuration Options The disadvantage is that you can't have any other memory boards in the system. If your system has only 1 megabyte on the planar, this is not a great loss. However, if you have a lot invested in Micro Channel memory boards, you probably want to keep using them. To use this other memory, you need to select "Mapped" or "Unmapped." Note: In some systems, the MCMaster cannot disable motherboard memory. If the MCMaster signs on with "Hardware Rev 00.
Appendix A Configuration Options 19 Summary This table does not cover every possibility, but it should be helpful in selecting memory options based on your system's configuration.
20 Appendix B Appendix B MCMaster Software Utilities MCMaster Software Utilities The MCMaster is designed to function as a self-contained product. In most installations, all the special program code required to make the MCMaster function is contained in its option ROM. However, your MCMaster option disk does include a few utilities to help maintain and configure the board, along with a few drivers for specific situations. This appendix describes these utilities and drivers. EPROM.
Appendix B MCMaster Software Utilities 21 MMUPD.BAT Automatic EPROM Update If the new code is supplied to you on a diskette or if you download the new code from the Kingston BBS (which comes in the form of a selfextracting executable file), there will be a file, MMUPD.BAT. This batch file will run EPROM.EXE with the appropriate switches and load the current HEX file automatically. Follow the EPROM instructions below, but type MMUPD at Step 5 to run the ROM update automatically.
22 Appendix B • • • • MCMaster Software Utilities Don't power off the system while the program is running. EPROM.EXE notifies you as it completes various steps of its operation, but it is not finished until it says so. If you power off in the middle of EPROM.EXE the contents of the EEPROM may get erased or garbled. When the program is done, you will be returned to the DOS prompt. If you also received a new ADF file, reconfigure the system following the procedure listed previously.
Appendix B s MCMaster Software Utilities 23 Start MCMaster (in connection with one of the other switches). If the i or r options are used and the Device Driver is being used to start up the MCMaster, the s option must also be used. If the MCMaster is started in Standard mode (see page 12) and the Device Driver is being used for other options, the s option is not required. Some example uses are: device=c:\kingston\mmpidd.sys r i will replace the resident interrupts and enable the cache toggle.
24 Appendix B MCMaster Software Utilities double-click on the filename. SYSTEM.INI will load into the Windows Notepad.) 3. Find the line that reads: device = *VDMAD 4 Change it to read: device = mmvdmad.386 5. If you are in Windows, exit Windows and re-start. Otherwise, simply start Windows. You don't need to reboot the system. Just restart Windows. Windows will read the edited SYSTEM.INI file and load the new driver. A previous version of MMVDMAD.386 was released prior to the release of Windows 3.
Appendix B MCMaster Software Utilities 25 For OS/2 1.2 and pre-1991 OS/2 1.3 DISK02.SYS is a replacement for the driver supplied with OS/2. If you're not absolutely certain which driver you need, it would be a good idea to copy the DISK02.SYS file now on your hard drive onto a floppy for safekeeping. Install the new DISK02.SYS file by just copying the file DISK02.SYS from the MCMaster option diskette into the root directory of your boot drive. When you reboot OS/2, the driver will load automatically.
26 Appendix C Appendix C Troubleshooting Troubleshooting We have made every effort to make the MCMaster as easy to install as possible. Nevertheless, problems do sometimes occur. If you have problems, first review the steps outlined in the installation and configuration chapters and make sure that each step was completed correctly. Configuration Problems Some installation problems are caused by hardware conflicts between the MCMaster and other adapter boards plugged into the system.
Appendix C Troubleshooting 27 MCMaster Error Messages The MCMaster Option ROM displays one of several error messages when it encounters a hardware problem. The ROM will display one of these error messages and halt the system to prevent data corruption. MCMaster Error 01: DMA Set to greater than 16Meg The DMA Controller on the PS/2 Motherboard is limited to 24 bits of addressing, imposing a 16 Megabyte limit on the address range in which DMA transfers can take place.
28 Appendix C Troubleshooting How to isolate problems If you have a problem with one particular peripheral or program, you may want to isolate the problem to determine if the problem is caused by interaction between the MCMaster and a particular piece of hardware or software. 1. Power up the system with the MCMaster installed. When the Aox logo appears, press the [o] key to return control to the original processor. 2. Retry the operation that failed with the original processor in control.
Appendix C Troubleshooting 29 Using the MCMaster Diagnostic Kingston provides a diagnostic program, MMDIAG.EXE, for the MCMaster. The purpose of the diagnostic is two-fold: First, it allows MCMaster users or dealers to test any new memory that they might install on the MCMaster; Second, it will allow Kingston Technical Support personnel to help diagnose some problems over the telephone. The diagnostic is menu-driven, and most of the tests are self-explanatory.
30 Appendix C Troubleshooting Attributes are SELECTED and LOOPING. Once you have positioned the highlight bar over the test you wish to select or loop on The attribute may be changed using the following Keys: L - Toggles Looping on and off. S - Toggles Selection on and off. Note that the Looping attribute overrides the selected attribute And that activating Looping implies selected To STOP TESTING - press any key. To QUIT THE PROGRAM - press ESC or "Q". 7.
Appendix C Troubleshooting 31 it will show its results in the status window. If any tests fail, the program will display error messages in red. The test list is divided into columns. The column headings, across the top of the window, mean: Test: The name of each test to be performed. If some of the test names are unfamiliar, don't worry. They test specific sections of the MCMaster hardware. Active: As each test is running, the diagnostic will place a flashing asterisk in this column.
32 Appendix C Troubleshooting Running Individual Tests To run an individual test, simply point to the test by moving the green highlight bar to that test, and press [R] or [Enter]. This will cause the test to run once. EEPROM Test If you run the EEPROM test, you will be prompted for the hex file name. Make sure that the appropriate hex file is available on the same disk or directory: for example, if your ROM code revision is 2.00, the appropriate hex file is MM200.HEX.
Appendix C Troubleshooting 33 correctly from the MCMaster's processor, and can only be run from the original processor as described in the previous section. The tests that can run from the MCMaster side are: • • Test Board ID The three DRAM tests. Use the same commands described in the previous section to run these tests. Command Line Switches Some features of MMDIAG are available as optional command line switches.
34 Appendix C Troubleshooting Interpreting the Results If the board fails the EEPROM test, try reprogramming the EEPROM using the EPROM.EXE program supplied with the MCMaster option disk. If you do this, and the test still fails, contact your dealer or Kingston Technical Support for further assistance. If the POS Register test fails, the MCMaster is for some reason not supplying the correct ID to the Micro Channel bus. You can try inserting the MCMaster into another slot if one is available.
Appendix C: Troubleshooting 35 Hardware Issues In the several years that the MicroMaster, and now, the MCMaster product line have been in existence, we've accumulated a fair amount of experience with what problems might arise. While no manual can cover every possible contingency, we can cover the most frequently encountered problems here. System Compatibility Issues This section describes known problems with various PS/2 systems, and fixes.
36 Appendix C Troubleshooting IBM 386 Enhanced Memory Adapter This adapter comes in two types. One uses a track 0 initializer, and the other has a ROM. To determine which is which, boot from your Reference diskette and go to the configuration screen. The adapter with a ROM will be identified as such in the configuration screen. The adapter with a ROM will work with the MCMaster without any special attention. To work with the other type, the MCMaster operating mode will have to be set to "INITPROG or IDD.
Appendix C: Troubleshooting 37 If you are using a third-party memory board that allows you to configure the board as either EMS or Extended Memory, we recommend configuring the board as Extended memory, and using a driver like BlueMAX (from Qualitas) or QEMM-386 (from Quarterdeck) to obtain your Expanded (EMS) memory. Software Issues If you're using the MCMaster to upgrade a 286-based system to a 486, you will have more software options available to you.
38 Appendix C Troubleshooting If you upgrade your system to a 486 after installing DOS 5.0, there are a few steps you can take to take advantage of these features. 1. 2. Insert a call to EMM386.EXE in your CONFIG.SYS file. Consult your DOS documentation for details. If you intend to run Windows in 386 Enhanced mode, copy the file WINA20.386 from the DOS distribution diskettes into the root directory of your boot drive. This file is in compressed format. Use the DOS EXPAND command to uncompress it.
Appendix C: Troubleshooting 39 The Solution The solution is to edit your CONFIG.SYS after the installation is done. Make the disk cache about half the size of the MCMaster memory. Version 3.0 of SMARTDRV does not need to be as precisely "tuned" as it used to need to be. Previously, you had to balance the size of the disk cache against the memory needs of your Windows applications. (Microsoft's MEMSET did this for you.) With Windows 3.
40 Appendix C Troubleshooting QEMM-386 If you are using QEMM version 5.0 or higher, there is a file called MCA.ADL that QEMM uses to identify option ROMs in the system. To make QEMM aware of the MCMaster's Option ROM, you should edit MCA.ADL to contain the following lines. These entries need to be in order by board ID (the four-digit hex number before the product's name at the top of each entry), so be sure and insert these lines at the appropriate places in the ADL file.
Appendix C: Troubleshooting 41 DOS 3.3 Users For the MCMaster to work under DOS 3.3 with the Stealth 'M' mode, you must include the driver QEMMFIX.SYS in your CONFIG.SYS file. This driver appears in your CONFIG.SYS before QEMM386. Copy the driver into a convenient directory on your hard drive, install QEMM, and edit your CONFIG.SYS file to call QEMMFIX.SYS like this: DEVICE=C:\[path]\QEMMFIX.SYS DEVICE=C:\[path]\QEMM386.SYS [switches] The QEMMFIX.
42 Appendix C Troubleshooting MCMaster and the Intel Above Board Some versions of the Intel Above Board use a boot track initializer; this means that, in order for the PS/2 to "see" the Above Board's memory, the Above Board has to be initialized by a small program. Later versions of the Intel Above Board use an Installable Device Driver in the CONFIG.SYS file rather than the method described here. Check your Intel documentation.
Appendix C: Troubleshooting 43 OVERVIEW In the early days of the PS/2 computers, there was no easy way to install nonIBM memory adapters so that the system 'saw' the memory. IBM issued an interim method of installing an initializer program on the first track of the hard disk (track 0). Later, IBM changed the Set Configuration (SC.EXE) program on the Reference disk to allow for installation of these initializers. However, not everyone has the new Set Configuration program.
44 Appendix C Troubleshooting 1. Installing the MCMaster with the Intel Above Board already installed 1. Remove any Expanded Memory Managers from the CONFIG.SYS file. 2. Run SOFTSET (from INTEL) and set the amount of Expanded Memory to 0. 3. Install MCMaster normally, but when you boot off of the Reference diskette, bypass Automatic Configuration. 4. From the main menu, select Set Configuration, and then select Change Configuration. 5.
Appendix C: Troubleshooting 45 2. Installing the MCMaster and Intel Above Board together It is preferred that you install the Intel Above Board first, and then install the MCMaster. To do this, see section 1 on the previous page. If you have decided to install these boards at the same time, then follow these instructions: 1. Boot your system with a Backup copy of your Reference diskette inserted in Drive A: 2.
46 Appendix C Troubleshooting message saying "Could not find the Intel Above Board 2 Plus initialization file," either the set configuration program removed it or you have the newer version of the Above Board. If it's been removed, rerun SOFTSET and then SETINIT to link in the Above Board and MCMaster initializers in the right order. Changing the amount of memory on the MCMaster has no effect. However, if you change the amount of memory on the Above Board, you'll have to rerun SOFTSET.
Appendix C: Troubleshooting 47 11. Remove the INTEL diskette and insert the MCMaster diskette. Type: A: [Enter] setinit i008e.adf [Enter] 12. Remove the diskette and reboot the system. This will look for a file named I008E.ADF (which should be on the same disk) and link it into the initializers on track 0 of your hard disk. Changing the amount of memory on the MCMaster has no effect. However, if you change the amount of memory on the Above Board, you'll have to rerun SOFTSET.
48 Appendix C Troubleshooting How to Reach Kingston If you have any problems, questions, or comments associated with installing or using your MCMaster, please call Kingston Technical Support. For the latest driver file updates and information, access the Kingston Bulletin Board Service, CompuServe or the Internet using your modem. To receive product information sent to you by fax, call Kingston’s RAMfax™.
Appendix D Product Warranties and Notices Appendix D 49 Product Warranties and Notices Limited Warranty KINGSTON TECHNOLOGY COMPANY ("Kingston") warrants that this product is free from defects in material and workmanship. Subject to the conditions and limitations set forth below, Kingston will, at its option, either repair or replace any part of this product which proves defective by reason of improper workmanship or materials.
50 Appendix D Product Warranties and Notices Warranty Claim Requirements To obtain warranty service, return the defective product, freight prepaid and insured, to your local authorized Kingston dealer or distributor, or to the Kingston factory service center located at 17600 Newhope Street, Fountain Valley, California 92708, U.S.A. You must include the product serial number (if applicable) and a detailed description of the problem you are experiencing.
Appendix D Product Warranties and Notices 51 F.C.C. Class B Certification This device has been tested and found to comply with limits for Class B digital device, pursuant to Part 15 of the FCC Rules. Operation is subject to the following two conditions: (1) This device may not cause harmful interference (2) This device must accept any interference received; including interference that may cause undesired operation.
MCMaster For Internal Use Only Revision History Revision Level Comments A First Release. B Changed the order of sub-sections in Hardware Installation section. Added Flush Mode Option. B1 Added INSTOS2 utility to Appendix B MCMaster Software Utilities (p.25). Added IBM SCSI Adapter ECA 032 to Appendix C (p.36). Changed Appendix B headers from Micro to MCMaster. B2 Changed SIMM part numbers to use standard Kingston #s. Recommend 70ns, not 80ns per AOX.