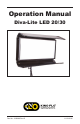
Operation Manual Diva-Lite LED 20/30 Part No.
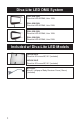
Diva-Lite LED DMX System DIV-L20X-120U Diva-Lite LED 20 DMX, Univ 120U DIV-L20X-230U Diva-Lite LED 20 DMX, Univ 230U DIV-L30X-120U Diva-Lite LED 30 DMX, Univ 120U DIV-L30X-230U Diva-Lite LED 30 DMX, Univ 230U Included w/ Diva-Lite LED Models LVR-SL290-P Diva-Lite 20 Louver/HP, 90° (Included) LVR-SL390-P Diva-Lite 30 Louver/HP, 90° (Included) MTP-LBC Kino 41 Lollipop w/ Baby Receiver Curve (16mm) (Included) 2
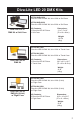
Diva-Lite LED 20 DMX Kits KIT-DL20XB-120U Diva-Lite LED 20 DMX Kit, Univ 120U w/ Soft Case KIT-DL20XB-230U Diva-Lite LED 20 DMX Kit, Univ 230U w/ Soft Case Diva-Lite LED 20 DMX Kit w/ Soft Case Kit Contents: 1 Diva-Lite LED 20 Fixture 1 Soft Case Dimensions: 31 x 7.5 x 18” (79 x 19 x 46cm) Weight: 19.
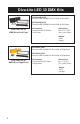
Diva-Lite LED 30 DMX Kits KIT-DL30XB-120U Diva-Lite LED 30 DMX Kit, Univ 120U w/ Soft Case KIT-DL30XB-230U Diva-Lite LED 30 DMX Kit, Univ 230U w/ Soft Case Diva-Lite LED 30 DMX Kit w/ Soft Case Kit Contents: 1 Diva-Lite LED 30 Fixture 1 Soft Case Dimensions: 42.5 x 7.5 x 16.
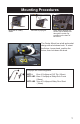
Mounting Procedures Mounted on a baby stand. Mounted to pipe grid. Note: When hanging in a studio, loop a safety cord through the metal ring provided on the back of the fixture. The Center Mount has a ball and socket design with a lockdown knob. To orient the fixture, loosen knob, position the fixture, then lock down the knob. Lollipops are interchangeable.
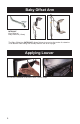
Baby Offset Arm MTP-B41F Kino Offset w/ Baby Receiver (16mm) The Baby Offset Arm (MTP-B41F) allows fixtures to mount on the center of a stand or it can also be under slung from a baby stand to use as an up light. Applying Louver The Louver is fastened to the fixture with 4 Velcro straps.
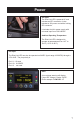
Power AC Input The Diva-Lite LED is powered AC and includes an IEC connection. It also includes a 12ft power cord with a locking IEC connector. It includes a built-in power supply with universal input from 100-240VAC. Ambient Operating Temperature The Diva-Lite LED is designed to operate at temperatures from 14°F to 104°F (-10°C to 40°C). DC Input The Diva-Lite LED can also be operated on 24VDC (input range 18-36VDC) through a 3-Pin XLR.
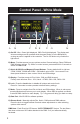
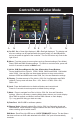
Control Panel - White Mode A B C D E F G H A) On /Off: On = Green light displayed. Off = Red light displayed. The display and all menu settings can be operated while the power button is in the Off position, as long as power is applied to the controller. The On /Off button only controls the light source. B) Menu: Provides access to menu options such as General settings, Reset, DMX and DMX Wireless settings. Tip: While on control screen, press and hold for 3 seconds to switch to Color mode.
Control Panel - Color Mode A B C D E F G H A) On /Off: On = Green light displayed. Off = Red light displayed. The display and all menu settings can be operated while the power button is in the Off position, as long as power is applied to the controller. The On /Off button only controls the light source. B) Menu: Provides access to menu options such as General settings (Color Mode), Reset, DMX and DMX Wireless settings.
Menu Overview 10
Dimming Press the Mode button to select Dim. Rotating the control knob will dim the light of the fixture. Default setting is Fine. Press the rotating knob once to shift to Coarse. When the power is turned off or removed, the display will remember its last setting.
Kelvin Selection/Presets Press the Mode button until Kelvin is highlighted. Default Presets: 1 = 2700K 2 = 3200K 3 = 5000K 4 = 6500K Default setting is Fine. Press the control knob to shift to Coarse. Rotating the control knob will change the Kelvin.
In White mode, Kelvin custom settings between 2700K to 6500K and displayed G/M can be assigned to any preset button by holding down the desired button for 3 seconds. In Color mode, Kelvin custom settings between 2500K to 9900K and displayed G/M, Gel or Hue angle and Saturation can be assigned to any preset button by holding down the desired button for 3 seconds. The Kelvin display will flash once the setting is registered.
Green/Magenta The Diva-Lite LED features a G/M (Green/Magenta) control to match the spectral sensitive curves of most popular cameras and other light sources. Green/Magenta Chart 100G +1 Green 50G +½ Green 25G +¼ Green 25M +¼ Magenta 50M +½ Magenta 100M +1 Magenta Press the Mode button until G/M is highlighted. Rotating the control knob to the right will adjust towards Green. Rotating to the left will adjust towards Magenta. Default setting is Fine.
Gel, Hue Angle & Saturation In Color mode (in addition to G/M control), Gel, Hue angle and Saturation adjustments are available. Kino Flo preset Gels and industry standard preset gels are included. Press Menu, select General and press control knob to change Mode to Color. Gel Press the Mode button until Gel is highlighted. Rotate the dimming knob to choose preset Gels. For DMX protocol for preset Gels, see www.kinoflo.com.
General Settings 16
Mode: White or Color Default is White mode. Custom Kelvin settings can be set between 2700K to 6500K. To change to Color mode, press the control knob. Custom Kelvin settings can be set between 2500K to 9900K. Timeout When choosing settings, if there is no activity, the display will default to Dim. The default for White mode is 5 seconds; the default for Color mode is 15 seconds, but can be changed by pressing the control knob to 0, 5, 15, 20 and 30 seconds. Smooth Default is On.
DMX DMX White mode: In White mode, the Diva-Lite LED operates on three DMX channels using DMX512 while in the default 8 Bit Dim mode. The first channel operates dimming; 2nd channel operates Kelvin color temperature control from 2700K to 6500K; 3rd channel operates G/M. Once an address is selected, the fixture automatically assigns 3 channels. Color Mode In Color mode, the Diva-Lite LED operates on six DMX channels using DMX512 while in the default 8 Bit Dim mode.
DMX Settings Press the Menu button to select DMX. Press and turn the control knob to select individual digit settings for a valid address from 1-512. On the main display, “X” next to DMX indicates DMX signal is present. All manual controls are disabled once the DMX cable is applied and DMX is turned on. To regain manual control with the DMX cable plugged in, set the DMX address to “0”. DIM Curve Default is Square. Press control knob to change to Linear.
DMX Wireless Settings The Diva-Lite LED includes a built-in Lumen Radio receiver and can be operated wirelessly with a Lumen Radio transmitter (sold separately). DMX Wireless is an alternative to using DMX cables. Set DMX address as previously instructed on p 19. For more information on Lumen Radio Receiver/Transmitter, see www.LumenRadio.com.
Enable Enables wireless DMX. Default is OFF. Press the control knob to turn Enable ON. The following are examples of what will be seen in the main display when wireless DMX is Enabled: 1) “R” with no signal bar: Indicates wireless DMX is enabled, but there is no connection to a transmitter. 2) “R” with signal bar: Indicates wireless DMX is enabled; the fixture is connected to a transmitter, but no valid DMX is currently being transmitted.
Accessories DFS-SL30-H Diva-Lite 30 Flozier, Half DFS-SL20-H Diva-Lite 20 Flozier, Half DFS-SL30-S Diva-Lite LED 30 Snapbag w/ 2 x Diffusion Diva-Lite LED 20 Snapbag w/ 2 x Diffusion DFS-SL20-S LVR-SL340-S Diva-Lite LED 30 Snapgrid 40° LVR-SL240-S Diva-Lite LED 20 Snapgrid 40° LVR-SL390-P LVR-SL360-P LVR-SL290-P LVR-SL260-P Diva-Lite 30 Louver/HP 90° Diva-Lite 30 Louver/HP 60° Diva-Lite 20 Louver/HP 90° Diva-Lite 20 Louver/HP 60° Lollipops are interchangeable.
Cases BAG-SL30 Diva-Lite LED 30 Soft Case BAG-SL20 Diva-Lite LED 20 Soft Case KAS-DL30 Diva-Lite LED 30 Flight Case KAS-DL20 Diva-Lite LED 20 Travel Case KAS-DL22 Diva-Lite LED 20 Flight Case (2) Diva-Lite LED Fixture Specifications DIV-L20X Diva-Lite LED 20 DMX AC Input Voltage: 100~240VAC 50/60Hz, 150W Amperage VAC: 1.3A at 120VAC, 0.65A at 230VAC DC Input Voltage: 18~36VDC, 150W Amperage VDC: 7.
FCC Part 15 Verification: This device complies with Part 15 of the FCC Rules. Operation is subject to the condition that this device does not cause harmful interference. FCC Part 15 Declaration of Conformity: This device complies with Part 15 of the FCC Rules. Operation is subject to the following two conditions: (1) this device may not cause harmful interference, and (2) this device must accept any interference received, including interference that may cause undesired operation.