GPS-910NA Portable Touchscreen Navigation System and A/V Media Player Quick-Start Guide
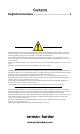
Contents English Instructions ................................................ 3 The Harman Kardon® GPS-910 uses a lithium-polymer battery. Under normal operating conditions, the battery will provide superior service with a lifespan that is superior to those of other battery types. Please observe the following guidelines to protect the performance of your GPS-910 and its battery: Do not operate the unit in ambient temperatures outside the following range: –10° C (14° F) to 55° C (131° F).
What’s in the Box ENGLISH GPS-910NA Car Charger Wall Charger USB Cable Quick-Start Guide Carrying Case Fold-Flat Mounting Bracket Plastic Adhesive Disc for Dash-Mount Wireless Remote Control w/Battery Mounting Disc for Wireless Remote Alcohol Cleaning Pads for Mounting Surfaces Before You Begin 1 2 Charge Battery at Least 6 Hours Unlock Switch Power On 4 To put the unit in stand by mode, PRESS the power button momentarily. To turn unit completely off, PRESS and HOLD the power button for 2 seconds.
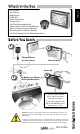
Setup Wizard 1 1 Select Language 2 2 1 Select Units 2 3 Select Time Zone 1 2 4 Set Time of Day 1 2 5 Quick-Start Guide Finished! The geographic information provided by this device serves as a navigational aid only and does not include information pertaining to construction, road closures, speed restrictions, road or traffic conditions, or other circumstances relevant to public safety.
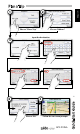
Plan a Trip 2 Choose “Plan a Trip” Choose “Address” 4 Input the destination 5 Choose “Go” Follow the on-screen prompts GPS-910NA Quick-Start Guide 3 ENGLISH 1
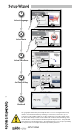
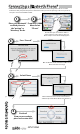
Connecting a Bluetooth Phone* * A Bluetooth® enabled phone is required operation with GPS-910NA calling features. Please read the instructions with your particular phone to determine how to place it into “pairing” or “discovery” mode to set up the connection with GPS-910NA. 1 2 Place your Bluetooth® From GPS-910NA enabled phone in Menu Select the “pairing” or “Phone” “discovery” mode.
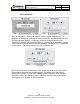
DOCUMENT NUMBER PN-SS-FUNC-1249 TITLE REV DATE 1.7.2 8/1/2007 User Interface Specification for Venice Personal Navigation Device FM Transmitter The FM transmitter is turned ON and OFF with the center footer button. The frequency is changed by pressing the arrow left (smaller number) and arrow right (for larger number) buttons. Frequency cannot be changed when the FM antenna is turned off.
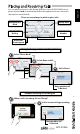
Placing and Receiving Calls ENGLISH You can place and receive calls directly from the screen of GPS-910NA once a phone is paired and an external hands-free microphone has been connected (microphone not included).
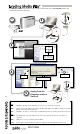
Loading Media Files* * An SD Memory Card is required for storage of audio and video files. This is not included with the unit and must be purchased separately. 1 2 3 SD Card Drive Name and Drive Letter depend on your settings 4 GPS-910 SD Card Media Files Drag and Drop Files 5 Unplug From the Computer, and You’re Finished! Quick-Start Guide GPS-910NA is compatible with the following A/V formats: Audio • MP3 VBR/CBR (8 - 448 kbps), 8 - 48 kHz, ID3 tags (v1 and v2.1 to v2.
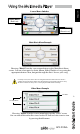
Using the Multimedia Player ENGLISH Source Menu Switcher Audio Menu (Red Icon) Video Menu (Green Icon) Main Music Menu Example Choosing “Music” from the source menu brings up the Main Music Menu screen. You can select music by Artist, Album, Genre, Playlist or Song, using the appropriate button. Then, navigate through the list to choose your song. For safety reasons, this device will cease navigation functions when the video mode is enabled.
In-Vehicle Installation Do not install this device in any manner that impairs the safe operation of the vehicle. Do not install this device on any airbag panels or in the deployment field of any airbags. Do not place the device on the vehicle’s dashboard unsecured. Failure to observe the installation or usage instructions may result in traffic accidents or personal injury.
Mounting the Control Knob ENGLISH 1 Select Mounting Location 2 CR2032/DL2032 Install Battery Use a coin to remove the bottom cover. 3 4 Mount Control Knob Base Toward front of car Attach Control Knob to Base Orient the base so that the arrow is facing the front of the car. You can either screw the base to the mounting location or use the supplied adhesive pad. If you use the adhesive pad, you must FIRST CLEAN the surface with the supplied alcohol cleaning pad.
Car Connections Connect to Audio System or Use Built-In Speaker 1 AUX IN 2 3 12 VDC Plug In for Charging and for Traffic Service Mount and Connect Hands-Free Microphone DC Power Hands-Free Microphone Audio Output Portable Audio 1 Connect Headphones or Ear Buds 2 Volume Headphone Jack Do not use headphones while driving! 12 Or Use the Built-In Speaker Quick-Start Guide Note: The headphone output may also be connected to the line/aux input of an audio device when the GPS-910NA is away from t
Activate Traffic Service ENGLISH 1 Choose “Traffic” 2 2 3 4 2 3 On the internet, go to: http://traffic.guideandpl ay.com 3 Enter ID: (Exampl e) 1F92F1CF48AB66 609 Visit activation website. Follow onscreen instuctions.
Text to Speech Feature GPS-910NA has a feature called “Text to Speech” in which navigation prompts that appear on the screen as text can be configured to be spoken in one of several voices (male or female). You can choose to have only directions announced or both directions and street names. For example, the voice would say: “In 500 feet, turn left on Lincoln Blvd.
Troubleshooting Make sure unit has a clear and unobstructed view of the sky Unit does not have songs/movies Requires loading to SD card Computer sees unit as “MTP Device” Change preference in “Settings” menu Screen is too bright or too dim Adjust in “Settings” menu or press rotary wheel on the right side Volume is too low for navigation prompts Adjust volume using rotary wheel on the right side or adjust volume of navigation prompts in Volume Mixer (Settings Menu) Output level is low or distorted w
IC Warning statement This digital apparatus does not exceed the Class B limits for radio noise emissions from digital apparatus as set out in the interference-causing equipment standard entitled "Digital Apparatus," ICES-003 of Industry Canada. Cet appareil numérique respecte les limites de bruits radioélectriques applicables aux appareils numériques de Classe B prescrites dans la norme sur le material brouilleur: "Appareils Numériques," NMB-003 édictée par l’Industrie.