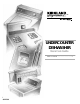
TM UNDERCOUNTER DISHWASHER Use & Care Guide Table of Contents ......................................
TABLE OF CONTENTS DISHWASHER SAFETY ................................................... 3 Before Using Your Dishwasher ....................................... 4 PARTS AND FEATURES.................................................. 5 START-UP GUIDE............................................................... 6 Using Your New Dishwasher........................................... 6 Stopping Your Dishwasher.............................................. 6 LOADING YOUR DISHWASHER ................................
DISHWASHER SAFETY Your safety and the safety of others is very important. We have provided many important safety messages in this manual and on your appliance. Always read and obey all safety messages. This is the safety alert symbol. This symbol alerts you to hazards that can kill or hurt you and others. All safety messages will be preceded by the safety alert symbol and the word “DANGER” or “WARNING.” These words mean: DANGER You will be killed or seriously injured if you don't follow instructions.
Before Using Your Dishwasher GROUNDING INSTRUCTIONS ■ For a grounded, cord-connected dishwasher: The dishwasher must be grounded. In the event of a malfunction or breakdown, grounding will reduce the risk of electric shock by providing a path of least resistance for electric current. The dishwasher is equipped with a cord having an equipment-grounding conductor and a grounding plug.
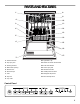
PARTS AND FEATURES 1. 8. 9. 2. 10. 3. 11. 4. 12. 13. 5. 14. 6. 15. 16. 17. 7. 1. Third level wash 10. Light items clip 2. Top spray arm 11. Model and serial number label 3. Heating element 12. Fold-down divider 4. Water inlet opening 13. Lower spray arm 5. Bottom rack 14. Silverware basket 6. Rack bumper 15. Overfill protection float 7. Vent 16. Detergent dispensers 8. Top rack 17. Rinse aid dispenser 9.
START-UP GUIDE 5. Select the desired cycle and options. (See “Using Your Dishwasher.”) Before using your dishwasher, remove all hang tags, temporary labels, and packaging materials. Read this entire Use and Care Guide. You will find important safety information and useful operating tips. Using Your New Dishwasher The dishwasher starts filling when you press a cycle. You can select options as the machine is filling. 1. Scrape large food soil and hard items (toothpicks or bones) from dishes. 2.
LOADING YOUR DISHWASHER Loading Suggestions ■ Loading the Top Rack The top rack is designed for cups, glasses, and smaller items. (See recommended loading patterns shown.) NOTE: The features on your dishwasher rack may vary from the drawings shown. Do not cover third level spray. See arrow. Remove leftover food, bones, toothpicks and other hard items from the dishes. It is not necessary to rinse the dishes before putting them in the dishwasher. The wash module removes food particles from the water.
Adjustable 3-position top rack Light Items Clips You can raise or lower the top rack to fit tall items in either the top or bottom rack. Two adjusters are located on each side of the top rack. Each adjuster has 3 preset positions. The high and low positions are marked on the adjuster. You can hold lightweight plastic items like cups, lids, or bowls in place during washing with the Light Items clips. You can move a clip anywhere in the rack. To adjust the top rack 1.
■ Load plates, soup bowls, etc., between prongs and facing inward to the spray. ■ Overlap the edges of plates for large loads. ■ Load soup, cereal, and serving bowls in the rack in a variety of ways depending upon their size and shape. Load bowls securely between the rows of prongs. Do not nest bowls because the spray will not reach all surfaces. Loading the Silverware Basket Load the silverware basket while it is in the bottom rack or take the basket out for loading on a counter or table.
USING YOUR DISHWASHER How Much Detergent to Use ■ The amount of detergent to use depends on the hardness of your water and the type of detergent. If you use too little, dishes won’t be clean. If you use too much in soft water, glassware will etch. ■ Water hardness can change over a period of time. Find out your water’s hardness by asking your local water department, water softener company, or county extension agent.
NOTE: Fill amounts shown are for standard powdered detergent. Amounts may vary if you use liquid or concentrated powdered detergent. Follow instructions on the package when using liquid dishwasher detergent or concentrated powdered detergent. Rinse Aid Dispenser A rinse aid prevents water from forming droplets that can dry as spots or streaks. It also improves drying by allowing water to drain off of the dishes during the final rinse by releasing a small amount of the rinse aid into the rinse water.
Use this cycle for pre-rinsed or lightly soiled Cycle Selection Chart loads. LOW ENERGY Select the wash cycle and options desired. The dishwasher starts filling once you press a cycle, unless you select the delay wash. You can select an option as the machine is filling. Use covered detergent dispenser section. PreWash Rinse Rinse ● ● Purge† Final Rinse Dry Time (min) Water Usage ● ● 68* 6.5/24.
Canceling a Cycle Anytime during a cycle, press Air Dry Select this option to dry dishes without heat and save energy. The dishes take longer to dry and some spotting can occur. AIR DRY CANCEL DRAIN For best drying, use a liquid rinse aid. Some items (such as plastics) may need towel drying. CANCEL/DRAIN glows. The dishwasher pauses for about 5 seconds and starts a 2 minute drain (if needed). Let the dishwasher drain completely. The light goes off when the dishwasher finishes the drain.
Cycle Status Indicators Follow the progress of your dishwasher with the Cycle Status Indicators. CLEAN glows when a cycle is finished. The light turns off when you open the door or press Cancel/ Drain. To lock the controls Press and hold AIR DRY for 5 seconds. CONTROLS LOCKED glows. If you press any pad while your dishwasher is locked, the light flashes 3 times. Washing WASHING glows at the start of the first fill of any cycle (except Rinse Only) and remains on until the end of the main wash.
WASHING SPECIAL ITEMS If you have doubts about washing a particular item, check with the manufacturer to see if it is dishwasher safe. MATERIAL DISHWASHER SAFE?/COMMENTS Aluminum Yes MATERIAL DISHWASHER SAFE?/COMMENTS Pewter, Brass, Bronze No Disposable Plastics No Plastics Yes High water temperature and detergents can affect finish of anodized aluminum.
CARING FOR YOUR DISHWASHER Cleaning Your Dishwasher Drain Air Gap Check the drain air gap anytime your dishwasher isn’t draining well Some state or local plumbing codes require the addition of a drain air gap between a built-in dishwasher and the home drain system. If a drain is clogged, the drain air gap protects your dishwasher from water backing up into it.
Storing Your Dishwasher Storing for the summer Protect your dishwasher during the summer months by turning off the water supply and power supply to the dishwasher. Moving or winterizing your dishwasher 5. Remove the spring clamp from the water outlet and separate from the water supply valve; drain water into pan. 6. Reconnect both water inlet and water outlet to the water supply valve. 7. Empty the pan and reposition it under the water pump. 8.
TROUBLESHOOTING Dishes are not completely clean ■ First try the solutions suggested here and possibly avoid the cost of a service call... Is the water temperature too low? If needed, turn home water heater up to ensure water entering dishwasher is at least 120°F (49°C). Refer to the “Dishwasher Efficiency Tips” section.
■ Brown stains on dishes and dishwasher interior Does your water have high iron content? Rewash dishes using 1-3 teaspoons (5-15 g) of citric acid crystals added to the covered section of the detergent dispenser. Do not use detergent. Follow with a Normal wash cycle with detergent. If treatment is needed more often than every other month, the installation of an iron removal unit is recommended.
ASSISTANCE OR SERVICE Before calling for assistance or service, please check “Troubleshooting.” It may save you the cost of a service call. If you still need help, follow the instructions below. When calling, please know the purchase date and the complete model and serial number of your appliance. This information will help us to better respond to your request. If you need replacement parts If you need to order replacement parts, we recommend that you only use Factory Specified Parts.
NOTES 21
NOTES 22
NOTES 23
DISHWASHER WARRANTY TM TWO-YEAR FULL WARRANTY For two years from the date of installation, when this dishwasher is operated and maintained according to instructions attached to or furnished with the product, Whirlpool will pay for Factory Specified Parts replacement parts and repair labor to correct defects in materials or workmanship. Service must be provided by a Whirlpool designated service company.