Installation Instructions and Use and Care Guide 30" (76.2 cm) 36" (91.4 cm) 48" (121.9 cm) Wall-Mount Canopy Range Hood IMPORTANT: Read and save these instructions. IMPORTANT: Installer: Leave Installation Instructions with the homeowner. Homeowner: Keep Installation Instructions for future reference. Save Installation Instructions for local electrical inspector's use.
Before you start... Your safety and the safety of others is very important. We have provided many important safety messages in this manual and on your appliance. Always read and obey all safety messages. This is the safety alert symbol. This symbol alerts you to potential hazards that can kill or hurt you and others. All safety messages will follow the safety alert symbol and either the word “DANGER” or “WARNING”.
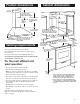
Product dimensions 5-7/8" (14.9 cm) Cabinet dimensions 10-7/8" (27.6 cm) 1" (2.5 cm) min. 20" (50.8 cm) max. upper chimney height 19" (48.3 cm)* 23" (58.4 cm) min. 42" (106.7) max. 22" (58.9 cm) overall chimney lower height chimney height 9-1/2" (24.1 cm) canopy height 19-1/4" (48.9 cm) overall depth 13" (33 cm) cabinet depth 30" hood 30" (76 cm), 36" hood 35-7/16" (90 cm) 48" hood 47-5/16" (120.2 cm) min. cabinet opening widths 30" hood 29-15/16" (76 cm), 36" hood 35-3/8" (89.
Venting methods This canopy range hood is factory set for venting through the roof or wall. For nonvented (recirculating) installations, see “Non-Vented (Recirculating) Kits” on back page. Vent system needed for installation is not included. 3-1/4" x 10" (8.3 cm x 25 cm) rectangular, 7" (17.8 cm) round, 8" (20.3 cm) round or 9" (22.9 cm) round vent may be used. The hood exhaust opening is 3-1/4" x 10" (8.3 cm x 25 cm). Vent system can terminate either through the roof or wall.
Electrical requirements Important: Observe all governing codes and ordinances. separate 15-amp circuit, fused on both sides of the line. It is the customer’s responsibility: Do not ground to a gas pipe. • To contact a qualified electrical installer. • To assure that the electrical installation is adequate and in conformance with National Electrical Code, ANSI/NFPA 70 — latest edition*, or CSA Standards C22.1-94, Canadian Electrical Code, Part 1 and C22.2 No.
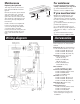
Electrical connection 7. Press on handle in front of filters to release filters from range WARNING hood canopy. Remove filters and set aside. 8. Remove the terminal box cover from the canopy hood. Remove the power supply cable knockout using a flat-blade screwdriver. Attach conduit connector into power supply cable opening so that conduit connector clamping screws are inside of canopy hood. WARNING Excessive Weight Hazard Use two or more people to move and install range hood.
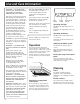
Check operation 16. Place filters in canopy openings so rear edge is over flange. Press filters up into position. 17. Turn power on. light switch blower switch blower speed switch 19. Check the operation of the range hood: control panel location 18. The canopy hood controls are located in a grey panel on underside of the canopy. To open the panel, press on the front edge of panel and release. The control panel will drop down.
Use and Care Information WARNING — TO REDUCE THE RISK OF FIRE, ELECTRIC SHOCK, OR INJURY TO PERSONS, OBSERVE THE FOLLOWING: Use this unit only in the manner intended by the manufacturer. If you have questions, contact the manufacturer. Before servicing or cleaning unit, switch power off at service panel and lock switch power off at service panel and lock service panel to prevent power from being switched on accidentally.
Maintenance For assistance: Replacing the light bulb: If you have questions about operating, cleaning or maintaining your range hood: Call the KitchenAid Consumer Assistance Center, 1-(800) 422-1230. This range hood uses fluorescent lamp type F33-15W-T8 and starter type 52. Remove the retainer clips from both ends of the light cover. Carefully slide the cover all the way to the right. Then lower the left end of the glass below the support flange and remove the glass by sliding it back from the left.
Warranty KitchenAid® Range Hood Warranty LENGTH OF WARRANTY KitchenAid WILL PAY FOR FULL ONE-YEAR WARRANTY From Date of Purchase Labor and any parts of your range hood (except light bulbs and filters) which are defective in materials or workmanship when this appliance is operated and maintained according to instructions attached to or furnished with this product. For models with a filter, 30 day limited warranty on filter.
Requesting Assistance or Service To avoid unnecessary service calls, please check the “Check Operation” section. It may save you the cost of a service call. If you still need help, follow the instructions below. If you need assistance or service in U.S.A. Call the KitchenAid Customer Interaction Center toll-free at 1-800-422-1230. Our consultants are available to assist you.
Requesting Assistance or Service Before calling for assistance or service, please check the “Check Operation” section. It may save you the cost of a service call. If you still need help, follow the instructions below. If you need assistance or service in Canada 1. If the problem is not due to one of the items listed in “Check Operation”✝... Contact the dealer from whom you purchased your appliance, or call the KitchenAid Canada Customer Interaction Center toll-free, 8:30 a.m. – 6 p.m.
Instructions d’installation et Guide d’utilisation et d’entretien Hotte d’aspiration pour cuisinière montage mural 76,2 cm (30 po) 91,4 cm (36 po) 121,9 cm (48 po) IMPORTANT : Lire et conserver ces instructions. Référence rapide Table des matières : Pages 2 Avant de commencer... 3 Dimensions du produit 3 Dimensions des placards IMPORTANT : 3 Circuit de décharge de l’air Installateur : Remettre les instructions d’installation au propriétaire de l’appareil.
Avant de commencer... Votre sécurité et celle des autres est très importante. Nous donnons de nombreux messages de sécurité importants dans ce manuel, et sur votre appareil ménager. Assurez-vous de toujours lire tous les messages de sécurité et de vous y conformer. Voici le symbole d’alerte de sécurité. Ce symbole d’alerte de sécurité vous signale les dangers potentiels de décès et de blessures graves à vous et à d’autres.
Dimensions des placards Dimensions du produit 14,9 cm (5 7/8 po) 27,6 cm (10 7/8 po) Cheminée - section supérieure hauteur de 2,5 cm (1 po) min. à 50,8 cm (20 po) max. 48,3 cm (19 po)* Cheminée - hauteur totale 58,4 cm (23 po) Cheminée min. à 106,7 cm section inférieure (42 po) max.
Configurations de circuit de décharge La hotte d’aspiration est configurée à l’usine pour la décharge à travers le toit ou un mur. Pour une installation sans évacuation de l’air (recyclage), voir en dernière page la section « Hottes à recyclage (sans décharge à l’extérieur) ». Le conduit d’évacuation nécessaire n’est pas inclus. On peut utiliser un conduit d’évacuation rectangulaire 8,3 cm x 25 cm (3 1/4 po x 10 po), ou conduit circulaire de diamètre 17,8 cm (7 po), 20,3 cm (8 po) ou 22,9 cm (9 po).
Alimentation électrique Important : Respecter les prescriptions de tous les codes et règlements en vigueur. C’est au client qu’incombe la responsabilité de : • Contacter un électricien qualifié pour l’installation. • Veiller à ce que l’installation électrique soit réalisée d’une manière adéquate et en conformité avec les prescriptions du Code national des installations électriques ANSI/NFPA 70 - dernière édition*, ou des normes ACNOR C22.1.94 / Code canadien des installations électriques (partie 1) et C22.
Raccordement au réseau électrique AVERTISSEMENT 7. Appuyer sur la manette à l’avant des filtres pour libérer les filtres; retirer les filtres de la hotte; conserver les filtres à part. 8. Ôter le couvercle de la boîte de connexion de la hotte. À l’aide d’un tournevis à lame plate, arracher l’opercule de l’orifice de passage du câble d’alimentation. Installer un connecteur de conduit dans cette ouverture; la vis de bridage du connecteur de conduit doit être à l’intérieur de la hotte.
Contrôle du fonctionnement 16. Placer les filtres dans leur logement dans la hotte (le bord arrière doit passer par-dessus le rebord). Appuyer pour insérer complètement chaque filtre. 17. Interrupteur Commutateur Sélecteur de vitesse d’éclairage du ventilateur ventilateur Mettre le système sous tension. 19. Contrôler le fonctionnement de la hotte. Pour obtenir la plus grande efficacité de cette nouvelle hotte, lire la section « Renseignements d’utilisation et entretien ».
Renseignements d’utilisation et entretien AVERTISSEMENT - POUR MINIMISER LE RISQUE D’INCENDIE, CHOC ÉLECTRIQUE OU DOMMAGES CORPORELS, RESPECTER LES INSTRUCTIONS SUIVANTES : Utiliser cet appareil uniquement dans les applications envisagées par le fabricant. Pour toute question, contacter le fabricant.
Entretien Si une assistance est nécessaire : Remplacement de la lampe : Pour toute question au sujet de l’utilisation, du nettoyage ou de l’entretien de la hotte : Téléphoner au Centre d’assistance aux consommateurs KitchenAid au 1-(800) 422-1230. L’éclairage est assuré par une lampe fluorescente de type F33-15W-T8, avec dispositif de démarrage S2. Ôter les agrafes de retenue aux deux extrémités du diffuseur de la lampe. Faire coulisser le diffuseur complètement vers la droite.
Garantie Garantie de la hotte d’aspiration KitchenAid® DURÉE DE LA PÉRIODE DE GARANTIE KitchenAid PAIERA GARANTIE COMPLÈTE DE UN AN À compter de la date d’achat Pièces et main-d’œuvre (sauf lampes et filtres) pour l’élimination d’un vice de matériau ou de fabrication lorsque cet appareil est utilisé et entretenu conformément aux instructions jointes à ou fournies avec ce produit. Pour les modèles avec filtre, une garantie limitée de 30 jours s’applique sur le filtre.
Demande d'assistance ou de service Si vous avez besoin d'assistance ou de service aux É.-U. Téléphoner au Centre d'interaction avec la clientéle KitchenAid sans frais d'interurbain au 1-800-422-1230. Nos consultants sont disponibles pour vous aider. Lors de votre appel, veuillez connaître la date d’achat et les numéros au complet de modèle et de série de votre appareil. Ces renseignements nous aideront à mieux répondre à votre demande.
Demande d’assistance ou de service Avant de faire un appel pour assistance ou service, veuillez vérifier la section “Contrôle du fonctionnement”. Cette vérification pourrait vous faire économiser le coût d’une visite de service. Si vous avez encore besoin d’aide, suivre les instructions ci-dessous. Si vous avez besoin d'assistance ou de service au Canada 2. Si vous avez besoin de service✝... 1.