YL10564/8284829B 8/7/01 3:32 PM Page 1 Installation Instructions and Use and Care Guide 36" (91.4 cm) 42" (106.7 cm) 48" (121.9 cm) Wall-Mount Pro Line™ Range Hood IMPORTANT: Read and save these instructions. Quick Reference Table of Contents: Pages 2 Before you start 3 Product dimensions 3 Cabinet dimensions IMPORTANT: 3 Venting requirements Installer: Leave Installation Instructions with the homeowner. Homeowner: Keep Installation Instructions for future reference.
YL10564/8284829B 8/7/01 3:32 PM Page 2 Before you start... Your safety and the safety of others is very important. We have provided many important safety messages in this manual and on your appliance. Always read and obey all safety messages. This is the safety alert symbol. This symbol alerts you to potential hazards that can kill or hurt you and others. All safety messages will follow the safety alert symbol and either the word “DANGER” or “WARNING”.
YL10564/8284829B 8/7/01 3:32 PM Page 3 Product dimensions Cabinet dimensions 12-1/32" (30.6 cm) vent cover (if used) 12" (30.5 cm) 36" (91.4 cm) hood: 36" (91.4 cm) 42" (106.7 cm) hood: 42" (106.7 cm) 48" (121.9 cm) hood: 48" (121.9 cm) min. cabinet opening widths 2-7/32" (5.6 cm) 18-3/16" (46.2 cm) canopy 1-3/8" (3.5 cm) 13" (33 cm) cabinet depth 25-3/16" (64 cm) 36" (91.4 cm) hood: 35-7/8" (91.1 cm) 42" (106.7 cm) hood: 41-7/8" (106.4 cm) 48" (121.9 cm) hood: 47-7/8" (121.6 cm) 18" (45.
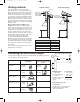
YL10564/8284829B 8/7/01 3:32 PM Page 4 Venting methods This canopy range hood is factory set for vertical venting. For rear vent applications, the blower must be turned inside the range hood so that the blower vents to the rear as indicated. The blower is turned by removing two screws on each side of the blower, rotating the blower with the exhaust opening facing the rear and then replacing the screws. The exhaust cover(s) must be moved to block the unused opening(s).
YL10564/8284829B 8/7/01 3:32 PM Page 5 Electrical requirements Important: Observe all governing codes and ordinances. separate 15-amp circuit, fused on both sides of the line. It is the customer’s responsibility: Do not ground to a gas pipe. • To contact a qualified electrical installer. • To assure that the electrical installation is adequate and in conformance with National Electrical Code, ANSI/NFPA 70 — latest edition*, or CSA Standards C22.1-94, Canadian Electrical Code, Part 1 and C22.2 No.
YL10564/8284829B 8/7/01 3:32 PM Page 6 Vent and Electrical openings 1-1/4" (3.2 cm) CL All vent openings are 3-1/4" x 10" (8.3 cm x 25.4 cm) 1-1/8" (2.9 cm) Electrical opening 2-7/8" (7.5 cm) 9-11/16" (24.6 cm) 6-3/32" (15.5 cm) 36" (91.4 cm) hood 42" (106.7 cm) hood 6-3/32" (15.5 cm) Electrical opening 48" (121.9 cm) hood 5. The hood attaches to the wall with the mounting screws located as shown. For the 36" (91.4 cm) models, there are two mounting screws. For the 42" (106.
YL10564/8284829B 8/7/01 3:32 PM Page 7 5b. If chimney extension is used: Attach the extension brackets as shown. 10-5/8" (27 cm) ceiling brackets 8-1/8" (20.6 cm) 23" (58.4 cm) max. 12" (30.5 cm) min. 8-1/8" (20.6 cm) top of hood Make sure that the screws are securely fastened to the wall. WARNING Excessive Weight Hazard Use two or more people to move and install range hood. Failure to do so can result in back or other injury. 9.
YL10564/8284829B 8/7/01 3:32 PM Page 8 16. Install the filters. • Remove the filters from the box and remove the white protective coating from the filters. • Grasp one of the filters so that the knob faces down and toward the back of the hood. • Insert the filter end without the knob into the retaining channel in the front of the hood. • Pull and turn the knob to the left (counterclockwise) so that the locking lever does not protrude from the filter.
YL10564/8284829B 8/7/01 3:32 PM Page 9 Replacing the Halogen lamps: Opening the canopy hood control panel: The hood controls are located on the right-hand underside of the canopy. controls Cleaning Filters: The filters should be washed frequently. Place metal filters in dishwasher or hot detergent solution to clean. To remove filters: • Pull knob forward, toward the front of the hood, while turning the knob to the left (counterclockwise) to release the locking lever. To reinstall filters, see Step 16.
YL10564/8284829B 8/7/01 3:32 PM Page 10 Wiring diagrams For 36" (91.4 cm) and 42" (106.7 cm) hoods For 48" (121.9 cm) hoods Warranty KitchenAid® Range Hood Warranty LENGTH OF WARRANTY KitchenAid WILL PAY FOR LIMITED ONE-YEAR WARRANTY From Date of Purchase Labor and any parts of your range hood (except light bulbs and filters) which are defective in materials or workmanship. KitchenAid WILL NOT PAY FOR A. Consumable parts such as light bulbs and filters. B. Service calls to: 1.
YL10564/8284829B 8/7/01 3:32 PM Page 11 Requesting Assistance or Service To avoid unnecessary service calls, please check the “Check Operation” section. It may save you the cost of a service call. If you still need help, follow the instructions below. If you need assistance or service in U.S.A. Call the KitchenAid Customer Interaction Center toll-free at 1-800-235-0665. Our consultants are available to assist you.
YL10564/8284829B 8/7/01 3:32 PM Page 12 Requesting Assistance or Service Before calling for assistance or service, please check the “Check Operation” section. It may save you the cost of a service call. If you still need help, follow the instructions below. If you need assistance or service in Canada 1. If the problem is not due to one of the items listed in “Check Operation”✝...
YL10564/8284829B-Fre 8/7/01 3:30 PM Page 1 Instructions d’installation et Guide d’utilisation et d’entretien Hotte d’aspiration pour cuisinière Pro Line™- montage mural 91,4 cm (36 po) 106,7 cm (42 po) 121,9 cm (48 po) IMPORTANT: Lire et conserver ces instructions. Référence rapide Table des matières : Pages 2 Avant de commencer...
YL10564/8284829B-Fre 8/7/01 3:30 PM Page 2 Avant de commencer. . . Votre sécurité et celle des autres est très importante. Nous donnons de nombreux messages de sécurité importants dans ce manuel, et sur votre appareil ménager. Assurez-vous de toujours lire tous les messages de sécurité et de vous y conformer. Voici le symbole d’alerte de sécurité. Ce symbole d’alerte de sécurité vous signale les dangers potentiels de décès et de blessures graves à vous et à d’autres.
YL10564/8284829B-Fre 8/7/01 3:30 PM Page 3 Dimensions du produit Dimensions des placards 30,6 cm (12 1/32 po) 30,5 cm (12 po) garniture cache-conduit (option) 5,6 cm (2 7/32 po) 46,2 cm (18 3/16 po) hotte 91,4 cm (36 po) : 91,4 cm (36 po) hotte 106,7 cm (42 po) : 106,7 cm (42 po) hotte 121,9 cm (48 po) : 121,9 cm (48 po) distance libre min.
YL10564/8284829B-Fre 8/7/01 3:30 PM Page 4 Configurations de circuit de décharge La hotte d’aspiration est configurée à l’usine pour la décharge à travers le toit ou un mur. Pour l’évacuation par l’arrière, il faut modifier l’orientation du ventilateur à l’intérieur de la hotte pour que le ventilateur rejette l’air par l’arrière. Pour cela, ôter les deux vis de chaque côté du ventilateur, changer l’orientation du ventilateur pour placer la décharge face à l’arrière, puis réinstaller les vis.
YL10564/8284829B-Fre 8/7/01 3:30 PM Page 5 Alimentation électrique Important : Respecter les prescriptions de tous les codes et règlements en vigueur. C’est au client qu’incombe la responsabilité de : • Contacter un électricien qualifié pour l’installation. • Veiller à ce que l’installation électrique soit réalisée d’une manière adéquate et en conformité avec les prescriptions du Code national des installations électriques ANSI/NFPA 70 - dernière édition*, ou des normes CSA C22.1.
YL10564/8284829B-Fre 8/7/01 3:30 PM Page 6 • Déterminer la hauteur d’installation de la hotte. • Positionner la hotte contre le mur en faisant coïncider le bord inférieur de la hotte avec le sommet du dosseret. Marquer la position des quatre trous des angles.
YL10564/8284829B-Fre 8/7/01 3:30 PM Page 7 7. Déterminer la hauteur appropriée pour l’orifice de passage du câble d’alimentation; percer un trou de 32 mm (1 1/4 po) à cet endroit. Faire passer le câble à travers le trou selon les prescriptions du Code national des installations électriques ou de la norme CSA, ou des codes ou règlements locaux en vigueur. La longueur du câble devra être suffisante pour qu’il soit possible de réaliser les connexions adéquates dans la boîte de connexion de la hotte.
YL10564/8284829B-Fre 8/7/01 3:30 PM Page 8 16. Installer les filtres. • Sortir les filtres de la boîte et enlever la pellicule de protection blanche des filtres. • Saisir l’un des filtres de telle sorte que le bouton soit orienté vers le bas et vers l’arrière de la hotte. • Insérer l’extrémité du filtre ne comportant pas le bouton dans la rainure de retenue à l’avant de la hotte.
YL10564/8284829B-Fre 8/7/01 3:30 PM Page 9 Remplacement d’une lampe à halogène Utilisation de la hotte Nettoyage La fonction de la hotte est d’aspirer les fumées, vapeurs de cuisson et odeurs au-dessus de la table de cuisson. Pour obtenir les meilleurs résultats, mettre le ventilateur de la hotte en marche avant le début de la cuisson, et laisser le ventilateur fonctionner pendant plusieurs minutes après l’achèvement de la cuisson, pour l’extraction de toute fumée et odeur de la cuisine.
YL10564/8284829B-Fre 8/7/01 3:30 PM Page 10 Ensembles d’installation – disponibles chez le revendeur local Accessoires utilisables pour l’installation – option disponibles chez le revendeur local Note : Ces ensembles sont disponibles seulement en acier inoxydable. Dosseret* : Le dosseret doit être installé avant l’installation de la hotte.
YL10564/8284829B-Fre 8/7/01 3:30 PM Page 11 Garantie Hotte d’aspiration KitchenAid® DURÉE DE LA PÉRIODE DE GARANTIE KitchenAid PAIERA GARANTIE LIMITÉE D’UNE ANNÉE À compter de la date d’achat Pièces et main-d’œuvre (sauf lampes et filtres) pour l’élimination d’un vice de matériau ou de fabrication. KitchenAid NE PAIERA PAS A. Pièces consomptibles comme lampes et filtres. B. Intervention d’un technicien pour : 1. Rectifier l’installation de la hotte. 2. Formation de l’utilisateur. 3.
YL10564/8284829B-Fre 8/7/01 3:30 PM Page 12 Demande d’assistance ou de service Avant de faire un appel pour assistance ou service, veuillez vérifier la section “Contrôle du fonctionnement”. Cette vérification pourrait vous faire économiser le coût d’une visite de service. Si vous avez encore besoin d’aide, suivre les instructions ci-dessous. Si vous avez besoin d'assistance ou de service au Canada 2. Si vous avez besoin de service✝... 1.