
Installation Instructions and Use and Care Guide 36" (91.4 cm) 48" (121.9 cm) Island Canopy Range Hood


7
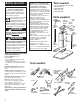
Install chimney
sections
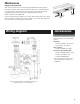
Check operation
13 . Connect vent to damper or
hood and seal all connections with
duct tape.
upper
chimney
lower
chimney
upper
chimney
trim
clip
clips
chimney
holes
lower
chimney
trim
15 . Cut upper chimney trim to
correct length. Be careful not to bend
strips while cutting. Slide clips into
trim. Postion to align with chimney
holes. Push trim strips so that clips
snap into holes.
16 . Place filters in canopy
opening so rear edge is over flange.
Press filters up into position.
Fit lower chimney section over upper
chimney section. Note: clip hole
arrows must point toward ceiling.
Check for proper position. Then
secure upper and lower chimney
sections to support system frame with
four screws.
14 . Position upper chimney
section on support system frame and
secure with two screws.
clip
chimney
holes
trim
upper chimney
support
system frame
screw
screws
upper
chimney
control panel
location
light
switch
blower
switch
blower speed
switch
19 . Check the operation of the
range hood:
Move light switch to “1” position.
The light should turn on.
Move blower switch to “1”
position. The blower should
operate.
Move the blower speed switch to
the far left; blower speed should
be LOW. Move blower speed to
right; blower speed should
gradually increase until you reach
HIGH speed at far right.
Move blower and light switches to
“0” position to turn blower and
light off.
If range hood does not operate:
Check that the circuit breaker is
not tripped or the house fuse
blown.
Disconnect power supply. Check
that wiring is correct.
18 . The island canopy hood
controls are located in a grey panel on
underside of the canopy. To open the
panel, press on the front edge of
panel and release. The control panel
will drop down.
17. Turn power on.