® OWL-LIFT STAN IX INSTRUCTIONS AND RECIPES 1-800=807-6777 Call our Customer experience Center with questions or comments Website: www.KitchenAid.
Product Registration Card Before you use your stand mixer, please fill out and mail your product registration card packed with the Instructions and Recipes manual. This card will enable us to Keep a copy of showing the date your stand mixer. will assure you of service. contact you in the unlikely event of a product safety notification. This card does not verify your warranty.
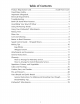
Table of Contents Product Stand Registration Mixer Safety Card ................................................... Safeguards Electrical Requirements Bowl-Lift the Using Your Mixing 2 .................................................................................... 2 .................................................................................. 3 Mixer Your Using Cover ............................................................................................
Stand Mixer Safety Your safety and the safety of others are very important. We have provided many important safety messages in this manual and on your appliance. Always read and obey all safety messages. This is the safety alert symbol. This symbol alerts you to potential you and others. hazards that can kill or hurt All safety messages will follow the safety alert symbol and either the word "DANGER" or "WARNING.
Electrical Requirements Volts: 120 A.C. only. Hertz: 60 The wattage rating for your stand mixer is printed on the serial plate. Do not use an extension cord. If the power supply cord is too short, have a qualified electrician or serviceman install an outlet near the appliance. The maximum the attachment Electrical rating is based on that draws the greatest load (power). Other recommended attachments may draw significantly less power. Shock Hazard Plug into a grounded outlet.
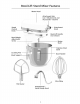
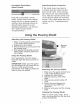
Bowl-Lift Stand Mixer Features Motor Head Attachment Hub (see "Attachments and Accessories" section) Attachment Knob Speed Control Knob Bowl-Lift Handle (not shown) Bowl Height Adjustment Screw Beater Shaft Stainless Bowl Locating Bowl Pins Bowl Handle Support S Wire Fiat Beater Power Knea d TM Spiral Dough Hook 4 Steel Whip
Assembling Your Bowl-Lift Mixer To Lower Bowl 1. Rotate handle To Remove back and down. Bowl 1. Turn speed control to OFF. 2. Unplug stand mixer. 3. Place bowl-lift handle in down Electrical Shock Hazard Plug into a grounded 3 prong outlet. Do not remove ground prong. Do not use an adapter. Do not use an extension Failure to follow these instructions can result death, fire, or electrical To Attach cord. in shock. position. 4. Remove flat beater, wire whip, or spiral dough hook. 5.
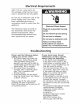
Household Stand Mixer Speed Control Auto-Reset Motor Protection Plug into a grounded 3 prong outlet. Speed control lever should always be set on lowest speed for starting, then gradually moved to desired higher speed to avoid splashing ingredients out of bowl. See "Speed Control Guide 10-Speed Mixers." If the stand mixer stops due to overload, slide the speed control lever to OFF. After a few minutes, the stand mixer will automatically reset.
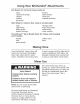
Using Your KitchenAid ®Attachments Flat Beater for normal to heavy mixtures: cakes biscuits creamed candies cookies frostings quick meat breads loaf mashed potatoes pie pastry Wire Whip for mixtures that need air incorporated: sponge cakes angel food cakes mayonnaise some candies eggs egg whites heavy cream boiled frostings PowerKnead yeast doughs: TM Spiral Dough Hook for breads rolls pizza dough mixing and kneading coffee cakes buns Mixing Time Your KitchenAid _ stand mi
Care and Cleaning Bowl, white flat beater and white spiral dough hook may be washed in an automatic dishwasher. Or, clean them thoroughly in hot sudsy water and rinse completely before drying. Wire whip, burnished spiral dough hook and burnished flat beater should be hand washed and dried and burnished flat beater in a dishwasher. Do not store beaters on shaft. NOTE: Always be sure to unplug stand mixer before cleaning. Wipe stand mixer with a soft, damp cloth. Do not use household/ commercial cleaners.
Speed Control Guide- l O-Speed Mixers All speeds have the Soft Start ® feature which automatically starts the stand mixer at a lower speed to help avoid ingredient splash-out and "flour puff" at start-up then quickly increases to the selected speed for optimal performance. Number of Speed Stir Speed STIR 2 SLOW 4 MIXING, BEATING For mixing semi-heavy batters, such as cookies. Use to combine sugar and shortening and to add sugar to egg whites for meringues. Medium speed for cake mixes.
Mixing Converting Your Recipe for the Mixer Tips Adding Ingredients Always side of directly Pouring simplify NOTE: bottom mixed, enough to Bowl The mixing instructions for recipes in this book can guide you in converting your own favorite recipes for preparation with your KitchenAid _ stand mixer. Look for recipes similar to yours and then adapt your recipes to use the procedures in the similar KitchenAid _ recipes.
Egg Whites Whipped Place room temperature egg whites in clean, dry bowl. Attach bowl and wire whip. To avoid splashing, gradually turn to designated speed and whip to desired stage. See chart below. AMOUNT Pour cold whipping cream into chilled bowl. Attach bowl and wire whip. To avoid splashing, gradually turn to designated speed and whip to desired stage. See chart below. AMOUNT SPEED 1/4cup 1/2cup 1 cup 1 pint 1 egg white ..... GRADUALLY to 10 2-4 egg whites ......
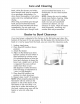
Attachment Knob Attachment Power / Hinged Hub Cover _ Attachment Housing J Attachment Hub Socket _Not part Shaft_t Notch Pin of mixer. ent Shaft Housing General Instructions To Attach 1. Turn speed control to OFF. 2. Unplug stand mixer. 3. Loosen attachment knob by turning it counterclockwise. 4. Flip up hinged hub cover. 5. Insert attachment shaft housing into attachment hub, making certain that attachment power shaft fits into square attachment hub socket.
KitchenAid ®Stand Mixer Warranty KitchenAid Length of Warranty: Will One Year Full warranty from date of purchase. Canada Pay For: KitchenAid Will Replacement parts and repair labour costs to correct defects in materials and workmanship. Service must be provided by a designated KitchenAid Service Centre. Not Canada Pay For: A. Repairs when stand mixer is used in other than normal singlefamily household use. B.
How to Arrange for Out-of-Warranty • First review the Troubleshooting section below. Service • Take the stand mixer or ship prepaid and insured to a designated KitchenAid Service Centre. Your repaired stand mixer will be returned prepaid and insured. • Then, consult your telephone directory for a designated KitchenAid Service Centre near you. If one is not listed contact KitchenAid Service from anywhere in Canada at 1-800-807-6777.
Attachments - For More Multifunction information call 1-800-807-6777 Attachment Pack Model FPPA Three popular KitchenAid _ attachments have been packaged one carton. It includes a Rotor Slicer/Shredder (RVSA), Food Grinder Strainer (FGA), and Fruit/Vegetable Parts (FVSP). Food Grinder Model FGA Grinds meat, firm fruits and vegetables, and dry bread. FruitNegetable Strainer Model FVSFGA Makes preparing jams, pur_es, sauces and baby foods quick and easy. Comes with Food Grinder.
Attachments - For More information call 1-800-807-6777 Food Tray Model FT Holds large quantities of food for quicker and easier juicing, pureeing and grinding. For use with FGA. .................................... ..... Sausage Stuffer Model SSA _" (9 mm) and _" (1 5 mm) stuffing tubes make Bratwurst, Kielbasa, Italian or Polish Sausage and breakfast links. For use with FGA. Rotor Slicer/Shredder Model RVSA Includes 4 cones: thin and thick slicer, fine and coarse shredder.
Attachments - For More information call 1-800-807-6777 Grain Mill Model GMA Grinds low-moisture fine to extra coarse grains from textures. very Can Opener Model CO Opens cans quickly, leaves smooth and snag-free. edges Pasta Roller and Cutter Set Model KPRA Makes lasagna noodles, fettuccini and linguine fini. 3-piece set includes Roller, Fettuccine Cutter and Linguine Fini Cutter.
Attachments - For More information call 1-800-807-6777 Citrus Juicer Model JE Juices citrus thoroughly, 81 fruits quickly and strains out pulp.
Attachments - For More information call 1-800-807-6777 Pouring Shields Model ...... ?17!:_!: 'Ii!i_ i?:;!::¸:::::®i_ii::!!_ ¸¸¸ _iii_iii; ::_iU_ _i_:i KN1PS (fits all 5 qt [4.73 L] bowl-lift models except the 5 qt [4.73 L] 4KV models) Minimizes splash-out when adding ingredients. Model KN256PS (fits all 6 qt [5.68 L] and 4KV 5 qt [4.73 L] bowl-lift models) Minimizes splash-out when adding ingredients. 9708308B © 2010. All rights reserved.
9708308B ® D6posee/TM Marque de commerce/La forme du © 2010. Tous droits r6serv6s, batteur sur socle est une marque d6pos6e de KitchenAid, U.S.A. 3/10 Imprim6 aux U.S.A.