, iNSTRU AND RECIPES Techniques for peak performance: The use and care of your Ki t c h e n Ai d _ Tilt Head ",_;,,j,,],;:,,:,,b_ Mixer N__,_-_:_ ,,®
.... IXBLEQ F CQ bITEbITS Proof of Purchase and Product Registration .................................................... 3 Stand Mixer Safety ................................................................................... 4 Important Safeguards ................................................................................ 4 Electrical Requirements .............................................................................. 5 KitchenAid ® Stand Mixer Warranty ................................
.... IABL % MAN R S Preuve d'achat et enregistrement du produit ................................................ 20 S¢curit¢ du batteur sur socle ..................................................................... 21 Consignes de s¢curit¢ importantes ............................................................. 21 Contraintes ¢lectriques ............................................................................ 22 Garantie du batteur sur socle KitchenAid _-*> .................................
ND Comprobante de compra y registro del producto ......................................... 40 Seguridad de la batidora con base ........................................................... 41 Medidas de seguridad importantes ........................................................... 41 Requisitos el¢ctricos ................................................................................ 42 Garantia de la batidora con base KitchenAid c*> ............................................
C:: ........... ........ ..... Always keep a copy of the sales receipt shovving the date of purchase of your Stand Mixer. Proof of purchase will assure you of in-warranty service. Before you use your Stand Mixer, please fill out and mail your product registration card packed with the unit. This card will enable us to contact you in the unlikely event of a product safety notification and assist us in complying with the provisions of the Consumer Product Safety Act. This card does not verify your warranty.
SIi h/,i M XEt
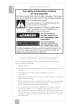
i;:_Theuseof attachments notrecommended or soldby KitchenAid maycause fire,electrical shockor injury. 8_ DonotusetheStandMixeroutdoors. 9 Donotletthecordhangoveredgeof tableor counter. _/0_Remove FlatBeater, WireWhip or DoughHookfromStandMixer beforewashing. _/ Thisproductisdesignedforhousehold useonly. S Volts: 120 V.A.C. Hertz: 60 Hz The vvattage rating for your Stand Mixer is printed on a tag under the mixer base. It is also listed on the trim band.
Lengthof Warranty: KitchenAid Will Pay For: KitchenAid Will Not Pay For: 50 United States, the District of Columbia, Canada, and Puerto 50 United States, the District of Columbia and Canada: Hassle- A. Repairs when Stand Mixer is used in other Rico: One-year limited warran V from date of purchase. free replacement of your Stand Mixer. See the follovving page for details on how to arrange for replacement.
We'resoconfidentthequalityof our products meetstheexactingstandards of KitchenAid that,ifyourStandMixer shouldfailvvithinthefirstyearof ownership, KitchenAid will arrange todeliveran identicalor comparable replacement toyourdoorfreeof charge andarrangetohaveyouroriginal StandMixerreturned tous.Your replacement unitwill alsobecovered byouroneyearlimitedwarranty. Please follovvtheseinstructions to receivethisqualityservice.
YourKitchenAid ®StandMixeris coveredbya one-year limitedwarranty fromthedateof purchase.KitchenAid will payforreplacement partsand laborcoststocorrectdefectsin materials andworkmanship. Service mustbe providedbyanAuthorized KitchenAid ServiceCenter_ A R TaketheStandMixeror shipprepaid andinsured toanAuthorized KitchenAid ServiceCenter.YourrepairedStand Mixervvillbe returned prepaidand insured.
To order accessories or replacement parts for your Stand Mixer in the 50 United States, District of Columbia, and Puerto Rico, call toll-free 1-800-541-6390 Monday through Friday, 8 a.m. to 8 p.m. (Eastern Time), or Saturday, 10 a.m. to 5 p.m. Or write to: Customer Satisfaction Center KitchenAid Portable Appliances P.O. Box 218 St.
.... 1 EA/;_SI;_ /;_M XEtqEAI/_ tqES Motor Head Speed Con_ol Knob Attachment Hub -- Attachment Knob Motor Head Lacking Lever (not shown) Beater Shaft Flat Beater Beater Heigl Adjustment Screw 4_,_or 5 Quart (4.26 or 4.73 L) Stainless Steel Bawl Wire Whip Dough Hook Bowl Clamping Plate NOTE: This photo shows the Artisan _-_*> Series Stand Mixer. The features on your mixer model may differ slightly.
Electrical Shock Hazard Plug into a grounded 3 prong outlet. Do not remove ground prong. Do not use an Do not use adapter. an extension cord. Failure to follow these instructions can result in death, fire, or electrical shock. To Attach Fiat Beater, Wire Whip, or Dough Hook 'ii Turn speed control to OFF. 2 Unplug Stand Mixer or disconnect power. 3_ Tilt motor head back. 4, Slip beater onto beater shaft and press upward as far as possible. _, Turn beater to right, hooking beater over pin on shaft.
................ _ ...... ..... /% To Operate Speed Control Speed control lever should always be set on lowest speed for starting, then gradually moved to desired higher speed to avoid splashing ingredients out of bowl. See page 15 for Speed Control Guide. _( Speed Control ................... To Lock Motor Head Make sure motor head is 2 '3 completely down. Place locking lever in LOCK Lock Unlock position. Before mixing, test lock by attempting to raise head.
,,, <,===, Y()t+ k /c ...... ,+-,_,_,+_, ......
.... MXEtq/sE NOTE: Do not scrape the bowl while the Stand Mixer is operating. injury Hazard Unplug mixer before touching beaters. Failure to do so can result in broken cuts or bruises. bones, Bowl, white Flat Beater and ,white Dough Hook may be washed in an automatic dishwasher. Or, clean them thoroughly in hot sudsy ,water and rinse completely before drying. Wire Whip, burnished Dough Hook and burnished Flat Beater should be hand washed and dried immediately.
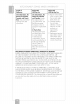
SPEED USE FOR DESCRIPTION For slow stirring, combining, mashing, starting all mixing procedures. Use to add flour and dry ingredients to batter, add liquids to dry ingredients, and combine heavy mixtures. Use with Ice Cream Maker attachment. For slow mixing, mashing, faster stirring. Use to mix heavy batters and candies, start mashing potatoes or other vegetables, cut shortening into flour, mix thin or splashy batters, and mix and knead yeast dough. Use with Can Opener attachment.
X b q) I :::S Converting Your Recipe for the Mixer The mixing instructions for recipes in this book can guide you in converting your own favorite recipes for preparation ,with your KitchenAid ® Stand Mixer. Look for recipes similar to yours and then adapt your recipes to use the procedures in the similar KitchenAid recipes. For example, the "quick mix" method (sometimes referred to as the "dump" method) is ideal for simple cakes, such as the Quick Yellow Cake and Easy White Cake included in this book.
Placeroomtemperature eggwhitesina clean,dry bovvl.AttachbowlandWire Whip.Toavoidsplashing, graduallyturntodesignated speedandwhipto the desiredstage.Seechartbelow. SPEED Soft Peak 1 egg white ...... GRADUALLY to 10 2+ egg vvhites ..... GRADUALLY to 8 Whipping Stages With your KitchenAid ® Stand Mixer, egg vvhites whip quickly. So, watch closely to avoid overwhipping. This list tells you what to expect. Tips of peaks fall over when Wire Whip is removed.
General Information KitchenAid ® attachments are designed to assure long life. The attachment power shaft and hub socket are of a square design, to eliminate any possibility of slipping during the transmission of power to the attachment. The hub and shaft housing are tapered to assure a snug fit, even after prolonged use and wear. KitchenAid ® attachments require no extra power unit to operate them; the power unit is built in. Attachment ....... ..........
'c;_ N E_AL/_I S_T_II(_X̧¸¸¸ 0_I St To Attach To Remove '_ Turn the speed control to OFF. 2 Unplug mixer or disconnect power. 3, Loosen the attachment knob by turning it counterclockwise, and remove the attachment hub cover 4, or flip up hinged hub cover. Insert the attachment shaft housing into the attachment hub, making certain the attachment power shaft fits into the square attachment hub socket. It may be necessary to rotate the attachment back and forth.
© 2009 PublicationsInternational, Ltd. KitchenAid, For The Way I_'sMade and _he shape of the s_andmixers are Trademarks of KitchenAid, U.S.A. All other trademarks are owned by their respective companies. This publication and the photographs contained therein © 2009 by Publications international, Ltd. Recipes and text on the inside front cover and pages 1-99, 101-109, 111-125, 127-135 and 137-142 © 2009 by KitchenAid. All rights reserved.
FOR THE WAY iT'S ® Registered trademark/TM the shape of the mixer is a trademark 9709785 rev.E MADE. _ Trademark/ of KitchenAid, U.S.A. © 2009. All rights reserved. Printed in China.