5KCF0103 W10755536B - Cook Processor Australia UCGv03.
C 2 W10755536B - Cook Processor Australia UCGv03.
COOK PROCESSOR INSTRUCTIONS TABLE OF CONTENTS COOK PROCESSOR SAFETY Important safeguards........................................................................................... 4 Electrical requirements....................................................................................... 6 Electrical equipment waste disposal.................................................................... 6 PARTS AND FEATURES Parts and features.........................................................................
COOK PROCESSOR SAFETY C IMPORTANT SAFEGUARDS When using electrical appliances, basic safety precautions should always be followed to reduce the risk of fire, electric shock, and/or injury to persons including the following: 1. Read all instructions. 2. To protect against risk of electrical shock do not put appliance in water or other liquid. 3. Unplug the appliance from outlet when not in use, before putting on or taking off parts and before cleaning. 4. Avoid contacting moving parts.
COOK PROCESSOR SAFETY 9. Appliances can be used by persons with reduced physical, sensory or mental capabilities or lack of experience and knowledge if they have been given supervision or instruction concerning use of the appliance in a safe way and if they understand the hazards involved. 10. The temperature of accessible surfaces may be high when the appliance is operating. 11. The appliance is not intended to be operated by means of an external timer or separate remote-control system. 12.
COOK PROCESSOR SAFETY P Electrical requirements Voltage: 220–240 VAC Frequency: 50-60 Hz Wattage: 1050 Watts Motor: 450 Watts NOTE: This product has a grounded (earthed) plug. To reduce the risk of electrical shock, this plug will fit in an outlet only one way. If the plug does not fit in the outlet, contact a qualified electrician. Do not modify the plug in any way. Do not use an extension cord.
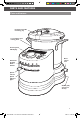
PARTS AND FEATURES Parts and features Lid with removable measuring cup 4.5 L stainless steel cooking bowl Control panel/ LED display Automatic Cooking Mode buttons Bowl release lever Speed selector Speed indicator lights On/Off (I/O) switch (not shown) 7 W10755536B - Cook Processor Australia UCGv03.
PARTS AND FEATURES P Control panel Status display Time display Temperature display Temperature select ˚C ˚F Stew P7:Step 2 H M S Time select Quick Stir Start/Pause Quick Stir Pulse Cancel Pulse Dial Accessories Steamer lid Upper steamer basket Lower steamer basket Steamer Capacity Basket Capacity (examples) Upper 3-4 small fish Lower Inner 500 g chopped or sliced vegetables 3-4 large or 6-8 small potatoes 6-8 medium-sized shrimp Food quantities for capacity are recommendations only.
PARTS AND FEATURES Accessories IMPORTANT: To avoid splashing, always follow recommended speeds when using the Egg Whip, Dough Blade, or MultiBlade. StirAssist MultiBlade Mini Bowl and Mini MultiBlade Egg Whip (max. temperature = 100°C)* Dough Blade (max. temperature = 40°C)* Storage case * Do not exceed these temperatures unless specified in a recipe in the KitchenAid cookbook or app. 9 W10755536B - Cook Processor Australia UCGv03.
COOKING MODES GUIDE C Your Cook Processor features 6 automatic cooking modes, each with specialty modes, designed for a variety of cooking tasks. The included recipe book features a selection of recipes optimized to work with these cooking modes. Refer to the provided cookbook for directions on selecting attachments, cooking modes, and settings when using Automatic Cooking modes. Reference quick guide below for Cooking Mode operations and tips.
ONS EXPLORATION COOKING MODES GUIDE Automatic cooking modes Temperatures, times, and speeds for multistep cooking modes are indicated with an g to show the value for each step.
EXPLORATION XPLORATION cons AUTOMATIC COOKING MODES A Boil Steam Select Boil to create delicious soups and bisques. It is also great for creating jams and jellies, stock, and other foods that need to cook at a boil for several minutes. Steam mode uses upper, lower, and inner steamer baskets to allow you to steam vegetables, fish, mussels, and more. This mode is excellent for delicate foods and cooking with indirect heat.
ADDITIONAL FUNCTIONS Quick Stir With the StirAssist paddle installed, press (Quick Stir) once to stir for 2 seconds at low speed. You may also press and hold the (Quick Stir) button; the StirAssist paddle will operate at low speed until the button is released. The timer will count up as long as the (Quick Stir) button is held down. H M S H M S ˚C ˚F Quick Stir Pulse Pulse Press Pulse to run the installed attachment at high speed. Release to stop.
GETTING STARTED S Preparing the Cook Processor for use 1. Place the Cook Processor on a dry, flat, level surface such as a countertop or table. 2. Be sure to provide enough room above the Cook Processor to open lid and remove bowl. 3. Remove all packaging materials, if present. 4. Wash lid and attachments in hot, sudsy water and rinse thoroughly. Wipe out inside of bowl with a damp cloth. Do not immerse bowl. Dry thoroughly. Using the Cook Processor Plug into an earthed (grounded) outlet.
START UP AND CONTROL SETUP Welcome screen A welcome screen will be displayed any time the Cook Processor is first turned on after being plugged in, after the main power switch is turned on, or after a power outage. Press any key on the control panel to continue. ˚C ˚F Press Any Ke H M S Quick Stir Pulse Display language You will be asked to select the display language the first time the Cook Processor is turned on: 1. Turn the dial until the desired language is displayed. 2.
USING AUTOMATIC COOKING MODES U IMPORTANT: Refer to the provided cookbook for directions on selecting attachments, cooking modes, and settings when using Automatic Cooking modes. 1 Place the bowl on the base, making sure it locks into place. If the bowl is not locked in place, UNLOCKED will show in the display. 2 Insert the accessory indicated by the recipe into the bowl, sliding it onto the drive shaft. 3 Add the ingredients for the first step of cooking. Do not exceed the MAX FILL line.
USING AUTOMATIC COOKING MODES ˚C ˚F ˚C ˚F Stew P7:Step 1 H Stew P7:Step 1 H M S M S Quick Stir Quick Stir Pulse Pulse Select the desired preset cooking mode by pressing the mode button, then use the dial to select the mode version, for example, Stew P7. The default time and temperature will flash in the display. 5 ˚C ˚F Stew P7:Step 1 6 Press (Start).
USING AUTOMATIC COOKING MODES ˚C ˚F Stew P7:Step 2 U H M S Quick Stir ˚C ˚F Pulse Stew P7 H M S Quick Stir Pulse 9 Change accessories, if necessary, and add any additional ingredients for the next step. ˚C ˚F Keep Warm H M S 10 Press (Start). The temp and time will stop flashing, and the time will begin counting down. In the event of a power outage, the welcome screen will be displayed when power is restored. Quick Stir Pulse 11 A tone will sound at the end of the next step.
USING STEAMER BASKETS The Cook Processor includes two different types of steamer baskets that can be used when cooking in certain modes. NOTE: Steamer baskets cannot be used with food processing attachments such as the MultiBlade, StirAssist, Dough Blade, or Egg Whip. Using the round internal steamer basket 1 Place the bowl on the base, making sure it locks into place. If the bowl is not locked in place, UNLOCKED will show in the display.
USING STEAMER BASKETS U You can use the upper and lower steamer baskets together, or just the lower steamer basket. You may also use the lower steamer basket with the inner steamer basket. The instructions below show an example of using both upper and lower baskets. Using the upper and lower steamer baskets 1 Place the bowl on the base, making sure it locks into place. If the bowl is not locked in place, UNLOCKED will show in the display.
USING MANUAL COOKING MODES Refer to the guide below for recommended speeds and quantities for accessories when using manual cooking modes. IMPORTANT: To avoid splashing, always follow recommended speeds when using the Egg Whip, Dough Blade, or MultiBlade. Accessory Food Speed Quantity Operating Time MultiBlade Pureed soups 10 2.5 L Up to 1 min. for puree† Meat (boneless) 10 1.0 kg Up to 1 min. for puree† Fish (boneless) 10 1.0 kg Up to 1 min. for puree† Vegetables 10 1.0 kg 2 min.
USING MANUAL COOKING MODES U Cooking with manual settings 1 Place the bowl on the base, making sure it locks into place. 2 OPTIONAL: Insert the desired accessory into the bowl, sliding it onto the drive shaft. 3 Add the ingredients for the first step of cooking. Do not exceed the MAX FILL line. 4 Close and latch the lid. If the lid is not properly installed, LID OPEN will show in the display if the speed lever, Pulse, or (Quick Stir) buttons are activated.
USING MANUAL COOKING MODES H M S ˚C ˚F H M S ˚C ˚F Quick Stir H M S ˚C ˚F Pulse Quick Stir Quick Stir Pulse Pulse 7 Press (Time) and use the dial to set the desired cooking time. 8 Press (Start). The temperature and time will stop flashing and the time will begin counting down. PREHEATING will appear in the display until the set temperature is reached.
CARE AND CLEANING Cleaning your Cook Processor The bowl and lid are dishwasher safe, however handwashing is recommended. Unplug your Cook Processor from the wall socket before cleaning. • Allow Cook Processor and accessories to cool completely before cleaning. Exterior Surfaces: • Do not use abrasive cleaners or metal scouring pads. They could scratch the surface. • Wipe the outside of the Cook Processor with a clean, damp cloth and dry thoroughly.
CARE AND CLEANING Lid and Inner Lid Seal: The lid contains drain holes covered by an inner rubber seal. • When washing the lid in the dishwasher or by hand, remove the inner seal from the lid by pulling it from under the tabs on the bottom of the lid. Wash the seal in the dishwasher or in warm, soapy water, and dry before reinstalling. Reinstall the seal before placing the lid back on the Cook Processor. Lid Inner seal To reinstall the inner lid seal: 1 Insert the front edge under the tabs, as shown.
TROUBLESHOOTING If your Cook Processor malfunctions or fails to operate • Display shows ACCESSORY: The display will show ACCESSORY if the StirAssist blade is installed and Pulse or a higher speed is selected. • Display shows COOLING: Unit is cooling down if a temperature lower than the current cooking temperature is selected. • Is the Cook Processor plugged into a grounded outlet? Plug the Cook Processor into a grounded outlet.
W10755536B - Cook Processor Australia UCGv03.
© 2015. All rights reserved. Specifications subject to change without notice. W10755536B 04/15 28 W10755536B - Cook Processor Australia UCGv03.